Saturday, April 9, 2011

15 Coolest Firefox Tricks!

This can come in handy for those who want to optimize FireFox! :

i
i
Everybody’s favorite open-source browser, Firefox, is great right out of the box. And by adding some of the awesome extensions available out there, the browser just gets better and better.

But look under the hood, and there are a bunch of hidden (and some not-so-secret) tips and tricks available that will crank Firefox up and pimp your browser. Make it faster, cooler, more efficient. Get to be a Jedi master with the following cool Firefox tricks.

1) More screen space. Make your icons small. Go to View - Toolbars - Customize and check the “Use small icons” box.

2) Smart keywords. If there’s a search you use a lot (let’s say IMDB.com’s people search), this is an awesome tool that not many people use. Right-click on the search box, select “Add a Keyword for this search”, give the keyword a name and an easy-to-type and easy-to-remember shortcut name (let’s say “actor”) and save it. Now, when you want to do an actor search, go to Firefox’s address bar, type “actor” and the name of the actor and press return. Instant search! You can do this with any search box.

3) Keyboard shortcuts. This is where you become a real Jedi. It just takes a little while to learn these, but once you do, your browsing will be super fast. Here are some of the most common:

Spacebar (page down) Shift-Spacebar (page up) Ctrl+F (find) Alt-N (find next) Ctrl+D (bookmark page) Ctrl+T (new tab) Ctrl+K (go to search box) Ctrl+L (go to address bar) Ctrl+= (increase text size) Ctrl+- (decrease text size) Ctrl-W (close tab) F5 (reload) Alt-Home (go to home page)

4) Auto-complete. This is another keyboard shortcut, but it’s not commonly known and very useful. Go to the address bar (Control-L) and type the name of the site without the “www” or the “.com”. Let’s say “google”. Then press Control-Enter, and it will automatically fill in the “www” and the “.com” and take you there - like magic! For .net addresses, press Shift-Enter, and for .org addresses, press Control-Shift-Enter.

5) Tab navigation. Instead of using the mouse to select different tabs that you have open, use the keyboard. Here are the shortcuts:

Ctrl+Tab (rotate forward among tabs) Ctrl+Shift+Tab (rotate to the previous tab) Ctrl+1-9 (choose a number to jump to a specific tab)

6) Mouse shortcuts. Sometimes you’re already using your mouse and it’s easier to use a mouse shortcut than to go back to the keyboard. Master these cool ones:

Middle click on link (opens in new tab) Shift-scroll down (previous page) Shift-scroll up (next page) Ctrl-scroll up (decrease text size) Ctrl-scroll down (increase text size) Middle click on a tab (closes tab)

7) Delete items from address bar history. Firefox’s ability to automatically show previous URLs you’ve visited, as you type, in the address bar’s drop-down history menu is very cool. But sometimes you just don’t want those URLs to show up (I won’t ask why). Go to the address bar (Ctrl-L), start typing an address, and the drop-down menu will appear with the URLs of pages you’ve visited with those letters in them. Use the down-arrow to go down to an address you want to delete, and press the Delete key to make it disappear.

8)User chrome. If you really want to trick out your Firefox, you’ll want to create a UserChrome.css file and customize your browser. It’s a bit complicated to get into here, but check out this tutorial.

9) Create a user.js file. Another way to customize Firefox, creating a user.js file can really speed up your browsing. You’ll need to create a text file named user.js in your profile folder (see this to find out where the profile folder is) and see this example user.js file that you can modify. Created by techlifeweb.com, this example explains some of the things you can do in its comments.

10) about:config. The true power user’s tool, about.config isn’t something to mess with if you don’t know what a setting does. You can get to the main configuration screen by putting about:config in the browser’s address bar. See Mozillazine’s about:config tips and screenshots.

11) Add a keyword for a bookmark. Go to your bookmarks much faster by giving them keywords. Right-click the bookmark and then select Properties. Put a short keyword in the keyword field, save it, and now you can type that keyword in the address bar and it will go to that bookmark.

12) Speed up Firefox. If you have a broadband connection (and most of us do), you can use pipelining to speed up your page loads. This allows Firefox to load multiple things on a page at once, instead of one at a time (by default, it’s optimized for dialup connections). Here’s how:

Type “about:config” into the address bar and hit return. Type “network.http” in the filter field, and change the following settings (double-click on them to change them):

Set “network.http.pipelining” to “true”

Set “network.http.proxy.pipelining” to “true”

Set “network.http.pipelining.maxrequests” to a number like 30. This will allow it to make 30 requests at once.

Also, right-click anywhere and select New-> Integer. Name it “nglayout.initialpaint.delay” and set its value to “0″. This value is the amount of time the browser waits before it acts on information it receives.

13) Limit RAM usage. If Firefox takes up too much memory on your computer, you can limit the amount of RAM it is allowed to us. Again, go to about:config, filter “browser.cache” & select “browser.cache.disk.capacity”. It’s set to 50000, but you can lower it, depending on how much memory you have. Try 15000 if you have between 512MB and 1GB ram.

14) Reduce RAM usage further for when Firefox is minimized. This setting will move Firefox to your hard drive when you minimize it, taking up much less memory. And there is no noticeable difference in speed when you restore Firefox, so it’s definitely worth a go. Again, go to about:config, right-click anywhere and select New-> Boolean. Name it “config.trim_on_minimize” and set it to TRUE. You have to restart Firefox for these settings to take effect.

15) Move or remove the close tab button. Do you accidentally click on the close button of Firefox’s tabs? You can move them or remove them, again through about:config. Edit the preference for “browser.tabs.closeButtons”. Here are the meanings of each value:

0: Display a close button on the active tab only 1: (Default) Display close buttons on all tabs 2: Don’t display any close buttons 3: Display a single close button at the end of the tab bar (Firefox 1.x behavior)


Monday, January 7, 2008

Firewall Torn Apart - Part I

I hope today's article will be able to meet most of your queries about firewall. Though it is a huge subject to discuss but i have tired to include at most i can for now. I hope you will enjoy. Please don't forget to add comment about the article or if you have any more interesting info that you wanna share with us.

What is a Firewall?
A firewall is a tool that monitors communication to and from your computer. It sits between your computer and the rest of the network, and according to some criteria, it decides which communication to allow, and which communication to block. It may also use some other criteria to decide about which communication or communication request to report to you (either by adding the information to a log file that you may browse whenever you wish, or in an alert message on the screen), and what not to report.

What Is It Good For?
Identifying and blocking remote access Trojans. Perhaps the most common way to break into a home computer and gain control, is by using a remote access Trojan (RAT). (sometimes it is called "backdoor Trojan" or "backdoor program". Many people simply call it a "Trojan horse" although the term "Trojan horse" is much more generic). A Trojan horse, is a program that claims to do something really innocent, but in fact does something much less innocent. This goes to the days where the Greek soldiers succeeded to enter through the gates of Troy by building a big wooden horse, and giving it as a present to the king of Troy. The soldiers allowed the sculpture to enter through their gates, and then at night, when the soldiers were busy guarding against an outside attack, many Greek soldiers who were hiding inside the horse went out and attacked Troy from the inside. This story, which may or may not be true, is an example of something which looks like something innocent and is used for some less innocent purpose. The same thing happens in computers. You may sometimes get some program, via ICQ, or via Usenet, or via IRC, and believe this program to be something good, while in fact running it will do something less nice to your computer. Such programs are called Trojan horses. It is accepted to say that the difference between a Trojan horse and a virus, is that a virus has the ability to self-replicate and to distribute itself, while a Trojan horse lacks this ability. A special type of Trojan horses, is RATs (Remote Access Trojans, some say "remote admin Trojans"). These Trojans once executed in the victim's computer, start to listen to incoming communication from a remote matching program that the attacker uses. When they get instructions from the remote program, they act accordingly, and thus let the user of the remote program to execute commands on the victim's computer. To name a few famous RATs, the most common are Netbus, Back-Orifice, and SubSeven (which is also known as Backdoor-G). In order for the attacker to use this method, your computer must first be infected by a RAT.
Prevention of infections by RATs is no different than prevention of infection by viruses. Antivirus programs can identify and remove most of the more common RATs. Personal firewalls can identify and block remote communication efforts to the more common RATs and by thus blocking the attacker, and identifying the RAT.

Blocking/Identifying Other Types of Trojans and WQorms?
There are many other types of Trojan horses which may try to communicate with the outside from your computer. Whether they are e-mail worms trying to distribute themselves using their own SMTP engine, or they might be password stealers, or anything else. Many of them can be identified and blocked by a personal firewall.

Identifying/Blocking Spyware's/Adbots?
The term "spyware" is a slang which is not well defined. It is commonly used mainly for various adware (and adware is a program that is supported by presenting advertisements to the user), and that during their installation process, they install an independent program which we shall call "adbot". The adbot runs independently even if the hosting adware is not running, and it maintains the advertisements, downloads them from the remote server, and provides information to the remote server. The adbot is usually hidden. There are many companies that offer adbots, and advertisements services to adware. The information that the adbots deliver to their servers from the computer where the adbot is installed, is "how much time each advertisement is shown, which was the hosting adware, and whether the user clicked on the advertisement. This is important so that the advertisements server will be able to know how much money to get from each of the advertised companies, and how much from it to deliver to each of the adware maintainers. Some of the adbots also collect other information in order to better choose the advertisements to the users. The term "spyware" is more generic, but most of the spyware fall into this category. Many types of adbots can be identified and blocked by personal firewalls.

Blocking Advertisements?
Some of the better personal firewalls can be set to block communication with specific sites. This can be used in order to prevent downloading of advertisements in web pages, and thus to accelerate the download process of the web sites. This is not a very common use of a personal firewall, though.

Preventing Communication to Tracking Sites?
Some web pages contain references to tracking sites. e.g. instruct the web browser to download a small picture (sometimes invisible) from tracking sites. Sometimes, the pictures are visible and provide some statistics about the site. Those tracking sites will try to save a small text either as a small file in a special directory, or as a line in a special file (depending on what is your browser), and your browser will usually allow the saving site to read the text that it saved on your computer. This is called "web cookies" or sometimes simply "cookies". Cookies allow a web site to keep information that it saved some time when you entered it, to be read whenever you enter the site again. This allow the web site to customize itself for you, and to keep track on everything that you did on that site. It does not have to keep that information on your computer. All it has to save on your computer is a unique identifying number, and then it can keep in the server's side information regarding what has been done by the browser that used that cookie. Yet, by this method, a web site can get only information regarding your visits in it. Some sites such as "doubleclick" or "hitbox" can collect information from various affiliated sites, by putting a small reference in the affiliated pages to some picture on their servers. When you enter one of the affiliated web pages, your browser will communicate with the tracking site, and this will allow the tracking site to put or to read a cookie that identifies your computer uniquely, and it can also know what was the web page that referred to it, and any other information that the affiliated web site wanted to deliver to the tracking site. This way tracking sites can correlate information from many affiliated sites, to build information that for example will allow them to better customize the advertisements that are put on those sites when you browse them.
Some personal firewalls can be set to block communication to tracking sites. It is not a common use of a personal firewall, though, and a personal firewall is not the best tool for that, but if you already have one, this is yet another possible use of it.

Blocking or Limiting the NetBIOS Communication? (as well as other default services)
The two common methods of intruders to break into home computers, are through a RAT (which was discussed in II.3a) and through the NetBIOS communication. The NetBIOS is a standard for naming computers in small networks, developed long ago by IBM and Microsoft. There are a few communication standards which are used in relation to the NetBIOS. The ones that are relevant for Microsoft Windows operating systems, are: NBT (NetBIOS over TCP/IP), IPX/SPX, and NetBEUI. The communication standard which is used over the Internet, is NBT. If it is enabled, and there is no firewall or something else in the middle, it means that your computer is listening for communications over the Internet via this standard, and will react according to the different NBT commands that it gets from the remote programs. It is thus that the NBT (which sometimes loosely called "NetBIOS") is acting as a server. So the next question should be "what remote NBT commands the NBT server will do on the local computer". The answer to this question depends on the specific setting on your computer. You may set your computer to allow file and print sharing. If also NBT is enabled, it means that you allow remote users to share your files or printers. This is a big problem. It is true that in principle the remote user has to know your password for that computer, but many users do not set a password for their user on Windows, or set a trivial password. Older versions of Win95 had file and print sharing over NetBIOS enabled by default. On Win98, and WinMe it was disabled by default, but many technicians, when they set a home network, they enable the file and print sharing, without being aware that it influences also the authorizations of a remote Internet user. There are even worms and viruses who use the File sharing option to spread in the Internet. Anyway, no matter whether you need it for some reason or just are not aware of it, a personal firewall can identify and block any external effort to communicate with the NetBIOS server on your computer. The more flexible personal firewalls can be set to restrict the authorization to communicate with the NetBIOS. Some Windows operating systems, especially those which are not meant for home uses, offer other public services by default, such as RPC. A firewall can identify communication efforts to them, and block them. Since such services listen to remote communications, there is a potential risk when there are efforts to exploit security holes in the programs that offer the services, if there are such security holes. A firewall may block or limit the communication to those services.

Hiding Your Computer on the Internet?
Without a firewall, on a typical computer, even if well maintained, a remote person will still be able to know that the communication effort has reached some computer, and perhaps some information about the operating system on that computer. If that computer is handled well, the remote user will not be able to get much more information from your computer, but might still be able to identify also who your ISP is, and might decide to invest further time in cracking into your computer.
With a firewall, you can set the firewall so that any communication effort from remote users (in the better firewalls you may define an exception list) will not be responded at all. This way the remote user will not be able to even know that it reached a live computer. This might discourage the remote attacker from investing further time in effort to crack into your computer.

The Non-Firewall Defenses

We've discussed a few situations where a personal firewall can provide defense. Yet, in many cases a computer maintainer can deal with those situations even without a firewall. Those "alternative" defenses, in many cases are recommended regardless of whether you use a firewall or not.

Remote Access Trojans?
The best way to defend against remote access Trojans (RATs) is to prevent them from being installed in the first place on your computer. A RAT should first infect your computer in order to start to listen to remote communication efforts. The infection techniques are very similar to the infection techniques that viruses use, and hence the defense against Trojan horses is similar to the defense against viruses. Trojan horses do not distribute themselves (although they might be companions of another Internet worm or virus that distributes them. Yet, because in most cases they do not distribute themselves, it is likely that you will get them from anonymous sources, such as instant messengers, Kazaa, IRC, or a newsgroup. adopting a suspicious policy regarding downloads from such places, will save you not only from viruses but also from getting infected with Trojan horses, including RATs. Because Trojan horses are similar in some ways to viruses, almost all antivirus programs can identify, block from being installed, and remove most of the Trojan horses, including all the common ones. There are also some programs (sometimes called antiTrojan programs) which specialize in the identification and removal of Trojan horses. For a list of those programs, and for comparison on how well different antivirus, and antiTrojan programs identify different Trojan horses, see Hackfix (http://www.hackfix.org), under "Software test results". Hackfix also has information on the more common RATS (such as the Netbus and the Subseven) and on how to remove them manually. There are some tools and web sites, such port scanners, and some ways with a use of more generic tools such as telnet, msconfig, and netstat, which may help you to identify a RAT.

Other types of Trojans and worms?
Also here your main interest should be to prevent them from infecting your computer in the first place, rather than blocking their communication. A good antivirus and a good policy regarding the prevention of virus infections, should be the first and most important defense.

Spyware and Adbots?
The term spyware is sometimes misleading. In my view, it is the responsibility of the adware developer to present the fact that the adware installation will install or use an independent adbots, and to provide the information on how this adbot communicates, and which information it delivers, in a fair place and manner before the adware is installed. It is also a responsibility to provide this information in their web sites, so that people will be aware of that before they even download the software. Yet, in general, those adbots do not pose any security threat, and in many cases also their privacy threat is negligible for many people (e.g. the computer with adbot number 1127533 has been exposed to advertisements a, b, c, such and such times, while using adware x, while on computer with adbot number 1127534 has been exposed to advertisements a,d, and e, such amount of time, with the use of adware y, and clicked on ads number d). It should be fully legitimate for software developers to offer an advertisement supported programs, and it is up to the user to decide whether the use of the program worth the ads and the adbot, or not. Preventing adbot from communicating is generally not a moral thing. If you decide to use an adware, you should pay the price of letting the adbot work. If you don't want it, please remove the adware, and only if for some reason the adbot continue to work even if no hosting adware that uses it is installed, you may remove the adbot. Anyway, there are some very useful tools to identify whether a program is a "spyware", or whether a "spyware" is installed on your computer, and you are certainly entitled to this information. Two useful programs are "AdAware" which identifies "spyware" components on your computer and allows you to remove them, and Ad-Search which allows you to provide a name of a program, and it tells you whether this program is a "spyware" and which adbot it uses. It is useful to assist you in choosing whether to install a program or not. You may find those programs in http://www.lavasoft.nu (or, if it doesn't work, you may try http://www.lavasoftusa.com). Those programs are useful, mainly because many adware developers are not fair enough to present this information in a fair manner. AdAware allows you to also remove those adbot components from your computer. This might, however, terminate your license to use the hosting adware programs, and might even cause them to stop functioning. A website which offers to check whether a specific program that you wish to install is "spyware" or not, is http://www.spychecker.com .


WISE WORDS:Faith is the continuation of reason.

ANNOUNCEMENT

WE R BACKKKKKKKKKKK!!!!!!!!!!!!!!!!!!!!!!

Hey friends, due to some unavoidable circumstances this site was down for quite sometimes.But now I am back....I wanna thank those friends who keep visiting this site in these days. I am here now to share with you those amazing secrets and tricks which will help you to become an expert from a newbie.

I am also planning to start 2 more sites which will be updated everyday like this one. But for that I need your help. Please contact me at aztecbit@rediffmail.com

Those who are interested will be working as my partner and get their chance to process the site's content as an assistant administrator, can publish their own article with their name and many more things. Further details will be discussed individually. So hurry up.. don't miss this chance to being associate with your rocking tutor http://myerudition.blogspot.com

Sunday, January 6, 2008

Getting the Password File Through FTP

Well one of the easiest ways of getting superuser access is through
anonymous ftp access into a webpage. First you need learn a little about
the password file...

root:User:d7Bdg:1n2HG2:1127:20:Superuser
TomJones:p5Y(h0tiC:1229:20:Tom Jones,:/usr/people/tomjones:/bin/csh
BBob:EUyd5XAAtv2dA:1129:20:Billy Bob:/usr/people/bbob:/bin/csh

This is an example of a regular encrypted password file. The Superuser is
the part that gives you root. That's the main part of the file.

root:x:0:1:Superuser:/:
ftp:x:202:102:Anonymous ftp:/u1/ftp:
ftpadmin:x:203:102:ftp Administrator:/u1/ftp

This is another example of a password file, only this one has one little
difference, it's shadowed. Shadowed password files don't let you view or
copy the actual encrypted password. This causes problems for the password
cracker and dictionary maker(both explained later in the text). Below is
another example of a shadowed password file:

root:x:0:1:0000-Admin(0000):/:/usr/bin/csh
daemon:x:1:1:0000-Admin(0000):/:
bin:x:2:2:0000-Admin(0000):/usr/bin:
sys:x:3:3:0000-Admin(0000):/:
adm:x:4:4:0000-Admin(0000):/var/adm:
lp:x:71:8:0000-lp(0000):/usr/spool/lp:
smtp:x:0:0:mail daemon user:/:
uucp:x:5:5:0000-uucp(0000):/usr/lib/uucp:
nuucp:x:9:9:0000-uucp(0000):/var/spool/uucppublic:/usr/lib/uucp/uucico
listen:x:37:4:Network Admin:/usr/net/nls:
nobody:x:60001:60001:uid no body:/:
noaccess:x:60002:60002:uid no access:/:
webmastr:x:53:53:WWW Admin:/export/home/webmastr:/usr/bin/csh
pin4geo:x:55:55:PinPaper Admin:/export/home/webmastr/new/gregY/test/pin4geo:/bin/false
ftp:x:54:54:Anonymous FTP:/export/home/anon_ftp:/bin/false

Shadowed password files have an "x" in the place of a password or sometimes
they are disguised as an * as well.

Now that you know a little more about what the actual password file looks
like you should be able to identify a normal encrypted password from a shadowed
password file. We can now go on to talk about how to crack it.

Cracking a password file isn't as complicated as it would seem, although the
files vary from system to system.

1.The first step that you would take is to download or copy the file.

2. The second step is to find a password cracker and a dictionary maker. Although it's nearly impossible to find a good cracker there are a few ok ones out there. I recommend that you look for Cracker Jack, John the Ripper, Brute Force Cracker, or Jack the Ripper. Now for a dictionary maker or a dictionary file... When you start a cracking program you will be asked to find the the password file. That's where a dictionary maker comes in. You can download one from nearly every hacker page on the net. A dictionary maker finds all the possible letter combinations with the alphabet that you choose(ASCII, caps, lowercase, and numeric letters may also be added) .

3. You then start up the cracker and follow the directions that it gives you.


The PHF Technique:

Well I wasn't sure if I should include this section due to the fact that
everybody already knows it and most servers have already found out about
the bug and fixed it. But still i thought that you should know about it. So I decided to include it.

The phf technique is by far the easiest way of getting a password file
(although it doesn't work 95% of the time). But to do the phf all you do
is open a browser and type in the following link:

http://webpage_goes_here/cgi-bin/phf?Qalias=x%0a/bin/cat%20/etc/passwd

You replace the webpage_goes_here with the domain. So if you were trying to
get the pw file for www.webpage.com you would type:

http://www.webpage.com/cgi-bin/phf?Qalias=x%0a/bin/cat%20/etc/passwd

and that's it! You just sit back and copy the file(if it works).


WISE WORDS: Ability and necessity dwell never each other.

Monday, October 1, 2007

Yahoo Messenger Tips & Tricks

Here is the collection you ever wanted to know about your favorite Yahoo Messenger. Read and enjoy!!!!

Yahoo! Messenger—The Latest Version:


The latest version of Yahoo! Messenger is a significant improvement over previous versions. Go to http://messenger.yahoo.com/ to download it, and to see what’s new.


New Mail Alert:

To be alerted in Yahoo! Messenger whenever you receive new mail in your Yahoo! account, do the following: Select Login > Preferences. Go to the Alerts and Sounds category. Under ‘Alert me when:’, highlight ‘I receive a mail message’. Select the desired notification options under ‘Alert me by:’, and click OK.


All The Smileys You Want:

Want to know about all the smileys you can use in Yahoo! Messenger, along with their keyboard shortcuts? Point your browser to http://www.bigblueball.com/im/yahoo/yahoo-smileys.php


YEmote2:

Download it from http://www.camgrab.tk/. YEmote2 adds several interesting features to Yahoo! Messenger, such as advanced Webcam capture, easy smileys selection, advanced message archive viewer, an auto-reply feature, and much more. Go to http://www.andy.w2s.co.uk/yahoo/YEmotePlus/index.htm for more on YEmote2.


Change The Title Text:

Here’s how you change the title text that appears at the top of the Messenger window. By default, this is “Yahoo! Messenger”, followed by your status. Simply edit the ymsgr.ini file, which you will find in the same folder as the Messenger program, in your Program Files folder. Locate the file and open it in Notepad. Then, at the end, add the following:

[APP TITLE]
caption=YOUR TEXT

Here, “YOUR TEXT” is whatever you want in the title bar. Save the file and close Messenger. When you restart it you will see your text in the title bar.


Multicast A Message:

To send a message to several recipients at once, right click on the group title in your contact list, on select Send Message to all in this group. Alternatively, hold down [Ctrl] and left-click on the contacts you wish to send a message to. Once you’ve highlighted the required names, simply right click on a name and select ‘Send a message’.


I Don’t Want To Be Your Friend:

Your Buddy Ever wanted to remove your name off someone else’s buddy list? Download a plugin to do this, from http://www.zakie.fsnet.co.uk/nobuddy/


Extra Smileys—Free:

For adult-themed, rude, and just plain naughty smileys for Yahoo! Messenger,
navigate to http://www.geocities.com /basefaces/. You will find a link there to download a zipped archive.


WISE WORDS:Do wrong to none.

Sunday, September 30, 2007

Customization Tricks For Windows XP

Use registry shortcuts to disable and enable screensavers in Win XP:

The steps in this tip will show you how to edit the registry for a time-saving shortcut for enabling and disabling your screensaver.
When you perform maintenance operations such as defragmenting or backing up the hard disk, you probably disable your screensaver before you begin to prevent it from interfering with the maintenance operation. However, disabling your screensaver manually is a multistep operation that involves accessing the Display Properties dialog box, navigating to the Screen Saver tab, and setting the screen saver to None. Then, you need to re-enable the screen saver after you complete the maintenance operation.
Fortunately, you can automate the disabling and enabling screen saver procedures with a couple of registry shortcuts. Note: Editing the registry is risky, so make sure you have a verified backup before making any changes.
Here's how.

1. Launch Notepad and type the following four lines. (Note: The second line must be blank.)
Windows Registry Editor Version 5.00
[HKEY_CURRENT_USER\Control Panel\Desktop]
"ScreenSaveActive"="0"
2. Save the file to your desktop with the name Disable Screen Saver.reg.
3. Change the 0 to a 1 in the fourth line.
4. Save the file to your desktop with the name Enable Screen Saver.reg.

Now, when you need to disable the screen saver, just double-click the Disable Screen Saver.reg shortcut. To enable the screen saver, double-click the Enable Screen Saver.reg shortcut.
When you run either of these files, the Registry Editor will display two confirmation prompts—one before making the change and one after making the change.


Create a drive menu for My Computer:

Set My Computer to work like a menu for easier access to the drives you need.
By default, the My Computer item on the Start menu is configured to work like a standard folder window. If you need to access a specific drive, select My Computer from the Start menu, wait a moment for the window to appear, and then double-click the icon for the drive you need to access.
When you're in a hurry, this two-step procedure can be time-consuming and frustrating—especially if My Computer contains a large number of drive icons. However, Windows XP makes it easy for you to configure My Computer so it works like a menu, with each drive listed as a menu item.
Here's how.
1. Right-click the Start button, and select Properties.
2. Click Customize, which is adjacent to the Start Menu radio button, and select Advanced.
3. Scroll through the Start Menu Items list box until you see My Computer.
4. Select Display As A Menu, and click OK twice.
Now, when you select My Computer from the Start menu, you'll see a menu of individual drives. To access the contents of that drive, just select the drive letter from the menu.


Add UNC information to the command prompt in XP:

Here’s a trick for configuring the command prompt to display the full UNC of a mapped drive letter.
If you're like most system administrators, you more than likely prefer to perform common tasks using Windows XP's vast array of command-line tools. If so, here's another trick to add to your toolbox.
Did you know that you can configure the command prompt to display the full UNC of a mapped drive letter? The ability to tell at a glance which server a particular driver letter maps to can save you both time and frustration when working at the command line. All you have to do is add a special character to the Prompt command.
Here's how.

1. Press [Windows][Break] to open the System Properties dialog box.
2. On the Advanced tab, click the Environment Variables button.
3. In the System Variables section, click the New button.
4. Enter PROMPT in the Variable Name text box.
5. Enter $m$p$g in the Variable Value text box.
6. Click OK three times to close all open dialog boxes.
Now, when you open a command prompt and access a mapped drive letter, you'll see the UNC path in the prompt.


Switch to Windows' basic search tool in XP:

Learn how to switch from the Windows XP Search Companion to the basic search tool.
As you probably know, the Windows XP Search Companion provides users with a lot of bells and whistles designed to make searching for files on hard drives much easier. But sometimes all of these extra features just get in the way.
If you're longing for Windows 2000's basic search tool, it doesn't have to be in vain. The basic search tool is still available in Windows XP, and you can activate it with a quick registry edit. Note: Editing the registry is risky, so be sure you have a verified backup before making any changes.
Here's how.

1. Open the Registry Editor (Regedit.exe).
2. Navigate to HKEY_CURRENT_USER\Software\Microsoft\Windows\ CurrentVersion\Explorer\CabinetState.
3. Go to Edit | New | String Value.
4. Name the new value Use Search Asst.
5. Double-click the new value, type no in the Value Data text box, and click OK.
6. Close the Registry Editor, and restart the system.
To switch back to the Search Companion, just go back to the Registry Editor, and change the Value Data to yes.


Add a Safe Mode option to the Boot menu in Windows XP:

Follow these steps to add a Safe Mode option to the Boot menu.
When you're experiencing a problem with Windows XP, you may need to boot the system into Safe Mode more than once. However, doing so can be a tiresome process. When the Boot menu appears, you must press [F8], and then you must select Safe Mode from yet another menu.
Wouldn't it be nice if Safe Mode were available from the Boot menu? In fact, it's relatively easy to add a Safe Mode option to the Boot menu.
Here's how.

1. Press [Windows][Break] to open the System Properties dialog box.
2. On the Advanced tab, click the Settings button in the Startup And Recovery section.
3. In the System Startup section, click the Edit button.
4. When the Boot.ini file opens in Notepad, locate the line that ends with the /fastdetect switch.
5. Highlight and copy that line and paste it in the line below.
6. Change the section on the line that reads WINDOWS="Microsoft Windows XP Professional" to WINDOWS="Safe Mode."
7. Add the following to the end of the line:
/safeboot:minimal /sos /bootlog


Make the Windows XP Favorites menu more useful in Windows Explorer:

Your favorite menu just got better at dealing with your Favorites. This shortcut will let you cut through the maze of folders on your Windows XP machine running Windows Explorer. Note: This tip applies to both Windows XP Professional and Home.
Similar to Internet Explorer, the Favorites menu in Windows XP appears in Windows Explorer. This makes it easy for you to access the Internet from within Windows Explorer. However, it really serves no other purpose in Windows Explorer—even though it has the potential to do so much more.
You can make hard disk and network navigation much easier and more efficient if you use the Favorites menu as a place to keep shortcuts to deeply nested folders on your hard disk, as well as to network drives you access frequently. Doing so just takes a bit of rethinking about how you use and organize the Favorites menu.

Here's how.
1. Press [Windows]R to access the Run dialog box, type Favorites in the Open text box, and click OK to open the Favorites folder in Windows Explorer.
2. Use the Make A New Folder command in the File And Folder Tasks pane to create three new folders, naming them Internet, Local Folders, and Network Folders.
3. Move all of your Internet links, except the folder titled Links, into the newly created Internet folder.
4. Navigate to some of the deeply nested folders on your hard disk that you access frequently and use the Add To Favorites command on the Favorites menu to create links in the Local Folders folder.
5. Navigate to some of the network shares that you access frequently and use the Add To Favorites command to create links in the Network Folders folder.
Now, when you're in Windows Explorer you can use the Local Folders and Network Folders shortcuts on the Favorites menu to make quick work of your regular hard disk and network navigation.


Simplify copy and paste operations in Windows XP:

Copying and pasting in Windows XP is simple enough—but how would you like to make it even easier? Teach some old keys new tricks and simplify the copy and paste process in both Professional and Home versions.
Do you spend a lot of time on your Windows XP machine researching IT-related topics on the Internet? If so, chances are that you probably spend time copying text from interesting Web sites and then pasting that text into word processing documents for later reference. That's four separate keyboard strokes—[Ctrl]C to copy and [Ctrl]V to paste—each time you want to save snippets of text. Wouldn't it be nice if you could reduce each operation to a single keystroke? Well, you can!
If you have a Microsoft keyboard that provides a special set of buttons across the top, you can use the IntelliType software to reassign any of the special buttons to perform the copy and paste operations.
Here's how.
1. Download and install the most current version of the IntelliType software for your keyboard from the Microsoft Hardware site. (This step is optional because the IntelliType software you have installed will allow you to reassign the special buttons.)
2. Access the Control Panel and double-click the Keyboard icon to display the Keyboard Properties dialog box.
3. Select the Key Settings tab, choose a key in the list, and click the Edit button to launch the Reassign A Key wizard.
4. Select the Choose From A List Of Commands option button in the Custom section and click Next.
5. In the Select A Command From The List scrolling list box, select the Copy command and click Finish.
6. Repeat steps 3 through 5 and assign another key to the Paste command.
7. When you return to the Keyboard Properties dialog box, click OK.
Now, anytime you want to perform a copy or paste operation, all you have to do is press the buttons that you reassigned. Likewise for a paste-only operation.

Friday, September 28, 2007

Tips And Tricks, Windows XP - Part9

Protection on system files:

To enable protection on system files such as the KnownDLLs list, add the following value;
1. Open RegEdit
2. HKEY_LOCAL_MACHINE\System\CurrentControlSet\
Control\SessionManager
3. Create the a Dword value and name it "ProtectionMode "
4. Set the Value to 1


The Fix For Grayed Out Boxes:

The File Types tab in Explorer's View / Options menu lets you edit most of your file types, but certain settings cannot be changed. The default action for a batch file, for instance, runs the batch file instead of opening it via Notepad or Wordpad. Thus, when you double-click on AUTOEXEC.BAT, a DOS window opens, and the file executes. If you want to change this default action and edit a batch file when you double-click on it, however, the File Types tab does not let you do so; the Set Default button for the file type called MS-DOS Batch File is always grayed out.

The button is grayed out because HKEY_CLASSES_ROOT's batfile key contains an EditFlag value entry. Such entries are used throughout the Registry to prevent novice users from altering certain system settings. The binary data in batfile's EditFlag reads d0 04 00 00. If you change this value to 00 00 00 00, you can then change any of the batch file settings. Do not, however, indiscriminately zero out EditFlag; if you do so in a system ProgID such as Drive or AudioCD, it completely disappears from the File Types list. For ProgIDs that are linked to extensions, set all EditFlags to 00 00 00 00. For system ProgIDs, replace EditFlag data with 02 00 00 00.

If you wish to have access to some buttons while leaving others grayed out, you must know the function of each EditFlag bit. The last two bytes of data are always zero, but most bits within the first two bytes have a specific effect:

• Byte 1, bit 1: Removes the file type from the master list in the File Types tab (select View / Options under Explorer) if it has an associated extension.
• Byte 1, bit 2: Adds the file type to the File Types tab if it does not have an associated extension.
• Byte 1, bit 3: Identifies a type with no associated extension.
• Byte 1, bit 4: Grays out the Edit button in the File Types tab.
• Byte 1, bit 5: Grays out the Remove button in the File Types tab.
• Byte 1, bit 6: Grays out the New button in the Edit File Type dialog (select the Edit button in the File Types tab).
• Byte 1, bit 7: Grays out the Edit button in the Edit File Type dialog.
• Byte 1, bit 8: Grays out the Remove button in the Edit File Type dialog.
• Byte 2, bit 1: Prevents you from editing a file type's description in the Edit File Type dialog.
• Byte 2, bit 2: Grays out the Change Icon button in the Edit File Type dialog.
• Byte 2, bit 3: Grays out the SetDefault button in the Edit File Type dialog.
• Byte 2, bit 4: Prevents you from editing an action's description in the Edit Action dialog (select the Edit button in the Edit File Type dialog).
• Byte 2, bit 5: Prevents you from editing the command line in the Edit Action dialog.
• Byte 2, bit 6: Prevents you from setting DDE (Dynamic Data Exchange) fields in the Edit Action dialog.

The EditFlags value for Drive, for instance, is d2 01 00 00 in Hex (1101 0010 0000 0001 in binary). Bits 2, 5, 7, and 8 are on in byte 1, and bit 1 is on in byte 2. The EditFlag for batfile is d0 04 00 00 in Hex or 1101 0000 0000 0100 in binary. In this case, bits 5, 7, and 8 are on in byte 1, and bit 3 is on in byte 2.

Bits 4, 5, and 6 of byte 2 apply only to actions that are protected. EditFlags with action keys (such as HKEY_CLASSES_ROOT\batfile\shell\open) determine protection. If byte 1, bit 1 of such an EditFlag is 0 (or if there is no EditFlag), then the action is protected. If byte 1, bit 1 is 1, then the action is unprotected.


Increasing the Modem Timeout:

If your modem it is timing out during file transfers or loading Web Pages, you might try increasing the timeout period. To change the Time Out::
1.Open RegEdit
2.Go to HKEY_LOCAL_MACHINE\System\CurrentControlSet\
Services\Class\Modem\XXXX\Settings Where XXXX is the number of your modem
3. In the right panel and double click on Inactivity Timeout
4.The number of minutes for a timeout should be entered between the brackets.
5.For example, a setting could have S19=<10> to set it to 10 minutes


Recycle Bin Edits:

Playing with the recycle bin. Why not make the icon context menu act like other icon context menus.
Add rename to the menu:
HKEY_CLASSES_ROOT\CLSID\
{645FF040-5081-101B-9F08-00AA002F954E}\ShellFolder
"Attributes"=hex:50,01,00,20
Add delete to the menu:
HKEY_CLASSES_ROOT\CLSID\
{645FF040-5081-101B-9F08-00AA002F954E}\ShellFolder
"Attributes"=hex:60,01,00,20
Add rename and delete to the menu:
HKEY_CLASSES_ROOT\CLSID\
{645FF040-5081-101B-9F08-00AA002F954E}\ShellFolder
"Attributes"=hex:70,01,00,20
Restore the recycle bin to Windows defaults including un-deleting the icon after deletion:
Restore the icon.
HKEY_LOCAL_MACHINE\SOFTWARE\Microsoft\Windows\CurrentVersion\explorer
\Desktop\NameSpace\{645FF040-5081-101B-9F08-00AA002F954E}
@="Recycle Bin"
Reset Windows defaults.
HKEY_CLASSES_ROOT\CLSID\
{645FF040-5081-101B-9F08-00AA002F954E}\ShellFolder
"Attributes"=hex:40,01,00,20
Other edits to the recycle bin icon:
HKEY_CLASSES_ROOT\CLSID\
{645FF040-5081-101B-9F08-00AA002F954E}\ShellFolder
"Attributes"=hex:40,01,01,20 ... standard shortcut arrow
"Attributes"=hex:40,01,02,20 ... a different shortcut arrow
"Attributes"=hex:40,01,04,20 ... and still another shortcut arrow
"Attributes"=hex:40,01,08,20 ... make it look disabled (like it's been cut)

For Windows XP and 2000 also edit HKEY_CURRENT_USER\Software\Microsoft\Windows\
CurrentVersion\Explorer\CLSID\
{645FF040-5081-101B-9F08-00AA002F954E}

For Windows ME also edit HKEY_CURRENT_USER\Software\Classes\
CLSID{645FF040-5081-101B-9F08-00AA002F954E}


Changing the caption on the Title Bar:

Change the Caption on the Title Bar for OutLook Express or the Internet Explorer:

For Outlook Express:
1. Open RegEdit
2. Go to HKEY_CURRENT_USER\Software\Microsoft\OutLook Express
3. Add a string value "WindowTitle" (no space)
4. Modify the value to what ever you like.
For no splash screen, add a dword value "NoSplash" set to 1
For IE5 and up use: HKEY_CURRENT_USER\IDENTITIES\
{9DDDACCO-38F2-11D6-93CA-812B1F3493B}\ SOFTWARE\MICROSOFT\OUTLOOK EXPRESS\5.0
The Key {9DDDACCO-38F2-11D6-93CA-812B1F3493B} can be any key you find here. Each user has his own Key number.
The Key 5.0 is whatever version of IE you have

For Internet Explorer:
1. Open RegEdit
2. Go to HKEY_LOCAL_MACHINE\Software\Microsoft\Internet Explorer\Main
3. Add a string value "Window Title" (use a space)
4. Modify the value to what ever you like.


WISE WORDS:Distance lends enchantment to the view.

Thursday, September 27, 2007

Tips And Tricks, Windows XP - Part8

Changing Windows' Icons:
You can change the Icons Windows uses for folders, the Start Menu, opened and closed folder in the Explorer, and many more.
1. Open RegEdit
2. Go to HKEY_LOCAL_MACHINE\Software\Microsoft\Windows\
CurrentVersion\Explorer\Shell Icons
3. Add a string value for each Icon you wish to change.
Example: "3" ="C:\Windows\Icons\MyIcon.ico,0" This will change the closed folders in the Explorer to "MyIcon.ico". Here is a complete list for each value.

0= Unknown file type
1= MSN file types
2= Applications Generic
3= Closed Folder
4= Open Folder
5= 5.25" Drive
6= 3.25" Drive
7= Removable Drive
8= Hard Drive
9= NetWork Drive
10= Network Drive Offline
11= CD-ROM Drive
12= RAM Drive
13= Entire Network 14= Network Hub
15= My Computer
16= Printer
17= Network Neighborhood
18= Network Workgroup
19= Start Menu's Program Folders
20= Start Menu's Documents
21= Start Menu's Setting
22= Start Menu's Find
23= Start Menu's Help
24= Start Menu's Run
25= Start Menu's Suspend
26= Start Menu's PC Undock
27= Start Menu's Shutdown 28= Shared
29= Shortcut Arrow
30= (Unknown Overlay)
31= Recycle Bin Empty
32= Recycle Bin Full
33= Dial-up Network
34= DeskTop
35= Control Panel
36= Start Menu's Programs
37= Printer Folder
38= Fonts Folder
39= Taskbar Icon
40= Audio CD


You need to reboot after making changes. You may need to delete the hidden file ShellIconCache if after rebooting the desired Icons are not displayed.


Disabling My Computer:
In areas where you are trying to restrict what users can do on the computer, it might be beneficial to disable the ability to click on My Computer and have access to the drives, control panel etc.
To disable this:
1.Open RegEdit
2.Search for 20D04FE0-3AEA-1069-A2D8-08002B30309D
3.This should bring you to the HKEY_CLASSES_ROOT\CLSID section
4.Delete the entire section.
Now when you click on My Computer, nothing will happen.
You might want to export this section to a Registry file before deleting it just in case you want to enable it again. You can also hide all the Desktop Icons, see Change/Add restrictions.


Opening Explorer from My Computer:
By default, when you click on the My Computer icon, you get a display of all your drives, the Control Panel etc. If you would like to have this open the Explorer:
1. Open RegEdit
2. Go to HKEY_CLASSES_ROOT\CLSID\
{20D04FE0-3AEA-1069-A2D8-08002B30309D}\Shell
3 . Add a new Key named "Open" if it does not exists by right clicking "Shell" and selecting new.
4. . Add a new Key named "Command" by right clicking "Open" and selecting new
5. Set the (Default) value for the Command Key to "Explorer.exe" or "C:\Windows\Explorer.exe"


Setting the Minimum Password Length:
1.Open RegEdit
2.Go to HKEY_LOCAL_MACHINE\SOFTWARE\Microsoft\Windows\
CurrentVersion\Policies\Network
3. Now, choose the Edit/New/Binary value command and call the new value MinPwdLen. Press Enter twice and Assign it a value equal to your minimum password length.


Add\delete programs to run every time Windows starts:
You can start or stop programs from executing at bootup by adding or deleting them to/from the run Keys in the Registry. Windows loads programs to start in the following order; Program listed in the Local Machine hive, then the Current User hive, then theWin.ini Run= and Load = lines. then finally programs in your Start Up folder.
To add or remove programs in the Registry
1.Open RegEdit
2.Go to the desired Key
HKEY_LOCAL_MACHINE\SOFTWARE\Microsoft\Windows\
CurrentVersion\Run
HKEY_LOCAL_MACHINE\SOFTWARE\Microsoft\Windows\
CurrentVersion\RunServices
HKEY_CURRENT_USER\SOFTWARE\Microsoft\Windows\
CurrentVersion\Run
HKEY_CURRENT_USER\SOFTWARE\Microsoft\Windows\
CurrentVersion\RunServices
3. Add a new String Value and name it anything you like
4. For the value data, enter the path and executable for the program you want to run.
By adding the value to the HKEY_CURRENT_USER hive instead allows the program to start only when that user is logged on.
If you add the value to the RunOnce key the program will run once and be removed from the key by Windows.


Removing the Shortcut Icon Arrows:

1.Open RegEdit
2.Open the Key HKEY_CLASSES_ROOT
3.Open the Key LNKFILE
4.Delete the value IsShortcut
5.Open the next Key PIFFILE
6.Delete the value IsShortcut
7.Restart the Windows


Turn Off Window Animation:
You can shut off the animation displayed when you minimize and maximize Windows.
1. Open RegEdit
2. Go to HKEY_CURRENT_USER\Control panel \
Desktop\WindowMetrics
3. Create a new string value "MinAnimate".
4. Set the value data of 0 for Off or 1 for On


Removing Programs from Control Panel's Add/Remove Programs Section:

If you uninstalled a program by deleting the files, it may still show up in the Add/Remove programs list in the Control Panel.
In order to remove it from the list.
1.Open RegEdit
2.Go to HKEY_LOCAL_MACHINE\SOFTWARE\Microsoft\Windows\
CurrentVersion\Uninstall
3.Delete any programs here.
If you have a problem locating the desired program open each key and view the DisplayName value


WISE WORDS:Defeat is a school in which truth always grows strong.

Wednesday, September 26, 2007

Tips And Tricks, Windows XP - Part7

Change/Add Restrictions And Features:

If you want to make restrictions to what users can do or use on their computer without having to run Poledit, you can edit the Registry. You can add and delete Windows features in this Key shown below.
Zero is Off and the value 1 is On. Example: to Save Windows settings add or modify the value name NoSaveSettings to 0, if set to1 Windows will not save settings. And NoDeletePrinter set to 1 will prevent the user from deleting a printer.
The same key shows up at:
HKEY_USERS\(yourprofilename)\Software\Microsoft\Windows\
CurrentVersion\Policies\Explorer
so change it there also if you are using different profiles.
1.Open RegEdit
2.Go to HKEY_CURRENT_USER\Software\Microsoft\CurrentVersion\Policies
3.Go to the Explorer Key (Additional keys that can be created under Policies are System, Explorer, Network and WinOldApp )
4.You can then add DWORD or binary values set to 1 in the appropriate keys for ON and 0 for off.

NoDeletePrinter - Disables Deletion of Printers
NoAddPrinter - Disables Addition of Printers
NoRun - Disables Run Command
NoSetFolders - Removes Folders from Settings on Start Menu
NoSetTaskbar - Removes Taskbar from Settings on Start Menu
NoFind - Removes the Find Command
NoDrives - Hides Drives in My Computers
NoNetHood - Hides the Network Neighborhood
NoDesktop - Hides all icons on the Desktop
NoClose - Disables Shutdown
NoSaveSettings - Don't save settings on exit
DisableRegistryTools - Disable Registry Editing Tools
NoRecentDocsMenu - Hides the Documents shortcut at the Start button
NoRecentDocsHistory- Clears history of Documents
NoFileMenu _ Hides the Files Menu in Explorer
NoActiveDesktop - No Active Desktop
NoActiveDesktopChanges- No changes allowed
NoInternetIcon - No Internet Explorer Icon on the Desktop
NoFavoritesMenu - Hides the Favorites menu
NoChangeStartMenu _ Disables changes to the Start Menu
NoFolderOptions _ Hides the Folder Options in the Explorer
ClearRecentDocsOnExit - Empty the recent Docs folder on reboot
NoLogoff - Hides the Log Off .... in the Start Menu
And here are a few more you can play with
ShowInfoTip
NoTrayContextMenu
NoStartMenuSubFolders
NoWindowsUpdate
NoViewContextMenu
EnforceShellExtensionSecurity
LinkResolveIgnoreLinkInfo
NoDriveTypeAutoRun
NoStartBanner
NoSetActiveDesktop
EditLevel
NoNetConnectDisconnect
RestrictRun - Disables all exe programs except those listed in the RestrictRun subkey
This key has many other available keys, there is one to even hide the taskbar, one to hide the control panel and more. I'm not telling you how, as someone may want to play a trick on you. The policies key has a great deal of control over how and what program can run and how one can access what feature.

In the System key you can enter:

NoDispCPL - Disable Display Control Panel
NoDispBackgroundPage - Hide Background Page
NoDispScrSavPage - Hide Screen Saver Page
NoDispAppearancePage - Hide Appearance Page
NoDispSettingsPage - Hide Settings Page
NoSecCPL - Disable Password Control Panel
NoPwdPage - Hide Password Change Page
NoAdminPage - Hide Remote Administration Page
NoProfilePage - Hide User Profiles Page
NoDevMgrPage - Hide Device Manager Page
NoConfigPage - Hide Hardware Profiles Page
NoFileSysPage - Hide File System Button
NoVirtMemPage - Hide Virtual Memory Button
In the Network key you can enter:
NoNetSetup - Disable the Network Control Panel
NoNetSetupIDPage - Hide Identification Page
NoNetSetupSecurityPage - Hide Access Control Page
NoFileSharingControl - Disable File Sharing Controls
NoPrintSharing - Disable Print Sharing Controls
In the WinOldApp key you can enter:
Disabled - Disable MS-DOS Prompt
NoRealMode - Disables Single-Mode MS-DOS


Disable Password Caching:

To disable password caching, which allows for the single Network login and eliminates the secondary Windows logon screen. Either use the same password or:
1. Open RegEdit
2. Go to the key HKEY_LOCAL_MACHINE\SOFTWARE\Microsoft\Windows\
CurrentVersion\Policies\Network
3. Add a Dword value "DisablePwdCaching" and set the value to 1


Remove Open, Explore & Find from Start Button:

When you right click on the Start Button, you can select Open, Explore or Find.
Open shows your Programs folder. Explore starts the Explorer and allows access to all drives.
Find allows you to search and then run programs. In certain situations you might want to disable this feature.
To remove them:
1.Open RegEdit
2.Go to HKEY_CLASSES_ROOT\Directory\Shell\Find
3.Delete Find
4.Scroll down below Directory to Folder
5.Expand this section under shell
6.Delete Explore and Open
Caution: - When you remove Open, you cannot open any folders


Removing Items from NEW Context Menu:

When you right-click on the desktop and select New, or use the File Menu item in the Explore and select New a list of default templates you can open up are listed.
To remove items from that list:
1. Open RegEdit
2. Do a Search for the string ShellNew in the HKEY_CLASSES_ROOT Hive
3. Delete the ShellNew command key for the items you want to remove.


Changing Telnet Window:

You can view more data if you increase the line count of Telnet. By Default it has a window size of 25 lines. To increase this so you can scroll back and look at a larger number on lines:
1. Open RegEdit
2. Go to HKEY_CURRENT_USER\Software\Microsoft\Telnet
3. Modify the value data of "Rows"


Changing the Tips of the Day:

You can edit the Tips of the day in the Registry by going to:
HKEY_LOCAL_MACHINE\SOFTWARE\Microsoft\Windows\
CurrentVersion\explorer\Tips


Disabling the Right-Click on the Start Button:

Normally, when you right button click on the Start button, it allows you to open your programs folder, the Explorer and run Find.
In situations where you don't want to allow users to be able to do this in order to secure your computer.
1.Open RegEdit
2.Search for Desktop
3.This should bring you to HKEY_CLASSES_ROOT\Directory
4.Expand this section
5.Under Shell is Find
6.Delete Find
7.Move down a little in the Registry to Folder
8.Expand this section and remove Explore and Open
Now when you right click on the Start button, nothing should happen.
You can delete only those items that you need.
Note: - On Microsoft keyboards, this also disables the Window-E (for Explorer) and Window-F (for Find) keys.


WISE WORDS:Confidence; you get it by getting it.

Tuesday, September 25, 2007

Tips And Tricks, Windows XP - Part6

Add Open With to all files:

You can add "Open With..." to the Right click context menu of all files.This is great for when you have several programs you want to open the same file types with. I use three different text editors so I added it to the ".txt" key.
1. Open RegEdit
2. Go to HKEY_CLASSES_ROOT\*\Shell
3. Add a new Key named "OpenWith" by right clicking the "Shell" Key and selecting new
4. Set the (Default) to "Op&en With..."
5. Add a new Key named "Command" by right clicking the "OpenWith" Key and selecting new
6. Set the (Default) to "C:\Windows\rundll32.exe shell32.dll,OpenAs_RunDLL %1", C:\ being your Windows drive. You must enter the "OpenAs_RunDLL %1" exactly this way.


Customize the System Tray:

You can add your name or anything you like that consists of 8 characters or less. This will replace the AM or PM next to the system time. But you cannot do this if you are using any of our software during the trial period; it will corrupt the trial license.
1. Open RegEdit
2. Go to HKEY_CURRENT_USER\Control Panel\International
3. Add two new String values, "s1159" and "s2359"
4. Right click the new value name and modify. Enter anything you like up to 8 characters.
If you enter two different values when modifying, you can have the system tray display the two different values in the AM and PM.


Disable the Outlook Express Splash Screen:

You can make OutLook Express load quicker by disabling the splash screen:
1. Open RegEdit
2. Go to HKEY_CURRENT_USER\Software\Microsoft\OutLook Express
3. Add a string value "NoSplash"
4. Set the value data to 1 as a Dword value


Multiple Columns For the Start Menu:

To make Windows use multiple Start Menu Columns instead of a single scrolling column, like Windows 95 had:
1. Open RegEdit
2. Go to the key HKEY_LOCAL_MACHINE\Software\Microsoft\Windows\
CurrentVersion\Explorer\Advanced

3. Create a string value "StartMenuScrollPrograms"
4. Right click the new string value and select modify
5. Set the value to "FALSE"


Change Default Folder Locations:

You can change or delete the Windows mandatory locations of folder like My Documents:
1. Open RegEdit
2. Go to HKEY_CURRENT_USER\Software\Microsoft\Windows\CurrentVersion\Explorer\Shell Folders
3. Change the desired folder location, My Documents is normally list as "Personal"
4. Open the Explorer and rename or create the folder you wish.
To change the desired location of the Program Files folder
1. Go to HKEY_LOCAL_MACHINE\Software\Microsoft\Windows\CurrentVersion
2. Change the value of "ProgramFiles", or "ProgramFilesDir"
Now when you install a new program it will default to the new location you have selected.


Change the Registered User Information:

You can change the Registered Owner or Registered Organization to anything you want even after Windows is installed.
1) Open RegEdit
2) Got to HKEY_LOCAL_MACHINE\SOFTWARE\Microsoft\Windows\CurrentVersion.
3) Change the value of "RegisteredOrganization" or "RegisteredOwner", to what ever you want


Changing Exchange/Outlook Mailbox Location:

To change the location of your mailbox for Exchange:
1. Open RegEdit
2. Go to HKEY_CURRENT_USER\Software\Microsoft\Windows Messaging Subsystem\Profiles
3. Go to the profile you want to change
4. Go to the value name that has the file location for your mailbox (*.PST) file
5. Make the change to file location or name
To change the location of your mailbox for Outlook
1. Open RegEdit
2. Go to HKEY_CURRENT_USER\Software\Microsoft\Outlook (or Outlook Express if Outlook Express)
3. Go to the section "Store Root"
4. Make the change to file location


Adding an Application to the Right Click on Every Folder:

Here is how to add any application to the Context Menu when you right click on any Folder. This way you do not have to always go to the Start Menu. When you right click on any folder, you can have access to that application, the same as using Sent To.
1. Open RegEdit
2. Go to HKEY_CLASSES_ROOT\Folder\shell
3. Add a new Key to the "Shell" Key and name it anything you like.
4. Give it a default value that will appear when you right click a folder, i.e. NewKey( use an "&" without the quotes, in front of any character and it will allow you to use the keyboard)
5. Click on the Key HKEY_CLASSES_ROOT\Folder\shell\NewKey
6. Add a New Key named Command
7. Set the (Default) value of the application you want to run
8. For example: c:\program files\internet explorer\iexplore.exe (Include the full path and parameters if you need them)


Changing the Location of Windows' Installation Files :

If you need to change the drive and or path where Windows looks for its installation files:
1.Open RegEdit
2.Go to HKEY_LOCAL_MACHINE\SOFTWARE\Microsoft\Windows\CurrentVersion\Setup
3.Edit the value next to SourcePath


Automatic Screen Refresh:
When you make changes to your file system and use Explorer, the changes are not usually displayed until you press the F5 key
To refresh automatically:
1. Open RegEdit
2. Go to HKEY_LOCAL_MACHINE\System\CurrentControlSet\Control\Update
3. Set the value name "UpdateMode" to 1


WISE WORDS:Eat to please thyself, but dress to please others.

Monday, September 24, 2007

Tips And Tricks, Windows XP - Part5

Turn Off Autoplay for Program CDs:

How can you stop Windows XP from launching program CDs?

Click Start, click Run, type GPEDIT.MSC to open Group Policy in the Microsoft
Management Console.
Double-click Computer Configuration, double-click Administrative templates,
double-click System, and then click Turn off autoplay.
The instructions on your screen describe how to configure this setting. Click
Properties to display the setting dialog.
Click Enabled, and choose CD-ROM drives, then click OK, to stop CD autoplay.
This setting does not prevent Autoplay for music CDs.


Turn off System Restore to Save Space:

By default, Windows XP keeps a backup of system files in the System Volume
Information folder. This can eat up valuable space on your hard drive. If you
don't want Windows to back up your system files:

Open the Control Panel.

Double-click on System.

Click the System Restore tab.

Check "Turn off System Restore on all drives".

Hit Apply.

You may now delete the System Volume Information folder.


Stop Jerky Graphics:

If you are connected to a LAN and have problems with jerky graphics, this might
be the solution:
Right-click "MyComputer".
Select "Manage".
Click on "Device Manager".
Double-click on your NIC under "Network Adapters".
In the new window, select the "Advanced" tab.
Select "Connection Type" and manually set the value of your NIC. (Not "Auto
Sense" which is default.).
You should reboot.


Increase Your Cable Modem or DSL Speed in XP:

This tweak is for broad band cable connections on stand alone machines with
WinXP professional version - might work on Home version also. It may also work
with networked machines as well.
This tweak assumes that you have let WinXP create a connection on install for
your cable modem/NIC combination and that your connection has tcp/ip - QoS -
file and print sharing - and client for Microsoft networks , only, installed.
It also assumes that WinXP will detect your NIC and has in-box drivers for it.
If it doesn't do not try this.
In the "My Network Places" properties (right-click on the desktop icon and
choose properties), highlight the connection
then at the menu bar choose "Advanced" then "Advanced Settings". Uncheck the
two boxes in the lower half for the bindings for File and Printer sharing and Client for MS networks. Click OK.


Adjust Various Visual Effects:

Open up the Control Panel.
Go under System and click on the Advanced tab.
Click settings under Performance options.
You can now change various graphical effects (mainly animations and shadows).


Synchronize Your Computer Clock with an Internet Time Server:

Does your computer have the right time? If your computer is not part of a
domain, you can synchronize your computer clock with an Internet time server.
To do so:
Double–click the time on your task bar.
Click the Internet Time tab.
Select the time server you want to use and make sure to select the Automatically
synchronize with an Internet time
server check box.


Disable Error Reporting:

Open Control Panel.
Click on Performance and Maintenance.
Click on System.
Then click on the Advanced tab.
Click on the error-reporting button on the bottom of the windows.
Select Disable error reporting.
Click OK. Click OK.


WISE WORDS:Early and provident care is the mother of safety.

Saturday, September 22, 2007

Tips And Tricks, Windows XP - Part4

Disable Windows XP Boot Logo:

It is possible to disable the XP splash screen, which will slightly speed up the
overall boot process. Be aware that removing the splash screen will also cause
you not to see any boot-up messages that might come up (chkdsk, convert ... ),
but if your system runs without any problems then it should not matter.
Edit boot.ini.
Add " /noguiboot" right after "/fastdetect".

Upon restarting, the splash screen will be gone. It can be re-enabled by removing the new switch.


Clean Your Prefetch to Improve Performance:

This is a unique technique for WinXP. We know that it is necessary to scrub registry and TEMP files for Win9X/ME/2000 periodically. Prefetch is a new and
very useful technique in Windows XP. However, after using XP some time, the prefetch directory can get full of junk and obsolete links in the Prefetch catalog, which can slow down your computer noticeably.

Open C (system drive):/windows/prefetch, delete those junk and obsolete files,
reboot. It is recommended that you do this every month.


Performance Increase Through My Computer:

Easy enough tweak to usually find out about it on your own, but still, some of
us still don't find it right away. So here it is:
Start > right-click on My Computer and select Properties.
Click on the "Advanced" tab.
See the "Performance" section? Click "Settings".
Disable the following:

Fade or slide menus into view
Fade or slide ToolTips into view
Fade out menu items after clicking
Show Shadows under menus
Slide open combo boxes
Slide taskbar buttons
Use a background image for each folder type
Use common tasks in folders

There, now Windows will still look nice and perform faster.


Easy Way to Adjust LargeSystemCache:

Normally, the tweak I've seen asks you to go into
HKLM\System\CurrentControlSet\Control\Session Manager\Memory Management and
change the value to either O or 1 to the adjustment the LargeSystemCache.

However, in Windows XP, all you have to do is:

Right-click My Computer.
Select Properties.
Click Advanced.
Choose Performance.
Click Advanced again.
Select either Programs or System Cache under Memory Usage.
Programs = 0 for the registry tweak equivalent
System Cache = 1 for the registry tweak equivalent


Startup & Shutdown Windows XP More Faster:

Like previous versions of windows, it takes long time to restart or shutdown
windows XP when the "Exit Windows" sound is enabled. To solve this problem you
must disable this useless sound.

Click Start button.
Go to settings > Control Panel > Sound, Speech and Audio devices > Sounds and
Audio Devices > Sounds.
Then under program events and windows menu click on "Exit Windows" sub-menu and
highlight it. Now from sounds you can select, choose "none" and then click
Apply and OK.
Now you should see some improvements when starting up or shutting down your system.


Turn Off Autoplay for Program CDs:

How can you stop Windows XP from launching program CDs?

Click Start, click Run, type GPEDIT.MSC to open Group Policy in the Microsoft
Management Console.
Double-click Computer Configuration, double-click Administrative templates,
double-click System, and then click Turn off autoplay.
The instructions on your screen describe how to configure this setting. Click
Properties to display the setting dialog.
Click Enabled, and choose CD-ROM drives, then click OK, to stop CD autoplay.
This setting does not prevent Autoplay for music CDs.


WISE WORDS:Clever men are good, but they are not the best.

Friday, September 21, 2007

EASTER EGGS

Easter Eggs are undocumented, hidden tidbits in software, games, etc., that users accidentally stumble upon. These are fun to find, and thousands have already been documented. Easter eggs started out as a rebellion by early programmers who did not get credit for their work. That’s why some of them are as simple as a scrolling list of programmers. However, you also find some as advanced as a hidden car racing game in Excel 2000. So read on to explore the amusing world of Easter eggs.


Windows XP :

Unexpected shutdown:-
You will be needing a software called Resource Hacker. Please refer my earlier post how-to-customise-your-start-button to know how to get Resource Hacker. Resource Hacker is a free tool to view and modify 32-bit Windows executables and resource files.

Open the msgina.dll file, located in the C:\Windows\System32 directory, in Resource Hacker. In the left pane, expand Dialog > 2210 > 1033. A dialog box opens at the bottom right hand of the screen. Notice the line just below the drop-down list entitled ‘Why did the computer shut down unexpectedly?!’


Solitare Win Win:-Force Solitare to win by a hack. Here’s how: Open sol.exe located in C:\Windows\System32\ using Resource Hacker. Expand String Table > 64 > 1033 in the left pane. Notice a line in the right pane saying 1010, “Force a win”. Use these numbers to enable the Easter Egg. Now expand Menu > 1 > 1033. Create a menu by typing the following just before the last closing brace:
POPUP “&Easter Egg”
{
MENUITEM "&Egg 1", 1008
MENUITEM "&Egg 2", 1009
MENUITEM "&Egg 3", 1010
}

Now, click the Compile Script button. Next, go to File > Save and save it in the original location, i.e., C:\Windows\System32\sol.exe. Also, replace sol.exe in the C:\Windows\System32\dllcache folder.

Now, a new menu Easter Egg appears with Egg 1, Egg 2 and Egg 3 as options. Click Egg 3 to force a win.


WinRAR:
Works on: WinRAR 3.20, 3.30
Falling Book:-WinRAR—the popular file compression utility—has a smart Easter Egg. Start WinRAR and go to Help > About. Next, click the book icon and it starts to fall. Further, if you press and hold [Shift], and click the logo, you see a small sail boat near the letter ‘R’. You may have to click a few times to see it , though.


Winamp:

Works on: Winamp 2.91:
Full Screen Credits:- Start Winamp, go to Winamp menu, click Nullsoft Winamp and switch to the Credits tab to see an animated screen. Now, hold down [Ctrl] + [Alt] and rightclick twice on the animation. This changes it to full-screen mode and alters the animation a bit. Repeat the same step to get back to normal mode. This full-screen animation depends on the active visualization. Change it to spectrum and then oscilloscope and repeat the process to see the difference.


Works On: Winamp 5:
Full Screen Credits:An animated logo comes up as you go to Winamp menu > Nullsoft Winamp and click the Winamp tab. Press and hold [Shift] and double-click on this logo to change it to an ASCII art.


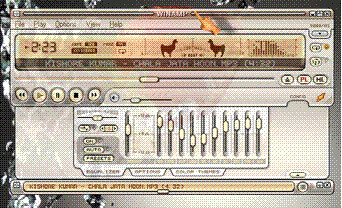
Dancing Llamas:This is one amusing egg in Winamp 5. First play a song with fast beats and heavy bass. Now, switch to the modern skin and resize the main window. Increase its width to make the Beat Analyzer visible to the left of the Spectrum Analyzer. Now, hold down [Shift] + [Ctrl] + [Alt] and click the centre of the Beat Analyzer. You’ll see two llamas striking their heads on the ground in tune with each beat.


Requires Windows XP or 2000,Winamp5
Transparent Beats:-
Play a song that’s akin to the one described above. Now, ensure that the main window has the focus (its title bar should be brighter than that of other windows) and type ‘NULLSOFT’. However, since pressing [L] opens the File Open dialog, you’ll have to press [Esc] after each [L]. Hence, you end up typing [N] [U] [L] [Esc] [L] [Esc] [S] [O] [F] [T]. This done, you see that the main window goes transparent at each beat and then reverts to being opaque. This Easter egg consumes a lot of system resources. If your system runs slow, type NULLSOFT again to turn it off, or just exit Winamp and restart it. In Winamp 2.91, the title bar shows a funny change when you do the same thing. Try this and see yourself.


Windows 98:
Teapot:
Works on: Windows 98, Windows 95

Right-click on the desktop and select Properties. Go to the Screensaver tab and choose the Pipes screensaver. Click Settings and select Pipes as Multiple, Pipe Style as Traditional, Joint Type as Mixed and Surface Style as Solid. Click OK and then click the Preview button. Watch the screensaver churn out teapots instead of joints!

Windows 98 team:
Go to C:\Windows\ ApplicationData\ Microsoft\WELCOME and find the file Weldata.exe. Right-click it and select Create Shortcut. Now, rightclick the shortcut and select Properties. In the General tab, add Y o u _ a r e _ a_real_rascal to the Target text box, after the path, and choose Minimized in the Run combo box. Click OK, doubleclick the shortcut and enjoy!


Windows 98 team:
Version 2
Works on:Windows 98 There is another way to view
Windows 98 team credits. Double-click the clock in the system tray to bring up the Date and Time Properties. Click the Time Zone tab, hold down [Ctrl] and click and hold the mouse button on Cairo, Egypt. With the mouse button still pressed, drag the pointer to Baton Rouge, LA. Release the mouse button but keep [Ctrl] pressed. Click on Baton Rouge, LA again and drag it to Redmond, WA. The credits movie starts to play once you release the mouse button. You can also try doing the same thing in Regional Settings under Control Panel.


to be continued....


WISE WORDS:Constant practice often excels even talent.

Thursday, September 20, 2007

Open the Command Prompt from the Right-Click Menu

Recently i was working on my java project which requires to use command prompt more frequently than ever before. But its really becomes boring to "cd blah\blah.." to get to my working directory every time i wanted to test my program. Its not that i was not aware of the fact that command prompt can be added to right click context menu to any folder while we are in GUI [Graphical User Interface] mode.

As far as i remember, i have had an apps called 'powertoys' from Microsoft. But only God knows where it is hiding in my 250GB harddisk [i am not a very disciplined fellow when comes to organizing things in order when it comes to harddisk or my bedroom.]. Yeah, a little goggling and i can find that stuff again but i rather choose to investigate what actually powertoys does under the hood. Because in computing world nothing is as such as magic. So here is the trick add a extra option for opening cmd prompt to folder right click context menus, also on drives and My Computer.

copy what's in the code area to notepad and save as cmd.reg

CODE:
**********************************************************************************
Windows Registry Editor Version 5.00

[HKEY_CLASSES_ROOT\Drive\shell\cmd]
@="Command Prompt"

[HKEY_CLASSES_ROOT\Drive\shell\cmd\command]
@="cmd.exe /k \"cd %L\""

[HKEY_CLASSES_ROOT\Directory\shell\cmd]
@="Command Prompt"

[HKEY_CLASSES_ROOT\Directory\shell\cmd\command]
@="cmd.exe /k \"cd %L\""

[HKEY_LOCAL_MACHINE\SOFTWARE\Classes\CLSID\
{20D04FE0-3AEA-1069-A2D8-08002B30309D}\shell\cmd]
@="Command Prompt"

[HKEY_LOCAL_MACHINE\SOFTWARE\Classes\CLSID\
{20D04FE0-3AEA-1069-A2D8-08002B30309D}\shell\cmd\command]
@="cmd.exe /k \"cd %L\""

**********************************************************************************


Double click on cmd.reg and merge it into registry. Maybe you need to restart computer to see the effect. I hope, you will also find some usefulness of the newly added option.


***Those who want to do it more easy way rather than editing registry,Download and install a free copy of Microsoft's "Open Command Window Here" PowerToy from http://www.microsoft.com/windowsxp/downloads/powertoys/xppowertoys.mspx


WISE WORDS:Each one sees what he carries in his heart.

Wednesday, September 19, 2007

Internet Explorer Tricks and Tips

  • Making the Internet Explorer & the Explorer Toolbars Fancy

The Internet Explorer toolbar looks pretty simple. Want to make it fancy and kewl? Why not add a background image to it. To do this kewl hack launch the Windows Registry Editor and go to the following key: HKEY_CURRENT_USER\SOFTWARE\Microsoft\ Internet Explorer\Toolbar\.

Now in the right pane create a new String Value and name it BackBitmap and modify it's value to the path of the Bitmap you want to dress it up with by rightclicking on it and choosing Modify. When you reboot the Internet Explorer and the Windows Explorer toolbars will have a new look.


  • Change Internet Explorer's Caption

Don't like the caption of Internet Explorer caption? Want to change it? Open the registry editor and go to

HKEY_LOCAL_MACHINE\SOFTWARE\Microsoft\Internet Explorer\Main.

In the right pane create a new String Value names Window Title (Note the space between Window and Title). Right click on this newly created String Value and select Modify. Type in the new caption you want to be displayed. Restart for the settings to take place.

Now let's move on to some Outlook Express Tricks.


  • Colorful Background

Don't like the boring background colors of Outlook Express? To change it launch the Windows Registry Editor and scroll down to the

HKEY_CURRENT_USER\Software\Microsoft\Internet Mail And News key.

On the left pane, click on ColorCycle or select Edit and Modify in the menu. Now change the value to 1. Close and restart. Now, launch Outlook Express and whenever you open up a New Message, hold down ctrl-shift and tap the z key to scroll to change the background color. Repeat the keystroke to cycle through the colors.


  • Internet Explorer 5 Hidden Features


Microsoft Internet Explorer 5 has several hidden features which can be controlled using the Windows Registry. Open your registry and scroll down to the following key:

HKEY_CURRENT_USER\Software\Policies\Microsoft\Internet Explorer\Restrictions

Create a new DWORD value named x(See complete list of values of x below) and modify it's value to 1 to enable it and to 0 to disable it.

NoBrowserClose : Disable the option of closing Internet Explorer.

NoBrowserContextMenu : Disable right-click context menu.

NoBrowserOptions : Disable the Tools / Internet Options menu.

NoBrowserSaveAs : Disable the ability to Save As.

NoFavorites : Disable the Favorites.

NoFileNew : Disable the File / New command.

NoFileOpen : Disable the File / Open command.

NoFindFiles : Disable the Find Files command.

NoSelectDownloadDir : Disable the option of selecting a download directory.

NoTheaterMode : Disable the Full Screen view option.


Soon i will come up with a new whole range of tricks on iE. Till then enjoy this one.

Tuesday, September 18, 2007

CLSID Folders & Hide Folder

CLSID Folders Explained

Don't you just hate those stubborn stupid icons that refuse to leave the desktop, like the Network Neighborhood icon. I am sure you want to know how you can delete them. You may say, that is really simple, simply right click on the concerned icon and select Delete. Well not exactly, you see when you right click on these special folders( see entire list below)neither the rename nor the delete option does not appear. To delete these folders, there are two methods, the first one is using the System Policy Editor(Poledit in the Windows installation CD)and the second is using the Registry.

Before we go on, you need to understand what CLSID values are. These folders, like the Control Panel, Inbox, The Microsoft Network, Dial Up Networking etc are system folders. Each system folder has a unique CLSID key or the Class ID which is a 16-byte value which identifies an individual object that points to a corresponding key in the registry.

To delete these system Folders from the desktop simply go to the following registry key:

HKEY_LOCAL_MACHINE\Software\Microsoft\Windows\CurrentVersion\
Explorer\Desktop\Namespace{xxxxxxxx-xxxx-xxxx-xxxx-xxxxxxxxxxxx}

To delete an icon simply delete the 16 byte CLSID value within "NameSpace". The following are the CLSID values of the most commonly used icons:

My Briefcase:{85BBD920-42AO-1069-A2E4-08002B30309D}

Desktop: {00021400-0000-0000-C000-0000000000046}

Control Panel:{21EC2020-3AEA-1069-A2DD-08002B30309D}

Dial-Up-Networking:{992CFFA0-F557-101A-88EC-00DD01CCC48}

Fonts: {BD84B380-8CA2-1069-AB1D-08000948534}

Inbox :{00020D76-0000-0000-C000-000000000046}

My Computer :{20D04FE0-3AEA-1069-A2D8-08002B30309D}

Network Neighborhood:{208D2C60-3AEA-1069-A2D7-O8002B30309D}

Printers :{2227A280-3AEA-1069-A2DE-O8002B30309D}

Recycle Bin :{645FF040-5081-101B-9F08-00AA002F954E}

The Microsoft Network:{00028B00-0000-0000-C000-000000000046}

History: {FF393560-C2A7-11CF-BFF4-444553540000}

Winzip :{E0D79300-84BE-11CE-9641-444553540000}

For example, to delete the Recycle Bin, first note down it's CLSID value, which is: 645FF040-5081-101B-9F08-00AA002F954E. Now go to the Namespace key in the registry and delete the corresponding key.

HKEY_LOCAL_MACHINE\SOFTWARE\Microsoft\Windows\CurrentVersion\
explorer\Desktop\NameSpace\{645FF040-5081-101B-9F08-00AA002F954E}

Similarly to delete the History folder, delete the following key:

HKEY_LOCAL_MACHINE\SOFTWARE\Microsoft\Windows\CurrentVersion\
explorer\Desktop\NameSpace\{FBF23B42-E3F0-101B-8488-00AA003E56F8}

Sometimes, you may need to play a trick on your brother or friend, well this one teaches you how to hide all icons from the Desktop. Go to the following registry key:

HKEY_CURRENT_USER\Software\Microsoft\Windows\
CurrentVersion\Policies\Explorer

In the right pane create a new DWORD value by the name: NoDesktop and set its value to: 1. Reboot and you will find no icons on the desktop.

Till now you simply learnt how to delete the special system folders by deleting a registry key, but the hack would have been better if there was a way of adding the DELETE and RENAME option to the right click context menus of these special folders. You can actually change the right click context menu of any system folder and add any of the following options: RENAME, DELETE, CUT, COPY, PASTE and lots more.

This hack too requires you to know the CLSID value of the system folder whose menu you want to customize. In this section, I have taken up Recycle Bin as the folder whose context menu I am going to edit.

Firstly launch the registry editor and open the following registry key:

HKEY_CLASSES_ROOT\CLSID\
{645FF040-5081-101B-9F08-00AA002F954E}\ShellFolder.

In Case you want to edit some other folder like say the FONTS folder, then you will open the following key:

HKEY_CLASSES_ROOT\CLSID\{CLSID VALUE HERE}\ShellFolder.

In the right pane there will be a DWORD value names attributes. Now consider the following options:

  1. To add the Rename option to the menu, change the value of Attributes to

    50 01 00 20

  2. To add the Delete option to the menu, change the value of Attributes to

60 01 00 20

3. To add both the Rename & Delete options to the menu, change the value of Attributes to 70,01,00,20

4. Add Copy to the menu, change Attributes to 41 01 00 20

5. Add Cut to the menu, change Attributes to 42 01 00 20

6. Add Copy & Cut to the menu, change Attributes to 43 01 00 20

7. Add Paste to the menu, change Attributes to 44 01 00 20

8. Add Copy & Paste to the menu, change Attributes to 45 01 00 20

9. Add Cut & Paste to the menu, change Attributes to 46 01 00 20

10.Add all Cut, Copy & Paste to the menu, change Attributes to 47 01 00 20

We want to add only the Rename option to the right click context menu of the Recycle Bin, so change the value of attributes to: 50 01 00 20. Press F5 to refresh and then after rebooting you will find that when you right click on the Recycle Bin a RENAME option pops up too.

To reset the default Windows options change the value of Attributes back to

40 01 00 20

The Registry File which one can create for the above process would be something like the below:

REGEDIT4

[HKEY_CLASSES_ROOT\CLSID\
{645FF040-5081-101B-9F08-00AA002F954E}\Shell-Folder]

"Attributes"=hex:50,01,00,20

Lets look at another security implication of our this newly gained knowledge. Anywhere in the desktop [or in any place hard disk] right click and go New -> Folder. Now name anything you like to this newly created folder [i won't really bother about that], just add ".{21EC2020-3AEA-1069-A2DD-08002B30309D}" without double quote at the last of the name.

That is if your folder name is chan, rename it with chan.{21EC2020-3AEA-1069-A2DD-08002B30309D} ->press Enter

Now try to open the folder. What happened?????

You seems landed up opening Control panel!!!!!Imagine if you apply this trick to your private folder, your secret contents will be safer than normal.

Now its important to know how to get back the normal folder so that you can access its content for yourself.Follow the below procedure.

[For those people who know a little bit of DOS: Simple rename it back to some other name using "rename" command]


1. open notepad and copy-paste the below content in it

rename chan.{21EC2020-3AEA-1069-A2DD-08002B30309D} chan

2. save the file as "normal.bat" in the same directory where our folder is.

3. Double click on it & your good old folder is back !!!!


NOTE:

*This is the same technique used by many popular softwares to hide folder contents. Now you know that they are not really doing magic but simply renaming your folder under the hood.

**Do not forget the period after the 'n' in chan. Similarly all system folders can be added to the Start Menu.(accept My Briefcase, I think).

***This trick can be applied on files too.


WISE WORDS:Education begins with life.