Protection on system files:
To enable protection on system files such as the KnownDLLs list, add the following value;
1. Open RegEdit
2. HKEY_LOCAL_MACHINE\System\CurrentControlSet\
Control\SessionManager
3. Create the a Dword value and name it "ProtectionMode "
4. Set the Value to 1
The Fix For Grayed Out Boxes:
The File Types tab in Explorer's View / Options menu lets you edit most of your file types, but certain settings cannot be changed. The default action for a batch file, for instance, runs the batch file instead of opening it via Notepad or Wordpad. Thus, when you double-click on AUTOEXEC.BAT, a DOS window opens, and the file executes. If you want to change this default action and edit a batch file when you double-click on it, however, the File Types tab does not let you do so; the Set Default button for the file type called MS-DOS Batch File is always grayed out.
The button is grayed out because HKEY_CLASSES_ROOT's batfile key contains an EditFlag value entry. Such entries are used throughout the Registry to prevent novice users from altering certain system settings. The binary data in batfile's EditFlag reads d0 04 00 00. If you change this value to 00 00 00 00, you can then change any of the batch file settings. Do not, however, indiscriminately zero out EditFlag; if you do so in a system ProgID such as Drive or AudioCD, it completely disappears from the File Types list. For ProgIDs that are linked to extensions, set all EditFlags to 00 00 00 00. For system ProgIDs, replace EditFlag data with 02 00 00 00.
If you wish to have access to some buttons while leaving others grayed out, you must know the function of each EditFlag bit. The last two bytes of data are always zero, but most bits within the first two bytes have a specific effect:
• Byte 1, bit 1: Removes the file type from the master list in the File Types tab (select View / Options under Explorer) if it has an associated extension.
• Byte 1, bit 2: Adds the file type to the File Types tab if it does not have an associated extension.
• Byte 1, bit 3: Identifies a type with no associated extension.
• Byte 1, bit 4: Grays out the Edit button in the File Types tab.
• Byte 1, bit 5: Grays out the Remove button in the File Types tab.
• Byte 1, bit 6: Grays out the New button in the Edit File Type dialog (select the Edit button in the File Types tab).
• Byte 1, bit 7: Grays out the Edit button in the Edit File Type dialog.
• Byte 1, bit 8: Grays out the Remove button in the Edit File Type dialog.
• Byte 2, bit 1: Prevents you from editing a file type's description in the Edit File Type dialog.
• Byte 2, bit 2: Grays out the Change Icon button in the Edit File Type dialog.
• Byte 2, bit 3: Grays out the SetDefault button in the Edit File Type dialog.
• Byte 2, bit 4: Prevents you from editing an action's description in the Edit Action dialog (select the Edit button in the Edit File Type dialog).
• Byte 2, bit 5: Prevents you from editing the command line in the Edit Action dialog.
• Byte 2, bit 6: Prevents you from setting DDE (Dynamic Data Exchange) fields in the Edit Action dialog.
The EditFlags value for Drive, for instance, is d2 01 00 00 in Hex (1101 0010 0000 0001 in binary). Bits 2, 5, 7, and 8 are on in byte 1, and bit 1 is on in byte 2. The EditFlag for batfile is d0 04 00 00 in Hex or 1101 0000 0000 0100 in binary. In this case, bits 5, 7, and 8 are on in byte 1, and bit 3 is on in byte 2.
Bits 4, 5, and 6 of byte 2 apply only to actions that are protected. EditFlags with action keys (such as HKEY_CLASSES_ROOT\batfile\shell\open) determine protection. If byte 1, bit 1 of such an EditFlag is 0 (or if there is no EditFlag), then the action is protected. If byte 1, bit 1 is 1, then the action is unprotected.
Increasing the Modem Timeout:
If your modem it is timing out during file transfers or loading Web Pages, you might try increasing the timeout period. To change the Time Out::
1.Open RegEdit
2.Go to HKEY_LOCAL_MACHINE\System\CurrentControlSet\
Services\Class\Modem\XXXX\Settings Where XXXX is the number of your modem
3. In the right panel and double click on Inactivity Timeout
4.The number of minutes for a timeout should be entered between the brackets.
5.For example, a setting could have S19=<10> to set it to 10 minutes
Recycle Bin Edits:
Playing with the recycle bin. Why not make the icon context menu act like other icon context menus.
Add rename to the menu:
HKEY_CLASSES_ROOT\CLSID\
{645FF040-5081-101B-9F08-00AA002F954E}\ShellFolder
"Attributes"=hex:50,01,00,20
Add delete to the menu:
HKEY_CLASSES_ROOT\CLSID\
{645FF040-5081-101B-9F08-00AA002F954E}\ShellFolder
"Attributes"=hex:60,01,00,20
Add rename and delete to the menu:
HKEY_CLASSES_ROOT\CLSID\
{645FF040-5081-101B-9F08-00AA002F954E}\ShellFolder
"Attributes"=hex:70,01,00,20
Restore the recycle bin to Windows defaults including un-deleting the icon after deletion:
Restore the icon.
HKEY_LOCAL_MACHINE\SOFTWARE\Microsoft\Windows\CurrentVersion\explorer
\Desktop\NameSpace\{645FF040-5081-101B-9F08-00AA002F954E}
@="Recycle Bin"
Reset Windows defaults.
HKEY_CLASSES_ROOT\CLSID\
{645FF040-5081-101B-9F08-00AA002F954E}\ShellFolder
"Attributes"=hex:40,01,00,20
Other edits to the recycle bin icon:
HKEY_CLASSES_ROOT\CLSID\
{645FF040-5081-101B-9F08-00AA002F954E}\ShellFolder
"Attributes"=hex:40,01,01,20 ... standard shortcut arrow
"Attributes"=hex:40,01,02,20 ... a different shortcut arrow
"Attributes"=hex:40,01,04,20 ... and still another shortcut arrow
"Attributes"=hex:40,01,08,20 ... make it look disabled (like it's been cut)
For Windows XP and 2000 also edit HKEY_CURRENT_USER\Software\Microsoft\Windows\
CurrentVersion\Explorer\CLSID\
{645FF040-5081-101B-9F08-00AA002F954E}
For Windows ME also edit HKEY_CURRENT_USER\Software\Classes\
CLSID{645FF040-5081-101B-9F08-00AA002F954E}
Changing the caption on the Title Bar:
Change the Caption on the Title Bar for OutLook Express or the Internet Explorer:
For Outlook Express:
1. Open RegEdit
2. Go to HKEY_CURRENT_USER\Software\Microsoft\OutLook Express
3. Add a string value "WindowTitle" (no space)
4. Modify the value to what ever you like.
For no splash screen, add a dword value "NoSplash" set to 1
For IE5 and up use: HKEY_CURRENT_USER\IDENTITIES\
{9DDDACCO-38F2-11D6-93CA-812B1F3493B}\ SOFTWARE\MICROSOFT\OUTLOOK EXPRESS\5.0
The Key {9DDDACCO-38F2-11D6-93CA-812B1F3493B} can be any key you find here. Each user has his own Key number.
The Key 5.0 is whatever version of IE you have
For Internet Explorer:
1. Open RegEdit
2. Go to HKEY_LOCAL_MACHINE\Software\Microsoft\Internet Explorer\Main
3. Add a string value "Window Title" (use a space)
4. Modify the value to what ever you like.
WISE WORDS:Distance lends enchantment to the view.
Showing posts with label Tweaks. Show all posts
Showing posts with label Tweaks. Show all posts
Friday, September 28, 2007


Thursday, September 27, 2007
Tips And Tricks, Windows XP - Part8
Changing Windows' Icons:
You can change the Icons Windows uses for folders, the Start Menu, opened and closed folder in the Explorer, and many more.
1. Open RegEdit
2. Go to HKEY_LOCAL_MACHINE\Software\Microsoft\Windows\
CurrentVersion\Explorer\Shell Icons
3. Add a string value for each Icon you wish to change.
Example: "3" ="C:\Windows\Icons\MyIcon.ico,0" This will change the closed folders in the Explorer to "MyIcon.ico". Here is a complete list for each value.
0= Unknown file type
1= MSN file types
2= Applications Generic
3= Closed Folder
4= Open Folder
5= 5.25" Drive
6= 3.25" Drive
7= Removable Drive
8= Hard Drive
9= NetWork Drive
10= Network Drive Offline
11= CD-ROM Drive
12= RAM Drive
13= Entire Network 14= Network Hub
15= My Computer
16= Printer
17= Network Neighborhood
18= Network Workgroup
19= Start Menu's Program Folders
20= Start Menu's Documents
21= Start Menu's Setting
22= Start Menu's Find
23= Start Menu's Help
24= Start Menu's Run
25= Start Menu's Suspend
26= Start Menu's PC Undock
27= Start Menu's Shutdown 28= Shared
29= Shortcut Arrow
30= (Unknown Overlay)
31= Recycle Bin Empty
32= Recycle Bin Full
33= Dial-up Network
34= DeskTop
35= Control Panel
36= Start Menu's Programs
37= Printer Folder
38= Fonts Folder
39= Taskbar Icon
40= Audio CD
You need to reboot after making changes. You may need to delete the hidden file ShellIconCache if after rebooting the desired Icons are not displayed.
Disabling My Computer:
In areas where you are trying to restrict what users can do on the computer, it might be beneficial to disable the ability to click on My Computer and have access to the drives, control panel etc.
To disable this:
1.Open RegEdit
2.Search for 20D04FE0-3AEA-1069-A2D8-08002B30309D
3.This should bring you to the HKEY_CLASSES_ROOT\CLSID section
4.Delete the entire section.
Now when you click on My Computer, nothing will happen.
You might want to export this section to a Registry file before deleting it just in case you want to enable it again. You can also hide all the Desktop Icons, see Change/Add restrictions.
Opening Explorer from My Computer:
By default, when you click on the My Computer icon, you get a display of all your drives, the Control Panel etc. If you would like to have this open the Explorer:
1. Open RegEdit
2. Go to HKEY_CLASSES_ROOT\CLSID\
{20D04FE0-3AEA-1069-A2D8-08002B30309D}\Shell
3 . Add a new Key named "Open" if it does not exists by right clicking "Shell" and selecting new.
4. . Add a new Key named "Command" by right clicking "Open" and selecting new
5. Set the (Default) value for the Command Key to "Explorer.exe" or "C:\Windows\Explorer.exe"
Setting the Minimum Password Length:
1.Open RegEdit
2.Go to HKEY_LOCAL_MACHINE\SOFTWARE\Microsoft\Windows\
CurrentVersion\Policies\Network
3. Now, choose the Edit/New/Binary value command and call the new value MinPwdLen. Press Enter twice and Assign it a value equal to your minimum password length.
Add\delete programs to run every time Windows starts:
You can start or stop programs from executing at bootup by adding or deleting them to/from the run Keys in the Registry. Windows loads programs to start in the following order; Program listed in the Local Machine hive, then the Current User hive, then theWin.ini Run= and Load = lines. then finally programs in your Start Up folder.
To add or remove programs in the Registry
1.Open RegEdit
2.Go to the desired Key
HKEY_LOCAL_MACHINE\SOFTWARE\Microsoft\Windows\
CurrentVersion\Run
HKEY_LOCAL_MACHINE\SOFTWARE\Microsoft\Windows\
CurrentVersion\RunServices
HKEY_CURRENT_USER\SOFTWARE\Microsoft\Windows\
CurrentVersion\Run
HKEY_CURRENT_USER\SOFTWARE\Microsoft\Windows\
CurrentVersion\RunServices
3. Add a new String Value and name it anything you like
4. For the value data, enter the path and executable for the program you want to run.
By adding the value to the HKEY_CURRENT_USER hive instead allows the program to start only when that user is logged on.
If you add the value to the RunOnce key the program will run once and be removed from the key by Windows.
Removing the Shortcut Icon Arrows:
1.Open RegEdit
2.Open the Key HKEY_CLASSES_ROOT
3.Open the Key LNKFILE
4.Delete the value IsShortcut
5.Open the next Key PIFFILE
6.Delete the value IsShortcut
7.Restart the Windows
Turn Off Window Animation:
You can shut off the animation displayed when you minimize and maximize Windows.
1. Open RegEdit
2. Go to HKEY_CURRENT_USER\Control panel \
Desktop\WindowMetrics
3. Create a new string value "MinAnimate".
4. Set the value data of 0 for Off or 1 for On
Removing Programs from Control Panel's Add/Remove Programs Section:
If you uninstalled a program by deleting the files, it may still show up in the Add/Remove programs list in the Control Panel.
In order to remove it from the list.
1.Open RegEdit
2.Go to HKEY_LOCAL_MACHINE\SOFTWARE\Microsoft\Windows\
CurrentVersion\Uninstall
3.Delete any programs here.
If you have a problem locating the desired program open each key and view the DisplayName value
WISE WORDS:Defeat is a school in which truth always grows strong.
You can change the Icons Windows uses for folders, the Start Menu, opened and closed folder in the Explorer, and many more.
1. Open RegEdit
2. Go to HKEY_LOCAL_MACHINE\Software\Microsoft\Windows\
CurrentVersion\Explorer\Shell Icons
3. Add a string value for each Icon you wish to change.
Example: "3" ="C:\Windows\Icons\MyIcon.ico,0" This will change the closed folders in the Explorer to "MyIcon.ico". Here is a complete list for each value.
0= Unknown file type
1= MSN file types
2= Applications Generic
3= Closed Folder
4= Open Folder
5= 5.25" Drive
6= 3.25" Drive
7= Removable Drive
8= Hard Drive
9= NetWork Drive
10= Network Drive Offline
11= CD-ROM Drive
12= RAM Drive
13= Entire Network 14= Network Hub
15= My Computer
16= Printer
17= Network Neighborhood
18= Network Workgroup
19= Start Menu's Program Folders
20= Start Menu's Documents
21= Start Menu's Setting
22= Start Menu's Find
23= Start Menu's Help
24= Start Menu's Run
25= Start Menu's Suspend
26= Start Menu's PC Undock
27= Start Menu's Shutdown 28= Shared
29= Shortcut Arrow
30= (Unknown Overlay)
31= Recycle Bin Empty
32= Recycle Bin Full
33= Dial-up Network
34= DeskTop
35= Control Panel
36= Start Menu's Programs
37= Printer Folder
38= Fonts Folder
39= Taskbar Icon
40= Audio CD
You need to reboot after making changes. You may need to delete the hidden file ShellIconCache if after rebooting the desired Icons are not displayed.
Disabling My Computer:
In areas where you are trying to restrict what users can do on the computer, it might be beneficial to disable the ability to click on My Computer and have access to the drives, control panel etc.
To disable this:
1.Open RegEdit
2.Search for 20D04FE0-3AEA-1069-A2D8-08002B30309D
3.This should bring you to the HKEY_CLASSES_ROOT\CLSID section
4.Delete the entire section.
Now when you click on My Computer, nothing will happen.
You might want to export this section to a Registry file before deleting it just in case you want to enable it again. You can also hide all the Desktop Icons, see Change/Add restrictions.
Opening Explorer from My Computer:
By default, when you click on the My Computer icon, you get a display of all your drives, the Control Panel etc. If you would like to have this open the Explorer:
1. Open RegEdit
2. Go to HKEY_CLASSES_ROOT\CLSID\
{20D04FE0-3AEA-1069-A2D8-08002B30309D}\Shell
3 . Add a new Key named "Open" if it does not exists by right clicking "Shell" and selecting new.
4. . Add a new Key named "Command" by right clicking "Open" and selecting new
5. Set the (Default) value for the Command Key to "Explorer.exe" or "C:\Windows\Explorer.exe"
Setting the Minimum Password Length:
1.Open RegEdit
2.Go to HKEY_LOCAL_MACHINE\SOFTWARE\Microsoft\Windows\
CurrentVersion\Policies\Network
3. Now, choose the Edit/New/Binary value command and call the new value MinPwdLen. Press Enter twice and Assign it a value equal to your minimum password length.
Add\delete programs to run every time Windows starts:
You can start or stop programs from executing at bootup by adding or deleting them to/from the run Keys in the Registry. Windows loads programs to start in the following order; Program listed in the Local Machine hive, then the Current User hive, then theWin.ini Run= and Load = lines. then finally programs in your Start Up folder.
To add or remove programs in the Registry
1.Open RegEdit
2.Go to the desired Key
HKEY_LOCAL_MACHINE\SOFTWARE\Microsoft\Windows\
CurrentVersion\Run
HKEY_LOCAL_MACHINE\SOFTWARE\Microsoft\Windows\
CurrentVersion\RunServices
HKEY_CURRENT_USER\SOFTWARE\Microsoft\Windows\
CurrentVersion\Run
HKEY_CURRENT_USER\SOFTWARE\Microsoft\Windows\
CurrentVersion\RunServices
3. Add a new String Value and name it anything you like
4. For the value data, enter the path and executable for the program you want to run.
By adding the value to the HKEY_CURRENT_USER hive instead allows the program to start only when that user is logged on.
If you add the value to the RunOnce key the program will run once and be removed from the key by Windows.
Removing the Shortcut Icon Arrows:
1.Open RegEdit
2.Open the Key HKEY_CLASSES_ROOT
3.Open the Key LNKFILE
4.Delete the value IsShortcut
5.Open the next Key PIFFILE
6.Delete the value IsShortcut
7.Restart the Windows
Turn Off Window Animation:
You can shut off the animation displayed when you minimize and maximize Windows.
1. Open RegEdit
2. Go to HKEY_CURRENT_USER\Control panel \
Desktop\WindowMetrics
3. Create a new string value "MinAnimate".
4. Set the value data of 0 for Off or 1 for On
Removing Programs from Control Panel's Add/Remove Programs Section:
If you uninstalled a program by deleting the files, it may still show up in the Add/Remove programs list in the Control Panel.
In order to remove it from the list.
1.Open RegEdit
2.Go to HKEY_LOCAL_MACHINE\SOFTWARE\Microsoft\Windows\
CurrentVersion\Uninstall
3.Delete any programs here.
If you have a problem locating the desired program open each key and view the DisplayName value
WISE WORDS:Defeat is a school in which truth always grows strong.
Wednesday, September 26, 2007
Tips And Tricks, Windows XP - Part7
Change/Add Restrictions And Features:
If you want to make restrictions to what users can do or use on their computer without having to run Poledit, you can edit the Registry. You can add and delete Windows features in this Key shown below.
Zero is Off and the value 1 is On. Example: to Save Windows settings add or modify the value name NoSaveSettings to 0, if set to1 Windows will not save settings. And NoDeletePrinter set to 1 will prevent the user from deleting a printer.
The same key shows up at:
HKEY_USERS\(yourprofilename)\Software\Microsoft\Windows\
CurrentVersion\Policies\Explorer
so change it there also if you are using different profiles.
1.Open RegEdit
2.Go to HKEY_CURRENT_USER\Software\Microsoft\CurrentVersion\Policies
3.Go to the Explorer Key (Additional keys that can be created under Policies are System, Explorer, Network and WinOldApp )
4.You can then add DWORD or binary values set to 1 in the appropriate keys for ON and 0 for off.
NoDeletePrinter - Disables Deletion of Printers
NoAddPrinter - Disables Addition of Printers
NoRun - Disables Run Command
NoSetFolders - Removes Folders from Settings on Start Menu
NoSetTaskbar - Removes Taskbar from Settings on Start Menu
NoFind - Removes the Find Command
NoDrives - Hides Drives in My Computers
NoNetHood - Hides the Network Neighborhood
NoDesktop - Hides all icons on the Desktop
NoClose - Disables Shutdown
NoSaveSettings - Don't save settings on exit
DisableRegistryTools - Disable Registry Editing Tools
NoRecentDocsMenu - Hides the Documents shortcut at the Start button
NoRecentDocsHistory- Clears history of Documents
NoFileMenu _ Hides the Files Menu in Explorer
NoActiveDesktop - No Active Desktop
NoActiveDesktopChanges- No changes allowed
NoInternetIcon - No Internet Explorer Icon on the Desktop
NoFavoritesMenu - Hides the Favorites menu
NoChangeStartMenu _ Disables changes to the Start Menu
NoFolderOptions _ Hides the Folder Options in the Explorer
ClearRecentDocsOnExit - Empty the recent Docs folder on reboot
NoLogoff - Hides the Log Off .... in the Start Menu
And here are a few more you can play with
ShowInfoTip
NoTrayContextMenu
NoStartMenuSubFolders
NoWindowsUpdate
NoViewContextMenu
EnforceShellExtensionSecurity
LinkResolveIgnoreLinkInfo
NoDriveTypeAutoRun
NoStartBanner
NoSetActiveDesktop
EditLevel
NoNetConnectDisconnect
RestrictRun - Disables all exe programs except those listed in the RestrictRun subkey
This key has many other available keys, there is one to even hide the taskbar, one to hide the control panel and more. I'm not telling you how, as someone may want to play a trick on you. The policies key has a great deal of control over how and what program can run and how one can access what feature.
In the System key you can enter:
NoDispCPL - Disable Display Control Panel
NoDispBackgroundPage - Hide Background Page
NoDispScrSavPage - Hide Screen Saver Page
NoDispAppearancePage - Hide Appearance Page
NoDispSettingsPage - Hide Settings Page
NoSecCPL - Disable Password Control Panel
NoPwdPage - Hide Password Change Page
NoAdminPage - Hide Remote Administration Page
NoProfilePage - Hide User Profiles Page
NoDevMgrPage - Hide Device Manager Page
NoConfigPage - Hide Hardware Profiles Page
NoFileSysPage - Hide File System Button
NoVirtMemPage - Hide Virtual Memory Button
In the Network key you can enter:
NoNetSetup - Disable the Network Control Panel
NoNetSetupIDPage - Hide Identification Page
NoNetSetupSecurityPage - Hide Access Control Page
NoFileSharingControl - Disable File Sharing Controls
NoPrintSharing - Disable Print Sharing Controls
In the WinOldApp key you can enter:
Disabled - Disable MS-DOS Prompt
NoRealMode - Disables Single-Mode MS-DOS
Disable Password Caching:
To disable password caching, which allows for the single Network login and eliminates the secondary Windows logon screen. Either use the same password or:
1. Open RegEdit
2. Go to the key HKEY_LOCAL_MACHINE\SOFTWARE\Microsoft\Windows\
CurrentVersion\Policies\Network
3. Add a Dword value "DisablePwdCaching" and set the value to 1
Remove Open, Explore & Find from Start Button:
When you right click on the Start Button, you can select Open, Explore or Find.
Open shows your Programs folder. Explore starts the Explorer and allows access to all drives.
Find allows you to search and then run programs. In certain situations you might want to disable this feature.
To remove them:
1.Open RegEdit
2.Go to HKEY_CLASSES_ROOT\Directory\Shell\Find
3.Delete Find
4.Scroll down below Directory to Folder
5.Expand this section under shell
6.Delete Explore and Open
Caution: - When you remove Open, you cannot open any folders
Removing Items from NEW Context Menu:
When you right-click on the desktop and select New, or use the File Menu item in the Explore and select New a list of default templates you can open up are listed.
To remove items from that list:
1. Open RegEdit
2. Do a Search for the string ShellNew in the HKEY_CLASSES_ROOT Hive
3. Delete the ShellNew command key for the items you want to remove.
Changing Telnet Window:
You can view more data if you increase the line count of Telnet. By Default it has a window size of 25 lines. To increase this so you can scroll back and look at a larger number on lines:
1. Open RegEdit
2. Go to HKEY_CURRENT_USER\Software\Microsoft\Telnet
3. Modify the value data of "Rows"
Changing the Tips of the Day:
You can edit the Tips of the day in the Registry by going to:
HKEY_LOCAL_MACHINE\SOFTWARE\Microsoft\Windows\
CurrentVersion\explorer\Tips
Disabling the Right-Click on the Start Button:
Normally, when you right button click on the Start button, it allows you to open your programs folder, the Explorer and run Find.
In situations where you don't want to allow users to be able to do this in order to secure your computer.
1.Open RegEdit
2.Search for Desktop
3.This should bring you to HKEY_CLASSES_ROOT\Directory
4.Expand this section
5.Under Shell is Find
6.Delete Find
7.Move down a little in the Registry to Folder
8.Expand this section and remove Explore and Open
Now when you right click on the Start button, nothing should happen.
You can delete only those items that you need.
Note: - On Microsoft keyboards, this also disables the Window-E (for Explorer) and Window-F (for Find) keys.
WISE WORDS:Confidence; you get it by getting it.
If you want to make restrictions to what users can do or use on their computer without having to run Poledit, you can edit the Registry. You can add and delete Windows features in this Key shown below.
Zero is Off and the value 1 is On. Example: to Save Windows settings add or modify the value name NoSaveSettings to 0, if set to1 Windows will not save settings. And NoDeletePrinter set to 1 will prevent the user from deleting a printer.
The same key shows up at:
HKEY_USERS\(yourprofilename)\Software\Microsoft\Windows\
CurrentVersion\Policies\Explorer
so change it there also if you are using different profiles.
1.Open RegEdit
2.Go to HKEY_CURRENT_USER\Software\Microsoft\CurrentVersion\Policies
3.Go to the Explorer Key (Additional keys that can be created under Policies are System, Explorer, Network and WinOldApp )
4.You can then add DWORD or binary values set to 1 in the appropriate keys for ON and 0 for off.
NoDeletePrinter - Disables Deletion of Printers
NoAddPrinter - Disables Addition of Printers
NoRun - Disables Run Command
NoSetFolders - Removes Folders from Settings on Start Menu
NoSetTaskbar - Removes Taskbar from Settings on Start Menu
NoFind - Removes the Find Command
NoDrives - Hides Drives in My Computers
NoNetHood - Hides the Network Neighborhood
NoDesktop - Hides all icons on the Desktop
NoClose - Disables Shutdown
NoSaveSettings - Don't save settings on exit
DisableRegistryTools - Disable Registry Editing Tools
NoRecentDocsMenu - Hides the Documents shortcut at the Start button
NoRecentDocsHistory- Clears history of Documents
NoFileMenu _ Hides the Files Menu in Explorer
NoActiveDesktop - No Active Desktop
NoActiveDesktopChanges- No changes allowed
NoInternetIcon - No Internet Explorer Icon on the Desktop
NoFavoritesMenu - Hides the Favorites menu
NoChangeStartMenu _ Disables changes to the Start Menu
NoFolderOptions _ Hides the Folder Options in the Explorer
ClearRecentDocsOnExit - Empty the recent Docs folder on reboot
NoLogoff - Hides the Log Off .... in the Start Menu
And here are a few more you can play with
ShowInfoTip
NoTrayContextMenu
NoStartMenuSubFolders
NoWindowsUpdate
NoViewContextMenu
EnforceShellExtensionSecurity
LinkResolveIgnoreLinkInfo
NoDriveTypeAutoRun
NoStartBanner
NoSetActiveDesktop
EditLevel
NoNetConnectDisconnect
RestrictRun - Disables all exe programs except those listed in the RestrictRun subkey
This key has many other available keys, there is one to even hide the taskbar, one to hide the control panel and more. I'm not telling you how, as someone may want to play a trick on you. The policies key has a great deal of control over how and what program can run and how one can access what feature.
In the System key you can enter:
NoDispCPL - Disable Display Control Panel
NoDispBackgroundPage - Hide Background Page
NoDispScrSavPage - Hide Screen Saver Page
NoDispAppearancePage - Hide Appearance Page
NoDispSettingsPage - Hide Settings Page
NoSecCPL - Disable Password Control Panel
NoPwdPage - Hide Password Change Page
NoAdminPage - Hide Remote Administration Page
NoProfilePage - Hide User Profiles Page
NoDevMgrPage - Hide Device Manager Page
NoConfigPage - Hide Hardware Profiles Page
NoFileSysPage - Hide File System Button
NoVirtMemPage - Hide Virtual Memory Button
In the Network key you can enter:
NoNetSetup - Disable the Network Control Panel
NoNetSetupIDPage - Hide Identification Page
NoNetSetupSecurityPage - Hide Access Control Page
NoFileSharingControl - Disable File Sharing Controls
NoPrintSharing - Disable Print Sharing Controls
In the WinOldApp key you can enter:
Disabled - Disable MS-DOS Prompt
NoRealMode - Disables Single-Mode MS-DOS
Disable Password Caching:
To disable password caching, which allows for the single Network login and eliminates the secondary Windows logon screen. Either use the same password or:
1. Open RegEdit
2. Go to the key HKEY_LOCAL_MACHINE\SOFTWARE\Microsoft\Windows\
CurrentVersion\Policies\Network
3. Add a Dword value "DisablePwdCaching" and set the value to 1
Remove Open, Explore & Find from Start Button:
When you right click on the Start Button, you can select Open, Explore or Find.
Open shows your Programs folder. Explore starts the Explorer and allows access to all drives.
Find allows you to search and then run programs. In certain situations you might want to disable this feature.
To remove them:
1.Open RegEdit
2.Go to HKEY_CLASSES_ROOT\Directory\Shell\Find
3.Delete Find
4.Scroll down below Directory to Folder
5.Expand this section under shell
6.Delete Explore and Open
Caution: - When you remove Open, you cannot open any folders
Removing Items from NEW Context Menu:
When you right-click on the desktop and select New, or use the File Menu item in the Explore and select New a list of default templates you can open up are listed.
To remove items from that list:
1. Open RegEdit
2. Do a Search for the string ShellNew in the HKEY_CLASSES_ROOT Hive
3. Delete the ShellNew command key for the items you want to remove.
Changing Telnet Window:
You can view more data if you increase the line count of Telnet. By Default it has a window size of 25 lines. To increase this so you can scroll back and look at a larger number on lines:
1. Open RegEdit
2. Go to HKEY_CURRENT_USER\Software\Microsoft\Telnet
3. Modify the value data of "Rows"
Changing the Tips of the Day:
You can edit the Tips of the day in the Registry by going to:
HKEY_LOCAL_MACHINE\SOFTWARE\Microsoft\Windows\
CurrentVersion\explorer\Tips
Disabling the Right-Click on the Start Button:
Normally, when you right button click on the Start button, it allows you to open your programs folder, the Explorer and run Find.
In situations where you don't want to allow users to be able to do this in order to secure your computer.
1.Open RegEdit
2.Search for Desktop
3.This should bring you to HKEY_CLASSES_ROOT\Directory
4.Expand this section
5.Under Shell is Find
6.Delete Find
7.Move down a little in the Registry to Folder
8.Expand this section and remove Explore and Open
Now when you right click on the Start button, nothing should happen.
You can delete only those items that you need.
Note: - On Microsoft keyboards, this also disables the Window-E (for Explorer) and Window-F (for Find) keys.
WISE WORDS:Confidence; you get it by getting it.
Tuesday, September 25, 2007
Tips And Tricks, Windows XP - Part6
Add Open With to all files:
You can add "Open With..." to the Right click context menu of all files.This is great for when you have several programs you want to open the same file types with. I use three different text editors so I added it to the ".txt" key.
1. Open RegEdit
2. Go to HKEY_CLASSES_ROOT\*\Shell
3. Add a new Key named "OpenWith" by right clicking the "Shell" Key and selecting new
4. Set the (Default) to "Op&en With..."
5. Add a new Key named "Command" by right clicking the "OpenWith" Key and selecting new
6. Set the (Default) to "C:\Windows\rundll32.exe shell32.dll,OpenAs_RunDLL %1", C:\ being your Windows drive. You must enter the "OpenAs_RunDLL %1" exactly this way.
Customize the System Tray:
You can add your name or anything you like that consists of 8 characters or less. This will replace the AM or PM next to the system time. But you cannot do this if you are using any of our software during the trial period; it will corrupt the trial license.
1. Open RegEdit
2. Go to HKEY_CURRENT_USER\Control Panel\International
3. Add two new String values, "s1159" and "s2359"
4. Right click the new value name and modify. Enter anything you like up to 8 characters.
If you enter two different values when modifying, you can have the system tray display the two different values in the AM and PM.
Disable the Outlook Express Splash Screen:
You can make OutLook Express load quicker by disabling the splash screen:
1. Open RegEdit
2. Go to HKEY_CURRENT_USER\Software\Microsoft\OutLook Express
3. Add a string value "NoSplash"
4. Set the value data to 1 as a Dword value
Multiple Columns For the Start Menu:
To make Windows use multiple Start Menu Columns instead of a single scrolling column, like Windows 95 had:
1. Open RegEdit
2. Go to the key HKEY_LOCAL_MACHINE\Software\Microsoft\Windows\
CurrentVersion\Explorer\Advanced
3. Create a string value "StartMenuScrollPrograms"
4. Right click the new string value and select modify
5. Set the value to "FALSE"
Change Default Folder Locations:
You can change or delete the Windows mandatory locations of folder like My Documents:
1. Open RegEdit
2. Go to HKEY_CURRENT_USER\Software\Microsoft\Windows\CurrentVersion\Explorer\Shell Folders
3. Change the desired folder location, My Documents is normally list as "Personal"
4. Open the Explorer and rename or create the folder you wish.
To change the desired location of the Program Files folder
1. Go to HKEY_LOCAL_MACHINE\Software\Microsoft\Windows\CurrentVersion
2. Change the value of "ProgramFiles", or "ProgramFilesDir"
Now when you install a new program it will default to the new location you have selected.
Change the Registered User Information:
You can change the Registered Owner or Registered Organization to anything you want even after Windows is installed.
1) Open RegEdit
2) Got to HKEY_LOCAL_MACHINE\SOFTWARE\Microsoft\Windows\CurrentVersion.
3) Change the value of "RegisteredOrganization" or "RegisteredOwner", to what ever you want
Changing Exchange/Outlook Mailbox Location:
To change the location of your mailbox for Exchange:
1. Open RegEdit
2. Go to HKEY_CURRENT_USER\Software\Microsoft\Windows Messaging Subsystem\Profiles
3. Go to the profile you want to change
4. Go to the value name that has the file location for your mailbox (*.PST) file
5. Make the change to file location or name
To change the location of your mailbox for Outlook
1. Open RegEdit
2. Go to HKEY_CURRENT_USER\Software\Microsoft\Outlook (or Outlook Express if Outlook Express)
3. Go to the section "Store Root"
4. Make the change to file location
Adding an Application to the Right Click on Every Folder:
Here is how to add any application to the Context Menu when you right click on any Folder. This way you do not have to always go to the Start Menu. When you right click on any folder, you can have access to that application, the same as using Sent To.
1. Open RegEdit
2. Go to HKEY_CLASSES_ROOT\Folder\shell
3. Add a new Key to the "Shell" Key and name it anything you like.
4. Give it a default value that will appear when you right click a folder, i.e. NewKey( use an "&" without the quotes, in front of any character and it will allow you to use the keyboard)
5. Click on the Key HKEY_CLASSES_ROOT\Folder\shell\NewKey
6. Add a New Key named Command
7. Set the (Default) value of the application you want to run
8. For example: c:\program files\internet explorer\iexplore.exe (Include the full path and parameters if you need them)
Changing the Location of Windows' Installation Files :
If you need to change the drive and or path where Windows looks for its installation files:
1.Open RegEdit
2.Go to HKEY_LOCAL_MACHINE\SOFTWARE\Microsoft\Windows\CurrentVersion\Setup
3.Edit the value next to SourcePath
Automatic Screen Refresh:
When you make changes to your file system and use Explorer, the changes are not usually displayed until you press the F5 key
To refresh automatically:
1. Open RegEdit
2. Go to HKEY_LOCAL_MACHINE\System\CurrentControlSet\Control\Update
3. Set the value name "UpdateMode" to 1
WISE WORDS:Eat to please thyself, but dress to please others.
You can add "Open With..." to the Right click context menu of all files.This is great for when you have several programs you want to open the same file types with. I use three different text editors so I added it to the ".txt" key.
1. Open RegEdit
2. Go to HKEY_CLASSES_ROOT\*\Shell
3. Add a new Key named "OpenWith" by right clicking the "Shell" Key and selecting new
4. Set the (Default) to "Op&en With..."
5. Add a new Key named "Command" by right clicking the "OpenWith" Key and selecting new
6. Set the (Default) to "C:\Windows\rundll32.exe shell32.dll,OpenAs_RunDLL %1", C:\ being your Windows drive. You must enter the "OpenAs_RunDLL %1" exactly this way.
Customize the System Tray:
You can add your name or anything you like that consists of 8 characters or less. This will replace the AM or PM next to the system time. But you cannot do this if you are using any of our software during the trial period; it will corrupt the trial license.
1. Open RegEdit
2. Go to HKEY_CURRENT_USER\Control Panel\International
3. Add two new String values, "s1159" and "s2359"
4. Right click the new value name and modify. Enter anything you like up to 8 characters.
If you enter two different values when modifying, you can have the system tray display the two different values in the AM and PM.
Disable the Outlook Express Splash Screen:
You can make OutLook Express load quicker by disabling the splash screen:
1. Open RegEdit
2. Go to HKEY_CURRENT_USER\Software\Microsoft\OutLook Express
3. Add a string value "NoSplash"
4. Set the value data to 1 as a Dword value
Multiple Columns For the Start Menu:
To make Windows use multiple Start Menu Columns instead of a single scrolling column, like Windows 95 had:
1. Open RegEdit
2. Go to the key HKEY_LOCAL_MACHINE\Software\Microsoft\Windows\
CurrentVersion\Explorer\Advanced
3. Create a string value "StartMenuScrollPrograms"
4. Right click the new string value and select modify
5. Set the value to "FALSE"
Change Default Folder Locations:
You can change or delete the Windows mandatory locations of folder like My Documents:
1. Open RegEdit
2. Go to HKEY_CURRENT_USER\Software\Microsoft\Windows\CurrentVersion\Explorer\Shell Folders
3. Change the desired folder location, My Documents is normally list as "Personal"
4. Open the Explorer and rename or create the folder you wish.
To change the desired location of the Program Files folder
1. Go to HKEY_LOCAL_MACHINE\Software\Microsoft\Windows\CurrentVersion
2. Change the value of "ProgramFiles", or "ProgramFilesDir"
Now when you install a new program it will default to the new location you have selected.
Change the Registered User Information:
You can change the Registered Owner or Registered Organization to anything you want even after Windows is installed.
1) Open RegEdit
2) Got to HKEY_LOCAL_MACHINE\SOFTWARE\Microsoft\Windows\CurrentVersion.
3) Change the value of "RegisteredOrganization" or "RegisteredOwner", to what ever you want
Changing Exchange/Outlook Mailbox Location:
To change the location of your mailbox for Exchange:
1. Open RegEdit
2. Go to HKEY_CURRENT_USER\Software\Microsoft\Windows Messaging Subsystem\Profiles
3. Go to the profile you want to change
4. Go to the value name that has the file location for your mailbox (*.PST) file
5. Make the change to file location or name
To change the location of your mailbox for Outlook
1. Open RegEdit
2. Go to HKEY_CURRENT_USER\Software\Microsoft\Outlook (or Outlook Express if Outlook Express)
3. Go to the section "Store Root"
4. Make the change to file location
Adding an Application to the Right Click on Every Folder:
Here is how to add any application to the Context Menu when you right click on any Folder. This way you do not have to always go to the Start Menu. When you right click on any folder, you can have access to that application, the same as using Sent To.
1. Open RegEdit
2. Go to HKEY_CLASSES_ROOT\Folder\shell
3. Add a new Key to the "Shell" Key and name it anything you like.
4. Give it a default value that will appear when you right click a folder, i.e. NewKey( use an "&" without the quotes, in front of any character and it will allow you to use the keyboard)
5. Click on the Key HKEY_CLASSES_ROOT\Folder\shell\NewKey
6. Add a New Key named Command
7. Set the (Default) value of the application you want to run
8. For example: c:\program files\internet explorer\iexplore.exe (Include the full path and parameters if you need them)
Changing the Location of Windows' Installation Files :
If you need to change the drive and or path where Windows looks for its installation files:
1.Open RegEdit
2.Go to HKEY_LOCAL_MACHINE\SOFTWARE\Microsoft\Windows\CurrentVersion\Setup
3.Edit the value next to SourcePath
Automatic Screen Refresh:
When you make changes to your file system and use Explorer, the changes are not usually displayed until you press the F5 key
To refresh automatically:
1. Open RegEdit
2. Go to HKEY_LOCAL_MACHINE\System\CurrentControlSet\Control\Update
3. Set the value name "UpdateMode" to 1
WISE WORDS:Eat to please thyself, but dress to please others.
Monday, September 24, 2007
Tips And Tricks, Windows XP - Part5
Turn Off Autoplay for Program CDs:
How can you stop Windows XP from launching program CDs?
Click Start, click Run, type GPEDIT.MSC to open Group Policy in the Microsoft
Management Console.
Double-click Computer Configuration, double-click Administrative templates,
double-click System, and then click Turn off autoplay.
The instructions on your screen describe how to configure this setting. Click
Properties to display the setting dialog.
Click Enabled, and choose CD-ROM drives, then click OK, to stop CD autoplay.
This setting does not prevent Autoplay for music CDs.
Turn off System Restore to Save Space:
By default, Windows XP keeps a backup of system files in the System Volume
Information folder. This can eat up valuable space on your hard drive. If you
don't want Windows to back up your system files:
Open the Control Panel.
Double-click on System.
Click the System Restore tab.
Check "Turn off System Restore on all drives".
Hit Apply.
You may now delete the System Volume Information folder.
Stop Jerky Graphics:
If you are connected to a LAN and have problems with jerky graphics, this might
be the solution:
Right-click "MyComputer".
Select "Manage".
Click on "Device Manager".
Double-click on your NIC under "Network Adapters".
In the new window, select the "Advanced" tab.
Select "Connection Type" and manually set the value of your NIC. (Not "Auto
Sense" which is default.).
You should reboot.
Increase Your Cable Modem or DSL Speed in XP:
This tweak is for broad band cable connections on stand alone machines with
WinXP professional version - might work on Home version also. It may also work
with networked machines as well.
This tweak assumes that you have let WinXP create a connection on install for
your cable modem/NIC combination and that your connection has tcp/ip - QoS -
file and print sharing - and client for Microsoft networks , only, installed.
It also assumes that WinXP will detect your NIC and has in-box drivers for it.
If it doesn't do not try this.
In the "My Network Places" properties (right-click on the desktop icon and
choose properties), highlight the connection
then at the menu bar choose "Advanced" then "Advanced Settings". Uncheck the
two boxes in the lower half for the bindings for File and Printer sharing and Client for MS networks. Click OK.
Adjust Various Visual Effects:
Open up the Control Panel.
Go under System and click on the Advanced tab.
Click settings under Performance options.
You can now change various graphical effects (mainly animations and shadows).
Synchronize Your Computer Clock with an Internet Time Server:
Does your computer have the right time? If your computer is not part of a
domain, you can synchronize your computer clock with an Internet time server.
To do so:
Double–click the time on your task bar.
Click the Internet Time tab.
Select the time server you want to use and make sure to select the Automatically
synchronize with an Internet time
server check box.
Disable Error Reporting:
Open Control Panel.
Click on Performance and Maintenance.
Click on System.
Then click on the Advanced tab.
Click on the error-reporting button on the bottom of the windows.
Select Disable error reporting.
Click OK. Click OK.
WISE WORDS:Early and provident care is the mother of safety.
How can you stop Windows XP from launching program CDs?
Click Start, click Run, type GPEDIT.MSC to open Group Policy in the Microsoft
Management Console.
Double-click Computer Configuration, double-click Administrative templates,
double-click System, and then click Turn off autoplay.
The instructions on your screen describe how to configure this setting. Click
Properties to display the setting dialog.
Click Enabled, and choose CD-ROM drives, then click OK, to stop CD autoplay.
This setting does not prevent Autoplay for music CDs.
Turn off System Restore to Save Space:
By default, Windows XP keeps a backup of system files in the System Volume
Information folder. This can eat up valuable space on your hard drive. If you
don't want Windows to back up your system files:
Open the Control Panel.
Double-click on System.
Click the System Restore tab.
Check "Turn off System Restore on all drives".
Hit Apply.
You may now delete the System Volume Information folder.
Stop Jerky Graphics:
If you are connected to a LAN and have problems with jerky graphics, this might
be the solution:
Right-click "MyComputer".
Select "Manage".
Click on "Device Manager".
Double-click on your NIC under "Network Adapters".
In the new window, select the "Advanced" tab.
Select "Connection Type" and manually set the value of your NIC. (Not "Auto
Sense" which is default.).
You should reboot.
Increase Your Cable Modem or DSL Speed in XP:
This tweak is for broad band cable connections on stand alone machines with
WinXP professional version - might work on Home version also. It may also work
with networked machines as well.
This tweak assumes that you have let WinXP create a connection on install for
your cable modem/NIC combination and that your connection has tcp/ip - QoS -
file and print sharing - and client for Microsoft networks , only, installed.
It also assumes that WinXP will detect your NIC and has in-box drivers for it.
If it doesn't do not try this.
In the "My Network Places" properties (right-click on the desktop icon and
choose properties), highlight the connection
then at the menu bar choose "Advanced" then "Advanced Settings". Uncheck the
two boxes in the lower half for the bindings for File and Printer sharing and Client for MS networks. Click OK.
Adjust Various Visual Effects:
Open up the Control Panel.
Go under System and click on the Advanced tab.
Click settings under Performance options.
You can now change various graphical effects (mainly animations and shadows).
Synchronize Your Computer Clock with an Internet Time Server:
Does your computer have the right time? If your computer is not part of a
domain, you can synchronize your computer clock with an Internet time server.
To do so:
Double–click the time on your task bar.
Click the Internet Time tab.
Select the time server you want to use and make sure to select the Automatically
synchronize with an Internet time
server check box.
Disable Error Reporting:
Open Control Panel.
Click on Performance and Maintenance.
Click on System.
Then click on the Advanced tab.
Click on the error-reporting button on the bottom of the windows.
Select Disable error reporting.
Click OK. Click OK.
WISE WORDS:Early and provident care is the mother of safety.
Saturday, September 22, 2007
Tips And Tricks, Windows XP - Part4
Disable Windows XP Boot Logo:
It is possible to disable the XP splash screen, which will slightly speed up the
overall boot process. Be aware that removing the splash screen will also cause
you not to see any boot-up messages that might come up (chkdsk, convert ... ),
but if your system runs without any problems then it should not matter.
Edit boot.ini.
Add " /noguiboot" right after "/fastdetect".
Upon restarting, the splash screen will be gone. It can be re-enabled by removing the new switch.
Clean Your Prefetch to Improve Performance:
This is a unique technique for WinXP. We know that it is necessary to scrub registry and TEMP files for Win9X/ME/2000 periodically. Prefetch is a new and
very useful technique in Windows XP. However, after using XP some time, the prefetch directory can get full of junk and obsolete links in the Prefetch catalog, which can slow down your computer noticeably.
Open C (system drive):/windows/prefetch, delete those junk and obsolete files,
reboot. It is recommended that you do this every month.
Performance Increase Through My Computer:
Easy enough tweak to usually find out about it on your own, but still, some of
us still don't find it right away. So here it is:
Start > right-click on My Computer and select Properties.
Click on the "Advanced" tab.
See the "Performance" section? Click "Settings".
Disable the following:
Fade or slide menus into view
Fade or slide ToolTips into view
Fade out menu items after clicking
Show Shadows under menus
Slide open combo boxes
Slide taskbar buttons
Use a background image for each folder type
Use common tasks in folders
There, now Windows will still look nice and perform faster.
Easy Way to Adjust LargeSystemCache:
Normally, the tweak I've seen asks you to go into
HKLM\System\CurrentControlSet\Control\Session Manager\Memory Management and
change the value to either O or 1 to the adjustment the LargeSystemCache.
However, in Windows XP, all you have to do is:
Right-click My Computer.
Select Properties.
Click Advanced.
Choose Performance.
Click Advanced again.
Select either Programs or System Cache under Memory Usage.
Programs = 0 for the registry tweak equivalent
System Cache = 1 for the registry tweak equivalent
Startup & Shutdown Windows XP More Faster:
Like previous versions of windows, it takes long time to restart or shutdown
windows XP when the "Exit Windows" sound is enabled. To solve this problem you
must disable this useless sound.
Click Start button.
Go to settings > Control Panel > Sound, Speech and Audio devices > Sounds and
Audio Devices > Sounds.
Then under program events and windows menu click on "Exit Windows" sub-menu and
highlight it. Now from sounds you can select, choose "none" and then click
Apply and OK.
Now you should see some improvements when starting up or shutting down your system.
Turn Off Autoplay for Program CDs:
How can you stop Windows XP from launching program CDs?
Click Start, click Run, type GPEDIT.MSC to open Group Policy in the Microsoft
Management Console.
Double-click Computer Configuration, double-click Administrative templates,
double-click System, and then click Turn off autoplay.
The instructions on your screen describe how to configure this setting. Click
Properties to display the setting dialog.
Click Enabled, and choose CD-ROM drives, then click OK, to stop CD autoplay.
This setting does not prevent Autoplay for music CDs.
WISE WORDS:Clever men are good, but they are not the best.
It is possible to disable the XP splash screen, which will slightly speed up the
overall boot process. Be aware that removing the splash screen will also cause
you not to see any boot-up messages that might come up (chkdsk, convert ... ),
but if your system runs without any problems then it should not matter.
Edit boot.ini.
Add " /noguiboot" right after "/fastdetect".
Upon restarting, the splash screen will be gone. It can be re-enabled by removing the new switch.
Clean Your Prefetch to Improve Performance:
This is a unique technique for WinXP. We know that it is necessary to scrub registry and TEMP files for Win9X/ME/2000 periodically. Prefetch is a new and
very useful technique in Windows XP. However, after using XP some time, the prefetch directory can get full of junk and obsolete links in the Prefetch catalog, which can slow down your computer noticeably.
Open C (system drive):/windows/prefetch, delete those junk and obsolete files,
reboot. It is recommended that you do this every month.
Performance Increase Through My Computer:
Easy enough tweak to usually find out about it on your own, but still, some of
us still don't find it right away. So here it is:
Start > right-click on My Computer and select Properties.
Click on the "Advanced" tab.
See the "Performance" section? Click "Settings".
Disable the following:
Fade or slide menus into view
Fade or slide ToolTips into view
Fade out menu items after clicking
Show Shadows under menus
Slide open combo boxes
Slide taskbar buttons
Use a background image for each folder type
Use common tasks in folders
There, now Windows will still look nice and perform faster.
Easy Way to Adjust LargeSystemCache:
Normally, the tweak I've seen asks you to go into
HKLM\System\CurrentControlSet\Control\Session Manager\Memory Management and
change the value to either O or 1 to the adjustment the LargeSystemCache.
However, in Windows XP, all you have to do is:
Right-click My Computer.
Select Properties.
Click Advanced.
Choose Performance.
Click Advanced again.
Select either Programs or System Cache under Memory Usage.
Programs = 0 for the registry tweak equivalent
System Cache = 1 for the registry tweak equivalent
Startup & Shutdown Windows XP More Faster:
Like previous versions of windows, it takes long time to restart or shutdown
windows XP when the "Exit Windows" sound is enabled. To solve this problem you
must disable this useless sound.
Click Start button.
Go to settings > Control Panel > Sound, Speech and Audio devices > Sounds and
Audio Devices > Sounds.
Then under program events and windows menu click on "Exit Windows" sub-menu and
highlight it. Now from sounds you can select, choose "none" and then click
Apply and OK.
Now you should see some improvements when starting up or shutting down your system.
Turn Off Autoplay for Program CDs:
How can you stop Windows XP from launching program CDs?
Click Start, click Run, type GPEDIT.MSC to open Group Policy in the Microsoft
Management Console.
Double-click Computer Configuration, double-click Administrative templates,
double-click System, and then click Turn off autoplay.
The instructions on your screen describe how to configure this setting. Click
Properties to display the setting dialog.
Click Enabled, and choose CD-ROM drives, then click OK, to stop CD autoplay.
This setting does not prevent Autoplay for music CDs.
WISE WORDS:Clever men are good, but they are not the best.
Thursday, September 20, 2007
Open the Command Prompt from the Right-Click Menu
Recently i was working on my java project which requires to use command prompt more frequently than ever before. But its really becomes boring to "cd blah\blah.." to get to my working directory every time i wanted to test my program. Its not that i was not aware of the fact that command prompt can be added to right click context menu to any folder while we are in GUI [Graphical User Interface] mode.
As far as i remember, i have had an apps called 'powertoys' from Microsoft. But only God knows where it is hiding in my 250GB harddisk [i am not a very disciplined fellow when comes to organizing things in order when it comes to harddisk or my bedroom.]. Yeah, a little goggling and i can find that stuff again but i rather choose to investigate what actually powertoys does under the hood. Because in computing world nothing is as such as magic. So here is the trick add a extra option for opening cmd prompt to folder right click context menus, also on drives and My Computer.
copy what's in the code area to notepad and save as cmd.reg
CODE:
**********************************************************************************
Windows Registry Editor Version 5.00
[HKEY_CLASSES_ROOT\Drive\shell\cmd]
@="Command Prompt"
[HKEY_CLASSES_ROOT\Drive\shell\cmd\command]
@="cmd.exe /k \"cd %L\""
[HKEY_CLASSES_ROOT\Directory\shell\cmd]
@="Command Prompt"
[HKEY_CLASSES_ROOT\Directory\shell\cmd\command]
@="cmd.exe /k \"cd %L\""
[HKEY_LOCAL_MACHINE\SOFTWARE\Classes\CLSID\
{20D04FE0-3AEA-1069-A2D8-08002B30309D}\shell\cmd]
@="Command Prompt"
[HKEY_LOCAL_MACHINE\SOFTWARE\Classes\CLSID\
{20D04FE0-3AEA-1069-A2D8-08002B30309D}\shell\cmd\command]
@="cmd.exe /k \"cd %L\""
**********************************************************************************
Double click on cmd.reg and merge it into registry. Maybe you need to restart computer to see the effect. I hope, you will also find some usefulness of the newly added option.
***Those who want to do it more easy way rather than editing registry,Download and install a free copy of Microsoft's "Open Command Window Here" PowerToy from http://www.microsoft.com/windowsxp/downloads/powertoys/xppowertoys.mspx
WISE WORDS:Each one sees what he carries in his heart.
As far as i remember, i have had an apps called 'powertoys' from Microsoft. But only God knows where it is hiding in my 250GB harddisk [i am not a very disciplined fellow when comes to organizing things in order when it comes to harddisk or my bedroom.]. Yeah, a little goggling and i can find that stuff again but i rather choose to investigate what actually powertoys does under the hood. Because in computing world nothing is as such as magic. So here is the trick add a extra option for opening cmd prompt to folder right click context menus, also on drives and My Computer.
copy what's in the code area to notepad and save as cmd.reg
CODE:
**********************************************************************************
Windows Registry Editor Version 5.00
[HKEY_CLASSES_ROOT\Drive\shell\cmd]
@="Command Prompt"
[HKEY_CLASSES_ROOT\Drive\shell\cmd\command]
@="cmd.exe /k \"cd %L\""
[HKEY_CLASSES_ROOT\Directory\shell\cmd]
@="Command Prompt"
[HKEY_CLASSES_ROOT\Directory\shell\cmd\command]
@="cmd.exe /k \"cd %L\""
[HKEY_LOCAL_MACHINE\SOFTWARE\Classes\CLSID\
{20D04FE0-3AEA-1069-A2D8-08002B30309D}\shell\cmd]
@="Command Prompt"
[HKEY_LOCAL_MACHINE\SOFTWARE\Classes\CLSID\
{20D04FE0-3AEA-1069-A2D8-08002B30309D}\shell\cmd\command]
@="cmd.exe /k \"cd %L\""
**********************************************************************************
Double click on cmd.reg and merge it into registry. Maybe you need to restart computer to see the effect. I hope, you will also find some usefulness of the newly added option.
***Those who want to do it more easy way rather than editing registry,Download and install a free copy of Microsoft's "Open Command Window Here" PowerToy from http://www.microsoft.com/windowsxp/downloads/powertoys/xppowertoys.mspx
WISE WORDS:Each one sees what he carries in his heart.
Monday, September 17, 2007
Internet Explorer meets the Group Policy Editor
XP Professional's Group Policy Editor lets you tweak Internet Explorer in countless ways—from changing its logo and background, to changing its title bar text and beyond.
ufffffff!!!!!!! That a quite long tutorial!!! I am tired:-(..so see you guys tomorrow.
Have a nice day. :-)
XP Professional owners have a reason to feel good about spending the extra bucks or so they forked over for their version of the operating system: the Group Policy Editor, available only in Professional, can make all kinds of secret tweaks to Internet Explorer. This tool, primarily used for setting network and multiuser policies and rights, can also be used to customize the way XP and Internet Explorer look and work. It makes it easy to customize many different aspects of Internet Explorer's behavior and appearance from one central place, without having to edit the Registry or delve deep into menus, dialog boxes, and options. You can customize how Internet Explorer looks and works for each individual account on the machine, or just for a single account if there is only one.
That means that you'll be able to create customized versions of IE for a variety of different purposes. For example, you can create customized browsers for your children, or for a business if you run or administer a small business.
Run the Group Policy Editor by typing gpedit.msc at a command line or the Run box and pressing Enter. When it opens, go to User Configuration\Windows Settings\Internet Explorer Maintenance. There are five categories of Internet Explorer settings you can modify:
-
Browser User Interface
-
Connection
-
URLs
-
Security
-
Programs
To change individual settings, browse to any of the categories, then from the right pane choose the setting you want to configure—for example, to change the browser title. Double-click on the setting, then fill out the dialog box, such as the one shown in below figure, which lets you change Internet Explorer's static and animated logos.

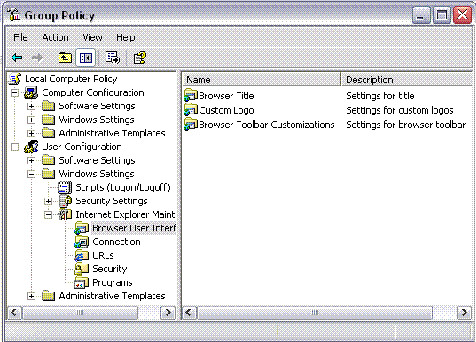
There are quite a few settings you can change with the Group Policy Editor. You can spend your whole day to tinker and play with them. Next, we'll take a look at what the best of each of these categories can do.
1. Browser User Interface:
As the name implies, this section lets you customize Internet Explorer's interface. This section, as a whole, lets you create your own customized version of Internet Explorer. For example, you can create a version of IE specifically for one of your children—take a digital photo of her and use it as the background for the toolbar, crop a headshot photo of your child and use it as the animated custom logo, and change the browser title to put her name on it. There are three types of tweaks you can make in this section:
- Browser Title
-
This option lets you customize Internet Explorer's titlebar text, though only to a limited degree; you can add your name or company's name to a text string of "Microsoft Internet Explorer provided by." For example, you can have the titlebar read "Microsoft Explorer provided by Preston Gralla." When you do this, Outlook Express will have the same title as well. Because you need to have that initial text string, this isn't a great hack unless you're a computer manufacturer and want to brand the browser.
- Custom Logo
-
This setting lets you replace Internet Explorer's static and animated logo with logos of your own. Note that to do this, you'll first have to create the logos yourself. It's easier to use the Group Policy Editor to change your logo than to use the Registry.
- Browser Toolbar Customizations
-
You can use your own bitmap as the background to the Internet Explorer toolbar. Additionally, you can delete the existing toolbar buttons and add buttons of your own. You don't have to worry if the bitmap you want to use is not the same size as the toolbar. XP will accommodate it—for example, by tiling a graphic that is smaller than the toolbar so that it appears multiple times.
2. Connection:
This section lets you customize Internet Explorer's connection settings, which you would otherwise have to go to several places to set.
- Connection Settings
-
This lets you customize your existing Internet connection settings and import them for another use on the PC. It doesn't have any use if you're the only user of the machine; it's intended to help you set up other accounts' connection settings. If you have a network at home, for example, you could copy the settings from one machine to every other machine on the network.
- Automatic Browser Configuration
-
This is purely an administrator's tool. It lets you automatically change browser configurations on users' machines.
- Proxy Settings
-
This lets you tell Internet Explorer to use proxy servers. You can also set up proxy servers from within Internet Explorer. For more details on setting up proxy servers.
- User Agent String
-
This lets you customize the user agent string that is sent to web sites whenever you visit them. The user agent string gives out basic information about your operating system and browser to the web site so that the site can better track usage statistics. Using this setting lets you append a specific text string to your PC's user agent string.
3. URLs:
This section is mainly for administrators, so if you don't need administrative tools you can pretty much forgo it. If you are an administrator, it will let you specify IE settings for multiple machines, such as setting a home page for all, specifying a URL they will go to when Help is chosen, and populating their Favorites with those of your choice. If you run a small business, you can use these settings to build a business-specific browser for all of your employees. For example, set the home page to be your company's home page or populate Favorites with Intranet pages or other pages your employees need to access regularly, such as benefits information.
- Favorites and Links
-
This lets you create a Favorites folder and links, or import them. It's primarily an administrator's tool, since it doesn't add much extra functionality to the normal way that you can manage Favorites.
- Important URLs
-
You can specify the starting page, create your own customized Search bar, and create a Help page that will display when someone clicks on Help -> Online Support. Again, this is primarily an administrator's tool.
4. Security:
Here's where to set Internet Explorer security settings. You can change these settings from directly within Internet Explorer just as easily as changing them here, unless you need to change the settings for several accounts, in which case here's the place to go.
- Security Zones and Content Rating
-
You can customize both security zones and content ratings, which limit sites with objectionable content from being visited. This is primarily an administrator's tool, since these settings can be edited easily from inside Internet Explorer by choosing Tools -> Internet Options -> Security and Tools -> Internet Options -> Content. But it's ideal for parents who have networks at home and want to customize different security settings for their children's computers. You can set a higher level of security for children's computers and a lower level for parents' PCs.
- Authenticode Settings
-
This lets you designate specific credential agencies and software publishers as trustworthy. This is primarily an administrator's tool, since these settings can be edited easily from inside Internet Explorer by choosing Tools -> Internet Options -> Security and Tools -> Internet Options -> Content -> Certificates.
5. Programs:
Once again, this section is mainly for administrators. It lets you change default programs for multiple machines. So, for users who require only a simple email program, you can set the default to be Outlook Express. For other users, you can set it as Outlook or a third-party email program.
- Programs
-
This lets you change the default programs to be used for purposes such as email, HTML editing, and others. This is primarily an administrator's tool, since these settings can be edited easily by choosing Tools -> Internet Options -> Security and Tools -> Internet Options -> Programs
ufffffff!!!!!!! That a quite long tutorial!!! I am tired:-(..so see you guys tomorrow.
Have a nice day. :-)
Saturday, September 15, 2007
Tips And Tricks, Windows XP - Part3
Forgetting What Your Files Are?
===============================
This procedure works under NTFS.
As times goes along you have a lot files on your computer. You are going to forget what they are. Well here is way to identify them as you scroll through Windows Explorer in the future.
This procedure works under NTFS.
1.. Open up a folder on your system that you want to keep track of the different files you might one to identify in the future.
2.. Under View make certain that you set it to the Details.
3.. Highlight the file you want to keep more information on. Right click the file and you will get a pop up menu. Click on properties.
4.. Click on the Summary Tab (make sure it says simple not advanced on the button in the box), You should now get the following fields,
Title,Subject, Author, Category, Keywords, Comments
You will see advanced also if you have changed it to simple, Here will be other fields you can fill in.
5.. Next you can fill in what ever field you want.
6.. After you finished click the apply button then OK.
7.. Next right click the bar above your files, under the address barand you should get a drop down menu. Here you can click the fields you want to display.
8.. You should now see a list with the new fields and any comments you have done.
9.. Now if you want to sort these just right click a blank spot and then you sort the information to your liking.
Change Web Page Font Size on the Fly
====================================
If your mouse contains a wheel for scrolling, you can change font size on the fly when viewing a Web page. To do so:
Press and hold Ctrl. Scroll down (or towards yourself) to enlarge the font size. Scroll up (or away from yourself) to reduce the font size.
You might find it useful to reduce font size when printing a Web page, so that you can fit more content on the page.
Remove the Shared Documents folders from My Computer
====================================================
One of the most annoying things about the new Windows XP user interface is that Microsoft saw fit to provide links to all of the Shared Documents folders on your system, right at the top of the My Computer window. I can't imagine why this would be the default, even in a shared PC environment at home, but what's even more annoying is that you cannot change this behavior through the sh*ll
: Those icons are stuck there and you have to live with it.
Until now, that is.
Simply fire up the Registry Editor and navigate to the following key:
HKEY_LOCAL_MACHINE \ SOFTWARE \ Microsoft \ Windows \ CurrentVersion \ Explorer \ My Computer \ NameSpace \ DelegateFolders
You'll see a sub-key named {59031a47-3f72-44a7-89c5-5595fe6b30ee}. If you delete this, all of the Shared Documents folders (which are normally under the group called "Other Files Stored on This Computer" will be gone.
You do not need to reboot your system to see the change.
Before: A cluttered mess with icons no one will ever use (especially that orphaned one). After: Simplicity itself, and the way it should be by default.
Some Registry Hacks:
@Auto Sort Start Menu:
HKEY_CURRENT_USER\Software\Microsoft\Windows\CurrentVersion\Explorer\MenuOrder
Go to Edit/Permissions, click Advanced, clear the "Inherit From Parent" check box, click Copy from the dialog box, click OK and then clear the "Full Control" for your account and now Windows will autp sort the start menu, but you can still do it too
@Disable User Tracking:
HKEY_CURRENT_USER\Software\Microsoft\Windows\CurrentVersion\Policies\Explorer
Add or Edit DWORD = NoInstrumentation, Value = 1
Disables Windows user tracking; better performance, much better privacy
@Cache Thumbnails:
HKEY_CURRENT_USER\Software\Microsoft\Windows\CurrentVersion\Explorer\Advanced
Add or Edit DWORD = DisableThumbnailCache, Value = 1
Disables thumbnails in Windows, saving hard drive space
@Kill Chrashed Apps Quicker:
HKEY_CURRENT_USER\Control Panel\Desktop
Add or Edit Sring = HungAppTimeout, Value = 1000-5000
Cuts time for Windows to recongize a crashed application and allow you to kill it; default is 5000(for 5 seconds)
@Faster Start Menu:
HKEY_CURRENT_USER\Control Panel\Desktop
Add or Edit Sring = MenuShowDelay, Value = 0 - 400
Changes the delay that for Windows to show a menu in the start menu; value is in ms
@Network Intelligently:
HKEY_LOCAL_MACHINE\SYSTEM\CurrentControlSet\Services\Tcpip\Parameters
Add or Edit String = DisableTaskOffload, Value = 1
Frees processor from doing network-card work
@Browse the Network Faster:
HKEY_LOCAL_MACHINE\SOFTWARE\Microsoft\Windows\CurrentVersion\Explorer\RemoteComputer\NameSpace
Delete subkeys {2227A280-3AEA-1069-A2DE-08002B30309D} and {D6277990-4C6A-11CF-8D87-00AA0060F5BF}
Speeds up network browsing of old Windows machines on the LAN by ignoring their scheduled tasks and printers
@Remove Compression Option In Disk Cleanup:
HKEY_LOCAL_MACHINE\SOFTWARE\Microsoft\Windows\CurrentVersion\Explorer\VolumeCaches\Compress old files
Delete the Default Value Key and the next time you start Disk Cleanup, it will skip the compression analyisis
WISE WORDS:Constancy is the foundation of virtues.
===============================
This procedure works under NTFS.
As times goes along you have a lot files on your computer. You are going to forget what they are. Well here is way to identify them as you scroll through Windows Explorer in the future.
This procedure works under NTFS.
1.. Open up a folder on your system that you want to keep track of the different files you might one to identify in the future.
2.. Under View make certain that you set it to the Details.
3.. Highlight the file you want to keep more information on. Right click the file and you will get a pop up menu. Click on properties.
4.. Click on the Summary Tab (make sure it says simple not advanced on the button in the box), You should now get the following fields,
Title,Subject, Author, Category, Keywords, Comments
You will see advanced also if you have changed it to simple, Here will be other fields you can fill in.
5.. Next you can fill in what ever field you want.
6.. After you finished click the apply button then OK.
7.. Next right click the bar above your files, under the address barand you should get a drop down menu. Here you can click the fields you want to display.
8.. You should now see a list with the new fields and any comments you have done.
9.. Now if you want to sort these just right click a blank spot and then you sort the information to your liking.
Change Web Page Font Size on the Fly
====================================
If your mouse contains a wheel for scrolling, you can change font size on the fly when viewing a Web page. To do so:
Press and hold Ctrl. Scroll down (or towards yourself) to enlarge the font size. Scroll up (or away from yourself) to reduce the font size.
You might find it useful to reduce font size when printing a Web page, so that you can fit more content on the page.
Remove the Shared Documents folders from My Computer
====================================================
One of the most annoying things about the new Windows XP user interface is that Microsoft saw fit to provide links to all of the Shared Documents folders on your system, right at the top of the My Computer window. I can't imagine why this would be the default, even in a shared PC environment at home, but what's even more annoying is that you cannot change this behavior through the sh*ll
: Those icons are stuck there and you have to live with it.
Until now, that is.
Simply fire up the Registry Editor and navigate to the following key:
HKEY_LOCAL_MACHINE \ SOFTWARE \ Microsoft \ Windows \ CurrentVersion \ Explorer \ My Computer \ NameSpace \ DelegateFolders
You'll see a sub-key named {59031a47-3f72-44a7-89c5-5595fe6b30ee}. If you delete this, all of the Shared Documents folders (which are normally under the group called "Other Files Stored on This Computer" will be gone.
You do not need to reboot your system to see the change.
Before: A cluttered mess with icons no one will ever use (especially that orphaned one). After: Simplicity itself, and the way it should be by default.
Some Registry Hacks:
@Auto Sort Start Menu:
HKEY_CURRENT_USER\Software\Microsoft\Windows\CurrentVersion\Explorer\MenuOrder
Go to Edit/Permissions, click Advanced, clear the "Inherit From Parent" check box, click Copy from the dialog box, click OK and then clear the "Full Control" for your account and now Windows will autp sort the start menu, but you can still do it too
@Disable User Tracking:
HKEY_CURRENT_USER\Software\Microsoft\Windows\CurrentVersion\Policies\Explorer
Add or Edit DWORD = NoInstrumentation, Value = 1
Disables Windows user tracking; better performance, much better privacy
@Cache Thumbnails:
HKEY_CURRENT_USER\Software\Microsoft\Windows\CurrentVersion\Explorer\Advanced
Add or Edit DWORD = DisableThumbnailCache, Value = 1
Disables thumbnails in Windows, saving hard drive space
@Kill Chrashed Apps Quicker:
HKEY_CURRENT_USER\Control Panel\Desktop
Add or Edit Sring = HungAppTimeout, Value = 1000-5000
Cuts time for Windows to recongize a crashed application and allow you to kill it; default is 5000(for 5 seconds)
@Faster Start Menu:
HKEY_CURRENT_USER\Control Panel\Desktop
Add or Edit Sring = MenuShowDelay, Value = 0 - 400
Changes the delay that for Windows to show a menu in the start menu; value is in ms
@Network Intelligently:
HKEY_LOCAL_MACHINE\SYSTEM\CurrentControlSet\Services\Tcpip\Parameters
Add or Edit String = DisableTaskOffload, Value = 1
Frees processor from doing network-card work
@Browse the Network Faster:
HKEY_LOCAL_MACHINE\SOFTWARE\Microsoft\Windows\CurrentVersion\Explorer\RemoteComputer\NameSpace
Delete subkeys {2227A280-3AEA-1069-A2DE-08002B30309D} and {D6277990-4C6A-11CF-8D87-00AA0060F5BF}
Speeds up network browsing of old Windows machines on the LAN by ignoring their scheduled tasks and printers
@Remove Compression Option In Disk Cleanup:
HKEY_LOCAL_MACHINE\SOFTWARE\Microsoft\Windows\CurrentVersion\Explorer\VolumeCaches\Compress old files
Delete the Default Value Key and the next time you start Disk Cleanup, it will skip the compression analyisis
WISE WORDS:Constancy is the foundation of virtues.
Friday, September 14, 2007
Tweaks for Peak PC Graphics Performance
Adjust the settings for your graphics board and display to improve image quality.
When it comes to your PC, looks definitely matter. Tiny text, blurry images, and flickering screens aren't just annoying, they can lead to eyestrain, lost productivity, and sometimes your really want to toss your monitor through out of frustration. But you don't have to give your display the heave-ho: A few simple adjustments to your graphics card and other Windows settings can ensure peak visual performance.
Your PC's graphics card is controlled by its Windows driver, so get the latest driver release for your board. To see what version you have, right-click the desktop and choose Properties to open the Display Properties dialog box, then click Settings, Advanced, Adapter (in Windows XP, also select Properties, Driver).
Visit your graphics-card vendor's Web site to download the most recent version of the driver, but don't install beta drivers. These are works in progress that may cause more trouble than they're worth.
Sight-Saving Settings:
Here are a few settings that should be available for all graphics drivers.
Resolution: This is the number of dots--or pixels (short for "picture elements")--displayed on your screen. The higher the resolution, the more dots per inch, and the sharper the displayed image (if your monitor supports the higher resolution). High resolutions increase the processing demands on your graphics board and PC.
The graphics cards in most computers made in the last three or four years support resolutions of at least 1024 by 768--meaning the screen image is composed of an orthogonal array 1024 pixels across and 768 pixels tall--and some support screen resolutions as high as 1600 by 1200. However, many older systems, as well as some newer budget systems, have a top resolution of only 800 by 600.
To adjust screen resolution, open Display Properties and click Settings. Slide the 'Screen area' or 'Screen resolution' bar to a higher (More) or lower (Less) resolution. Though higher resolutions improve image quality, they also shrink icons, text, and other on-screen objects. Experiment to find the setting that's right for you. For most people, 1024 by 768 is the highest resolution they can read easily on a 17-inch CRT monitor.
Color depth: This setting is the number of colors that your graphics card supports. The more colors available for use, the more realistic the image, but again, the more colors on your screen, the greater the processing demands on your system.
Your graphics card's color-depth settings are listed in Display Properties under the Settings tab on the Colors drop-down menu ('Color quality' in Windows XP). Each is named for the number of bits it assigns to each pixel: True Color (also called 24-bit color) makes 16,777,216 colors available, while High Color (16 bits) supports 65,536 colors. At lower than 16-bit color, your images may suffer. Many drivers no longer offer 8-bit (256 colors) or 15-bit (32,536 colors) settings.
New PCs often support 32-bit color, which offers the same 16 million-plus colors as True Color. The extra 8 bits control image opacity. This is useful in fast-moving 3D games but of little help in most business apps.
Refresh rate: Expressed in hertz, or cycles per second, this tells how often the phosphors that glow to create an image on a CRT screen are re-energized--that is, the times per second that the screen's image is redrawn. A refresh rate that's too low can cause annoying screen flicker. Even if you don't see the flicker, slow refreshes can cause eyestrain and headaches.
Conventional wisdom says your refresh rate should be no less than 72 Hz. Some experts say the minimum rate is 80 Hz. Try different refresh rates until you find the one that works for you. Note that if your refresh rate is too high, you could lose image opacity. Still, few of us can discern rates higher than 85 Hz.
To adjust your screen's refresh rate in Windows XP, open Display Properties and click Settings, Advanced, Adapter, List All Modes. Pick a combination of refresh rate, screen resolution, and color depth from the list of supported values.
To change your refresh rate in other versions of Windows, open Display Properties and then click Settings, Advanced, Adapter. Select an option from the 'Refresh rate' drop-down menu. If you see no options there, however, your graphics board and monitor don't support multiple refresh rates.
Even in that case, you might be able to increase your display screen's refresh rate by decreasing your screen resolution or your color depth. All three specs compete for graphics-processing capacity, so if your graphics system is running at its maximum, try increasing one setting and lowering another. For example, reducing color depth from 32-bit to 16-bit--no big deal if you never look at photos--may free up enough processing power to let you bump your refresh rate from an annoying 60 Hz to an eye-pleasing 72 Hz. Or you may be able to increase resolution from 800 by 600 to 1024 by 768. There's no guarantee, but these tricks might work.
Windows automatically sets your screen refresh rate to a safe but slow 60 Hz when it can't detect your monitor. To confirm that Windows XP correctly recognizes your monitor, open Display Properties and click Settings, Advanced, Monitor. If your monitor isn't listed under 'Monitor type', download and install the device's driver from the manufacturer's Web site.
In other versions of Windows, verify that Plug and Play is enabled. Make sure your monitor is listed under 'Display' on the Settings tab in Display Properties, and then click Advanced, Monitor. Verify that Automatically detect Plug & Play monitors is checked. If it isn't, select it and then reset your refresh rate to a level that is higher than Windows' default 60 Hz.
DirectX: This Windows component controls multimedia functions. To check your current DirectX version, click Start, Run, type dxdiag, and click OK. Choose the System tab and look under System Information on the lower part of the screen. Look for the latest DirectX version; if you don't have it, download it from Microsoft.
Touch Those Dials!
You can improve the image quality of your monitor via its built-in controls. The options vary by display manufacturer and model, but you should find brightness and other controls on most monitors.
Adjust brightness and contrast: Use this gray-scale image on your screen. Be sure you can see as many of the image's 17 shades as possible; the two or three darkest may be tough to view in a bright room.
Center and align: Few monitors come straight from the factory with optimal screen geometry. Use your monitor's screen-placement controls to center your displayed image, keep its edges straight, and minimize unfilled screen space.
To avoid eyestrain and other physical problems, put the top of the screen at eye level and at arm's length from your head (your best position may vary). Orient your screen to avoid glare from lights and windows.
Clean it: Gently wipe your screen with a soft, lightly moistened cloth. Unless the monitor is really filthy, avoid cleaning solutions, which can damage delicate screen coatings. Clean the dust from the cooling vents in the monitor's case; overheating is your display's lethal enemy.
Graphics Triage:
If your screen goes blank, the problem is likely due to a disconnected monitor cable, an unplugged power cord, or a too-low brightness setting. Monitors do die, however. If you smell something burning or hear popping sounds, your monitor could be failing--turn it off immediately. Monitors have been known to spontaneously combust.
Corrupted graphics drivers cause all kinds of PC problems. To check for a damaged graphics driver, install the plain-vanilla VGA driver that comes with Windows. If your troubles disappear, reinstall a clean copy of the monitor's original driver, or an updated version.
Some graphics boards don't work or play well with other hardware devices. Windows allows you to disable graphics-acceleration functions for the sake of compatibility. Open Display Properties and click Settings, Advanced, Troubleshooting in Windows XP and 2000, or Settings, Advanced, Performance in Windows 98 and Me. Move the slider under 'Hardware acceleration' to the left to disable your graphics acceleration.
A shaking or shimmering image on your screen may be due to nearby magnetic fields. Keep clocks and other appliances that use electric motors, and those that use a lot of electricity (such as microwave ovens), far from your monitor. Power lines behind walls can cause interference, so try moving the display away from nearby walls.
If your screen image is washed in blue, red, or green, check for a loose cable connecting your graphics board to your monitor. Look for bent pins inside the cable connector; you can often straighten them with needle-nose pliers. If on-screen objects have a rainbow cast, some monitors have convergence controls that you can use to tune the image.
Living in a Flat World:
Notebook displays are fine-tuned in the factory to work with the system's other hardware; your desktop's flat panel likely isn't. And tuning an LCD isn't the same as tuning a CRT monitor. If both your LCD and graphics board support Digital Visual Interface connections, make sure they're using them. Vendors don't always ship a DVI cable with cards that produce both analog and digital signals, so you'll have to replace the analog cable. If your display supports DVI but your graphics card doesn't, upgrade your card.
Make sure your LCD is set to its native resolution. Many flat-panel displays don't look good at other resolutions. Unfortunately, some 15-inch LCDs have a native resolution of 1024 by 768 dpi, which makes text minuscule. The solution is to open Display Properties, click Appearance, and change the setting on the 'Font size' drop-down menu to increase the size of your text. (Most browsers include their own font-size settings.)
In Windows XP, open Display Properties, click Appearance, Effects, and check Use the following method to smooth screen fonts. Select ClearType to see a big improvement in the appearance of many of your fonts.
When it comes to your PC, looks definitely matter. Tiny text, blurry images, and flickering screens aren't just annoying, they can lead to eyestrain, lost productivity, and sometimes your really want to toss your monitor through out of frustration. But you don't have to give your display the heave-ho: A few simple adjustments to your graphics card and other Windows settings can ensure peak visual performance.
Your PC's graphics card is controlled by its Windows driver, so get the latest driver release for your board. To see what version you have, right-click the desktop and choose Properties to open the Display Properties dialog box, then click Settings, Advanced, Adapter (in Windows XP, also select Properties, Driver).
Visit your graphics-card vendor's Web site to download the most recent version of the driver, but don't install beta drivers. These are works in progress that may cause more trouble than they're worth.
Sight-Saving Settings:
Here are a few settings that should be available for all graphics drivers.
Resolution: This is the number of dots--or pixels (short for "picture elements")--displayed on your screen. The higher the resolution, the more dots per inch, and the sharper the displayed image (if your monitor supports the higher resolution). High resolutions increase the processing demands on your graphics board and PC.
The graphics cards in most computers made in the last three or four years support resolutions of at least 1024 by 768--meaning the screen image is composed of an orthogonal array 1024 pixels across and 768 pixels tall--and some support screen resolutions as high as 1600 by 1200. However, many older systems, as well as some newer budget systems, have a top resolution of only 800 by 600.
To adjust screen resolution, open Display Properties and click Settings. Slide the 'Screen area' or 'Screen resolution' bar to a higher (More) or lower (Less) resolution. Though higher resolutions improve image quality, they also shrink icons, text, and other on-screen objects. Experiment to find the setting that's right for you. For most people, 1024 by 768 is the highest resolution they can read easily on a 17-inch CRT monitor.
Color depth: This setting is the number of colors that your graphics card supports. The more colors available for use, the more realistic the image, but again, the more colors on your screen, the greater the processing demands on your system.
Your graphics card's color-depth settings are listed in Display Properties under the Settings tab on the Colors drop-down menu ('Color quality' in Windows XP). Each is named for the number of bits it assigns to each pixel: True Color (also called 24-bit color) makes 16,777,216 colors available, while High Color (16 bits) supports 65,536 colors. At lower than 16-bit color, your images may suffer. Many drivers no longer offer 8-bit (256 colors) or 15-bit (32,536 colors) settings.
New PCs often support 32-bit color, which offers the same 16 million-plus colors as True Color. The extra 8 bits control image opacity. This is useful in fast-moving 3D games but of little help in most business apps.
Refresh rate: Expressed in hertz, or cycles per second, this tells how often the phosphors that glow to create an image on a CRT screen are re-energized--that is, the times per second that the screen's image is redrawn. A refresh rate that's too low can cause annoying screen flicker. Even if you don't see the flicker, slow refreshes can cause eyestrain and headaches.
Conventional wisdom says your refresh rate should be no less than 72 Hz. Some experts say the minimum rate is 80 Hz. Try different refresh rates until you find the one that works for you. Note that if your refresh rate is too high, you could lose image opacity. Still, few of us can discern rates higher than 85 Hz.
To adjust your screen's refresh rate in Windows XP, open Display Properties and click Settings, Advanced, Adapter, List All Modes. Pick a combination of refresh rate, screen resolution, and color depth from the list of supported values.
To change your refresh rate in other versions of Windows, open Display Properties and then click Settings, Advanced, Adapter. Select an option from the 'Refresh rate' drop-down menu. If you see no options there, however, your graphics board and monitor don't support multiple refresh rates.
Even in that case, you might be able to increase your display screen's refresh rate by decreasing your screen resolution or your color depth. All three specs compete for graphics-processing capacity, so if your graphics system is running at its maximum, try increasing one setting and lowering another. For example, reducing color depth from 32-bit to 16-bit--no big deal if you never look at photos--may free up enough processing power to let you bump your refresh rate from an annoying 60 Hz to an eye-pleasing 72 Hz. Or you may be able to increase resolution from 800 by 600 to 1024 by 768. There's no guarantee, but these tricks might work.
Windows automatically sets your screen refresh rate to a safe but slow 60 Hz when it can't detect your monitor. To confirm that Windows XP correctly recognizes your monitor, open Display Properties and click Settings, Advanced, Monitor. If your monitor isn't listed under 'Monitor type', download and install the device's driver from the manufacturer's Web site.
In other versions of Windows, verify that Plug and Play is enabled. Make sure your monitor is listed under 'Display' on the Settings tab in Display Properties, and then click Advanced, Monitor. Verify that Automatically detect Plug & Play monitors is checked. If it isn't, select it and then reset your refresh rate to a level that is higher than Windows' default 60 Hz.
DirectX: This Windows component controls multimedia functions. To check your current DirectX version, click Start, Run, type dxdiag, and click OK. Choose the System tab and look under System Information on the lower part of the screen. Look for the latest DirectX version; if you don't have it, download it from Microsoft.
Touch Those Dials!
You can improve the image quality of your monitor via its built-in controls. The options vary by display manufacturer and model, but you should find brightness and other controls on most monitors.
Adjust brightness and contrast: Use this gray-scale image on your screen. Be sure you can see as many of the image's 17 shades as possible; the two or three darkest may be tough to view in a bright room.
Center and align: Few monitors come straight from the factory with optimal screen geometry. Use your monitor's screen-placement controls to center your displayed image, keep its edges straight, and minimize unfilled screen space.
To avoid eyestrain and other physical problems, put the top of the screen at eye level and at arm's length from your head (your best position may vary). Orient your screen to avoid glare from lights and windows.
Clean it: Gently wipe your screen with a soft, lightly moistened cloth. Unless the monitor is really filthy, avoid cleaning solutions, which can damage delicate screen coatings. Clean the dust from the cooling vents in the monitor's case; overheating is your display's lethal enemy.
Graphics Triage:
If your screen goes blank, the problem is likely due to a disconnected monitor cable, an unplugged power cord, or a too-low brightness setting. Monitors do die, however. If you smell something burning or hear popping sounds, your monitor could be failing--turn it off immediately. Monitors have been known to spontaneously combust.
Corrupted graphics drivers cause all kinds of PC problems. To check for a damaged graphics driver, install the plain-vanilla VGA driver that comes with Windows. If your troubles disappear, reinstall a clean copy of the monitor's original driver, or an updated version.
Some graphics boards don't work or play well with other hardware devices. Windows allows you to disable graphics-acceleration functions for the sake of compatibility. Open Display Properties and click Settings, Advanced, Troubleshooting in Windows XP and 2000, or Settings, Advanced, Performance in Windows 98 and Me. Move the slider under 'Hardware acceleration' to the left to disable your graphics acceleration.
A shaking or shimmering image on your screen may be due to nearby magnetic fields. Keep clocks and other appliances that use electric motors, and those that use a lot of electricity (such as microwave ovens), far from your monitor. Power lines behind walls can cause interference, so try moving the display away from nearby walls.
If your screen image is washed in blue, red, or green, check for a loose cable connecting your graphics board to your monitor. Look for bent pins inside the cable connector; you can often straighten them with needle-nose pliers. If on-screen objects have a rainbow cast, some monitors have convergence controls that you can use to tune the image.
Living in a Flat World:
Notebook displays are fine-tuned in the factory to work with the system's other hardware; your desktop's flat panel likely isn't. And tuning an LCD isn't the same as tuning a CRT monitor. If both your LCD and graphics board support Digital Visual Interface connections, make sure they're using them. Vendors don't always ship a DVI cable with cards that produce both analog and digital signals, so you'll have to replace the analog cable. If your display supports DVI but your graphics card doesn't, upgrade your card.
Make sure your LCD is set to its native resolution. Many flat-panel displays don't look good at other resolutions. Unfortunately, some 15-inch LCDs have a native resolution of 1024 by 768 dpi, which makes text minuscule. The solution is to open Display Properties, click Appearance, and change the setting on the 'Font size' drop-down menu to increase the size of your text. (Most browsers include their own font-size settings.)
In Windows XP, open Display Properties, click Appearance, Effects, and check Use the following method to smooth screen fonts. Select ClearType to see a big improvement in the appearance of many of your fonts.
Thursday, September 13, 2007
Tips And Tricks, Windows XP - Part 2
@SPEED UP BROWSING WITH DNS CATCH:
When you connect to a web site your computer sends information back and forth, this is obvious. Some of this information deals with resolving the site name to an IP address, the stuff that tcp/ip really deals with, not words. This is DNS information and is used so that you will not need to ask
for the site location each and every time you visit the site. Although WinXP and win2000 has a pretty efficient DNS cache, you can increase its
overall performance by increasing its size. You can do this with the registry entries below:
*****************************************
Windows Registry Editor Version 5.00
[HKEY_LOCAL_MACHINE\SYSTEM\CurrentControlSet\Services\
Dnscache\Parameters]
"CacheHashTableBucketSize"=dword:00000001
"CacheHashTableSize"=dword:00000180
"MaxCacheEntryTtlLimit"=dword:0000fa00
"MaxSOACacheEntryTtlLimit"=dword:0000012d
*****************************************
1. Make a new text file and rename it to dnscache.reg.
2. Then copy and paste the above into it and save it.
3. Then merge it into the registry by double clicking on dnscache.reg
@SPEED UP DETAILED VIEW IN WINDOWS EXPLORER:
If you like to view your files in Windows Explorer using the "Details" view here is a tweak to speed up the listing of file attributes: Viewing files in
Windows Explorer using the "Details" mode shows various attributes associated with each file shown. Some of these must be retrieved from the individual files when you click on the directory for viewing. For a directory with numerous and relatively large files (such as a folder in which one stores media, eg: *.mp3's, *.avi's etc.)
Windows Explorer lags as it reads through each one. Here's how to disable viewing of unwanted attributes and speed up file browsing:
1. Open Windows Explorer
2. Navigate to the folder which you wish to optimize.
3. In "Details" mode right click the bar at the top which displays the names of the attribute columns.
4. Uncheck any that are unwanted/unneeded.
Explorer will apply your preferences immediately, and longs lists of unnecessary attributes will not be displayed.
Likewise, one may choose to display any information which is regarded as needed, getting more out of Explorer.
@DELETING My eBooks AND SPECIALS FOLDER IN MY DOCUMENTS:
1. Click Start
2.Go to Run and type: regsvr32 /u mydocs.dll
3. Now delete them.
@ADMINISTRATOR IN WELCOME SCREEN:
When you install Windows XP an Administrator Account is created (you are asked to supply an administrator password), but the "Welcome Screen" does not give you the option to log on as Administrator unless you boot up in Safe Mode.
First you must ensure that the Administrator Account is enabled:
1. open Control Panel
2. open Administrative Tools
3. open Local Security Policy
4. expand Local Policies
5. click on Security Options
6. ensure that Accounts: Administrator account status is enabled.
Then follow the instructions below
1. open Control Panel
2. open User Accounts
3. click Change the way users log on or log off
4. untick Use the Welcome Screen
5. click Apply Options
You will now be able to log on to Windows XP as Administrator in Normal Mode.
@OUTLOOK EXPRESS WINDOWS TITLE TWEAKS:
Change the window title of Outlook Express to anything you want!
In regedt32 and navigate to HKEY_CURRENT_USER\Identities\{EE383506-901D-43C6-8E40-9A61901DF7CC}\
Software\Microsoft\Outlook
Express\5.0. Add a new string key called WindowTitle and make its value the desired window title. Then close the registry editor, and restart
Outlook Express (if it's running.) Your new title now shows up in the title bar!
@CHANGING THE WINDOWS MEDIA PLAYER TITLEBAR:
This is a per-user tweak.
1. Open RegEdit.
2. Browse to the following key:
HKEY_USERS\S-1-5-21-xxxxxxxxx-xxxxxxxxx-xxxxxxxxxx-xxxx\
Software\Policies\Microsoft\WindowsMediaPlayer(the x's will vary from computer to computer, it's the key without the "_Classes" at the end)
3. Create the following String, "TitleBar" , the value of this will now become the TitleBar of Windows Media Player.
@TURN OFF INDEXING TO SPEED UP XP:
Windows XP keeps a record of all files on the hard disk so when you do a search on the hard drive it is faster. There is a downside to this and because the computer has to index all files, it will slow down normal file commands like open, close, etc. If you do not do a whole lot of searches on your hard drive then I suggest turning this feature off:
1. Control Panel
2. Administrative Tools
3. Services
4. Disable Indexing Services
Enjoy, Fast Browsing!!!!!!!!!!
@SPEED UP BOOT BY DISABLING UNUSED PORTS:
You may have tried many tweaks like modifying windowsXP start-up applications, prefetches, unload DLLs method,etc. And yes those methods do work for me.
I have just accidentally found out another way to give you an extra boost in windows XP's boot performance. This is done by disabling your unused devices in Device Manager. for example, if you don't have input devices that are connected to one of your USBs or COM ports, disabling them will give you an extra performance boost in booting.
Go to Control Panel -> System -> Hardware tab -> device manager
Disable devices that you don't use for your PC and then restart.
@CD ROM STOPS AUTOPLAYING/AUTORUN:
If the AutoPlay Tab has disappeared in My Computer, Devices With Removable Storage, Right Click on CDROM, Properties, Autoplay,Choose a appropriate action for yourself.
Now, Go to Control Panel, Administrative Tools, Services. The service: "Shell Hardware Detection" has been set to Manual or Disabled.
Return this service to "Automatic".
WISE WORDS:Delay of justice is injustice.
When you connect to a web site your computer sends information back and forth, this is obvious. Some of this information deals with resolving the site name to an IP address, the stuff that tcp/ip really deals with, not words. This is DNS information and is used so that you will not need to ask
for the site location each and every time you visit the site. Although WinXP and win2000 has a pretty efficient DNS cache, you can increase its
overall performance by increasing its size. You can do this with the registry entries below:
*****************************************
Windows Registry Editor Version 5.00
[HKEY_LOCAL_MACHINE\SYSTEM\CurrentControlSet\Services\
Dnscache\Parameters]
"CacheHashTableBucketSize"=dword:00000001
"CacheHashTableSize"=dword:00000180
"MaxCacheEntryTtlLimit"=dword:0000fa00
"MaxSOACacheEntryTtlLimit"=dword:0000012d
*****************************************
1. Make a new text file and rename it to dnscache.reg.
2. Then copy and paste the above into it and save it.
3. Then merge it into the registry by double clicking on dnscache.reg
@SPEED UP DETAILED VIEW IN WINDOWS EXPLORER:
If you like to view your files in Windows Explorer using the "Details" view here is a tweak to speed up the listing of file attributes: Viewing files in
Windows Explorer using the "Details" mode shows various attributes associated with each file shown. Some of these must be retrieved from the individual files when you click on the directory for viewing. For a directory with numerous and relatively large files (such as a folder in which one stores media, eg: *.mp3's, *.avi's etc.)
Windows Explorer lags as it reads through each one. Here's how to disable viewing of unwanted attributes and speed up file browsing:
1. Open Windows Explorer
2. Navigate to the folder which you wish to optimize.
3. In "Details" mode right click the bar at the top which displays the names of the attribute columns.
4. Uncheck any that are unwanted/unneeded.
Explorer will apply your preferences immediately, and longs lists of unnecessary attributes will not be displayed.
Likewise, one may choose to display any information which is regarded as needed, getting more out of Explorer.
@DELETING My eBooks AND SPECIALS FOLDER IN MY DOCUMENTS:
1. Click Start
2.Go to Run and type: regsvr32 /u mydocs.dll
3. Now delete them.
@ADMINISTRATOR IN WELCOME SCREEN:
When you install Windows XP an Administrator Account is created (you are asked to supply an administrator password), but the "Welcome Screen" does not give you the option to log on as Administrator unless you boot up in Safe Mode.
First you must ensure that the Administrator Account is enabled:
1. open Control Panel
2. open Administrative Tools
3. open Local Security Policy
4. expand Local Policies
5. click on Security Options
6. ensure that Accounts: Administrator account status is enabled.
Then follow the instructions below
1. open Control Panel
2. open User Accounts
3. click Change the way users log on or log off
4. untick Use the Welcome Screen
5. click Apply Options
You will now be able to log on to Windows XP as Administrator in Normal Mode.
@OUTLOOK EXPRESS WINDOWS TITLE TWEAKS:
Change the window title of Outlook Express to anything you want!
In regedt32 and navigate to HKEY_CURRENT_USER\Identities\{EE383506-901D-43C6-8E40-9A61901DF7CC}\
Software\Microsoft\Outlook
Express\5.0. Add a new string key called WindowTitle and make its value the desired window title. Then close the registry editor, and restart
Outlook Express (if it's running.) Your new title now shows up in the title bar!
@CHANGING THE WINDOWS MEDIA PLAYER TITLEBAR:
This is a per-user tweak.
1. Open RegEdit.
2. Browse to the following key:
HKEY_USERS\S-1-5-21-xxxxxxxxx-xxxxxxxxx-xxxxxxxxxx-xxxx\
Software\Policies\Microsoft\WindowsMediaPlayer(the x's will vary from computer to computer, it's the key without the "_Classes" at the end)
3. Create the following String, "TitleBar" , the value of this will now become the TitleBar of Windows Media Player.
@TURN OFF INDEXING TO SPEED UP XP:
Windows XP keeps a record of all files on the hard disk so when you do a search on the hard drive it is faster. There is a downside to this and because the computer has to index all files, it will slow down normal file commands like open, close, etc. If you do not do a whole lot of searches on your hard drive then I suggest turning this feature off:
1. Control Panel
2. Administrative Tools
3. Services
4. Disable Indexing Services
Enjoy, Fast Browsing!!!!!!!!!!
@SPEED UP BOOT BY DISABLING UNUSED PORTS:
You may have tried many tweaks like modifying windowsXP start-up applications, prefetches, unload DLLs method,etc. And yes those methods do work for me.
I have just accidentally found out another way to give you an extra boost in windows XP's boot performance. This is done by disabling your unused devices in Device Manager. for example, if you don't have input devices that are connected to one of your USBs or COM ports, disabling them will give you an extra performance boost in booting.
Go to Control Panel -> System -> Hardware tab -> device manager
Disable devices that you don't use for your PC and then restart.
@CD ROM STOPS AUTOPLAYING/AUTORUN:
If the AutoPlay Tab has disappeared in My Computer, Devices With Removable Storage, Right Click on CDROM, Properties, Autoplay,Choose a appropriate action for yourself.
Now, Go to Control Panel, Administrative Tools, Services. The service: "Shell Hardware Detection" has been set to Manual or Disabled.
Return this service to "Automatic".
WISE WORDS:Delay of justice is injustice.
Wednesday, September 12, 2007
Tips And Tricks, Windows XP - Part 1
@STOP NOISE IN COPYING AUDIO CD:
When using 3rd party burning software (eg, Nero Burning Rom) to copy audio CD,some noise may be heard at the end of each track. To prevent this,try the following method:
1. Enter System Properties\device manager
2. Select IDE ATA/ATAPI controllers
3. Double click on thee CD writer IDE channel
4. Select advance setting
5. Change the transfer mode to 'PIO Only'
6. Restart Computer
You are done!!!
@RESTORING MEDIA PLAYER:
To restore Windows Media Player insert the the XP CD into the CD drive (if it autostarts click exit). Open a command window and type the following :
rundll32.exe setupapi,InstallHinfSection InstallWMP7 132 c:\windows\inf\wmp.inf
@RESTORING ACCESS TO CD ROM'S:
If you removed CD Burning software, or for some other mystical reason, can not longer access your CD ROM's, in most cases following registry keys needs to be deleted: Locate and delete the UpperFilters and LowerFilters values under the following key in the registry:
HKEY_LOCAL_MACHINE\SYSTEM\CurrentControlSet\Control\Class\
{4D36E965-E325-11CE-BFC1-08002BE10318}
Your CD ROM is good boy now!!!
@REMOVING USERNAME IN THE STARTMENU:
Open Registry Editor Then Go To :
1. "HKEY_CURRENT_USER\Software\Microsoft\Windows\CurrentVersion\Policies\Explorer"
2. On The Right, Make A New Entry With Right Click On Your Mouse Then Choose "New | DWORD Value"
3. Change The Entry's Name Into "NoUserNameInStartMenu", Double Click In The New Entry And Fill The "Value Data" With "1".
4. Press OK, Exit From The Registry Editor.
5. Restart Your Computer.
Oops!!! Where is your little picture in the start menu??!!!!!
@INTERNET EXPLORER LIGHTING-FAST STARTUP:
Isn't it annoying when you want to go to a new website, or any other site but your homepage, and you have to wait for your 'home' to load? This tweak tells Internet Explorer to simply 'run', without loading any webpages. (If you use a 'blank' page, that is still a page, and slows access. Notice the 'about:blank' in the address bar. The blank html page must still be loaded..). To load IE with 'nothing' [nothing is different than blank]:
1. Right-click on any shortcut you have to IE
[You should create a shortcut out of your desktop IE icon, and delete the original icon]
2. Click Properties
3. Add ' -nohome' [with a space before the dash] after the endquotes in the Target field.
4. Click OK
Fire up IE from your modified shortcut, and be amazed by how fast you are able to use IE!
Voillaa!!!!!!!!
@ORIGINAL WALLPAPERS:
This is more of a fun tweak than it is useful. Go to run, type regedit press ok. when that comes up go to HKEY_CURRENT_USER>Control Panel>Desktop
Now find the orginalwallpaper, right click and select modify.In the text box type the path to the file you want to be your orginal desktop wallpaper.
@REMOVE PAST ITEMS ICONS IN TASKBAR.
Some times When you check your TasKbar properties or when you hide or unhide icons you can see old icons from Uninstalled or old programs you dont have anymore. This Tweak will help you how to get rid of this problem. Here is how to clear the past items or icons list in the TaskBar, perform the following steps:
1.Open Regedit Navigate to:
HKEY_CURRENT_USER\Software\Microsoft\Windows\CurrentVersion\Explorer\TrayNotify
2.Delete the IconStreams and PastIconsStream values
3.Open Task Manager, click the Processes tab, click Explorer.exe , and then click End Process .
4.In Task Manager, click File , click New Task , type explorer , and then click OK .
continue....
When using 3rd party burning software (eg, Nero Burning Rom) to copy audio CD,some noise may be heard at the end of each track. To prevent this,try the following method:
1. Enter System Properties\device manager
2. Select IDE ATA/ATAPI controllers
3. Double click on thee CD writer IDE channel
4. Select advance setting
5. Change the transfer mode to 'PIO Only'
6. Restart Computer
You are done!!!
@RESTORING MEDIA PLAYER:
To restore Windows Media Player insert the the XP CD into the CD drive (if it autostarts click exit). Open a command window and type the following :
rundll32.exe setupapi,InstallHinfSection InstallWMP7 132 c:\windows\inf\wmp.inf
@RESTORING ACCESS TO CD ROM'S:
If you removed CD Burning software, or for some other mystical reason, can not longer access your CD ROM's, in most cases following registry keys needs to be deleted: Locate and delete the UpperFilters and LowerFilters values under the following key in the registry:
HKEY_LOCAL_MACHINE\SYSTEM\CurrentControlSet\Control\Class\
{4D36E965-E325-11CE-BFC1-08002BE10318}
Your CD ROM is good boy now!!!
@REMOVING USERNAME IN THE STARTMENU:
Open Registry Editor Then Go To :
1. "HKEY_CURRENT_USER\Software\Microsoft\Windows\CurrentVersion\Policies\Explorer"
2. On The Right, Make A New Entry With Right Click On Your Mouse Then Choose "New | DWORD Value"
3. Change The Entry's Name Into "NoUserNameInStartMenu", Double Click In The New Entry And Fill The "Value Data" With "1".
4. Press OK, Exit From The Registry Editor.
5. Restart Your Computer.
Oops!!! Where is your little picture in the start menu??!!!!!
@INTERNET EXPLORER LIGHTING-FAST STARTUP:
Isn't it annoying when you want to go to a new website, or any other site but your homepage, and you have to wait for your 'home' to load? This tweak tells Internet Explorer to simply 'run', without loading any webpages. (If you use a 'blank' page, that is still a page, and slows access. Notice the 'about:blank' in the address bar. The blank html page must still be loaded..). To load IE with 'nothing' [nothing is different than blank]:
1. Right-click on any shortcut you have to IE
[You should create a shortcut out of your desktop IE icon, and delete the original icon]
2. Click Properties
3. Add ' -nohome' [with a space before the dash] after the endquotes in the Target field.
4. Click OK
Fire up IE from your modified shortcut, and be amazed by how fast you are able to use IE!
Voillaa!!!!!!!!
@ORIGINAL WALLPAPERS:
This is more of a fun tweak than it is useful. Go to run, type regedit press ok. when that comes up go to HKEY_CURRENT_USER>Control Panel>Desktop
Now find the orginalwallpaper, right click and select modify.In the text box type the path to the file you want to be your orginal desktop wallpaper.
@REMOVE PAST ITEMS ICONS IN TASKBAR.
Some times When you check your TasKbar properties or when you hide or unhide icons you can see old icons from Uninstalled or old programs you dont have anymore. This Tweak will help you how to get rid of this problem. Here is how to clear the past items or icons list in the TaskBar, perform the following steps:
1.Open Regedit Navigate to:
HKEY_CURRENT_USER\Software\Microsoft\Windows\CurrentVersion\Explorer\TrayNotify
2.Delete the IconStreams and PastIconsStream values
3.Open Task Manager, click the Processes tab, click Explorer.exe , and then click End Process .
4.In Task Manager, click File , click New Task , type explorer , and then click OK .
continue....
Thursday, September 6, 2007
How to Add an Option to Print the Contents of a Folder
Would you like to be able to right click any folder in Explorer and print its contents? You can add this option to the context menu by following these steps:
First, you need to create a batch file called Printdir.bat. Open Notepad or another text editor and type (or cut and paste) this text:
@echo off
dir %1 /-p /o:gn > "%temp%\Listing"
start /w notepad /p "%temp%\Listing"
del "%temp%\Listing"
exit
Now, in the Save As dialog box, type "%windir%\Printdir.bat" (without the quotation marks) and click the Save button.
Click Start, Control Panel, Folder Options.
Click the File Types tab, and then click File Folder.
Click the Advanced button.
Click the New button.
In the Action box, type "Print Directory Listing" (without the quotation marks).
In the Application used to perform action box, type "Printdir.bat" (without the quotation marks).
Click OK in all three dialog boxes to close the dialog boxes.
You're not quite finished yet! Now you need to edit the Registry, so open your favorite Registry Editor.
Navigate to HKEY CLASSES ROOT\Directory\shell.
Right click on "default" and select Modify.
In the File Data box, type "none" (without the quotation marks).
Click OK and close the Registry Editor.
Now when you right click a folder, you'll see the option to Print Directory Listing. Selecting it will print the contents of the folder.
Who needs a stinking program to print a folder directory? :-)
WISE WORDS:An open purse tempts a saint.
First, you need to create a batch file called Printdir.bat. Open Notepad or another text editor and type (or cut and paste) this text:
@echo off
dir %1 /-p /o:gn > "%temp%\Listing"
start /w notepad /p "%temp%\Listing"
del "%temp%\Listing"
exit
Now, in the Save As dialog box, type "%windir%\Printdir.bat" (without the quotation marks) and click the Save button.
Click Start, Control Panel, Folder Options.
Click the File Types tab, and then click File Folder.
Click the Advanced button.
Click the New button.
In the Action box, type "Print Directory Listing" (without the quotation marks).
In the Application used to perform action box, type "Printdir.bat" (without the quotation marks).
Click OK in all three dialog boxes to close the dialog boxes.
You're not quite finished yet! Now you need to edit the Registry, so open your favorite Registry Editor.
Navigate to HKEY CLASSES ROOT\Directory\shell.
Right click on "default" and select Modify.
In the File Data box, type "none" (without the quotation marks).
Click OK and close the Registry Editor.
Now when you right click a folder, you'll see the option to Print Directory Listing. Selecting it will print the contents of the folder.
Who needs a stinking program to print a folder directory? :-)
WISE WORDS:An open purse tempts a saint.
Wednesday, September 5, 2007
Make Your Cd Autorun
If you wanna make a autorun file for that CD you are ready to burn just read this...
1) You open notepad
2) now you writ: [autorun]
OPEN=INSTALL\Setup_filename.EXE
ICON=INSTALL\Setup_filename.EXE
Now save it but not as a .txt file but as a .inf file.
But remember! The "Setup_filename.EXE" MUST be replaced with the name of the setup file. And you also need to rember that it is not all of the setup files there are called '.exe but some are called '.msi
3) Now burn your CD with the autorun .inf file included.
4) Now set the CD in you CD drive and wait for the autorun to begin or if nothing happens just double-click on the CD drive in "This Computer"
1) You open notepad
2) now you writ: [autorun]
OPEN=INSTALL\Setup_filename.EXE
ICON=INSTALL\Setup_filename.EXE
Now save it but not as a .txt file but as a .inf file.
But remember! The "Setup_filename.EXE" MUST be replaced with the name of the setup file. And you also need to rember that it is not all of the setup files there are called '.exe but some are called '.msi
3) Now burn your CD with the autorun .inf file included.
4) Now set the CD in you CD drive and wait for the autorun to begin or if nothing happens just double-click on the CD drive in "This Computer"
Boot Winindows XP Fast
Follow the following steps:
1. Open notepad.exe, type "del c:\windows\prefetch\ntosboot-*.* /q" (without the quotes) & save as "ntosboot.bat" in c:\
2. From the Start menu, select "Run..." & type "gpedit.msc".
3. Double click "Windows Settings" under "Computer Configuration" and double click again on "Shutdown" in the right window.
4. In the new window, click "add", "Browse", locate your "ntosboot.bat" file & click "Open".
5. Click "OK", "Apply" & "OK" once again to exit.
6. From the Start menu, select "Run..." & type "devmgmt.msc".
7. Double click on "IDE ATA/ATAPI controllers"
8. Right click on "Primary IDE Channel" and select "Properties".
9. Select the "Advanced Settings" tab then on the device or 1 that doesn't have 'device type' greyed out select 'none' instead of 'autodetect' & click "OK".
10. Right click on "Secondary IDE channel", select "Properties" and repeat step 9.
11. Reboot your computer.
WISE WORDS:Brevity is the soul of wit.
1. Open notepad.exe, type "del c:\windows\prefetch\ntosboot-*.* /q" (without the quotes) & save as "ntosboot.bat" in c:\
2. From the Start menu, select "Run..." & type "gpedit.msc".
3. Double click "Windows Settings" under "Computer Configuration" and double click again on "Shutdown" in the right window.
4. In the new window, click "add", "Browse", locate your "ntosboot.bat" file & click "Open".
5. Click "OK", "Apply" & "OK" once again to exit.
6. From the Start menu, select "Run..." & type "devmgmt.msc".
7. Double click on "IDE ATA/ATAPI controllers"
8. Right click on "Primary IDE Channel" and select "Properties".
9. Select the "Advanced Settings" tab then on the device or 1 that doesn't have 'device type' greyed out select 'none' instead of 'autodetect' & click "OK".
10. Right click on "Secondary IDE channel", select "Properties" and repeat step 9.
11. Reboot your computer.
WISE WORDS:Brevity is the soul of wit.
XP Tweaks
-----------
STARTUP
-----------
Windows Prefetcher
******************
[HKEY_LOCAL_MACHINE \ SYSTEM \ CurrentControlSet \ Control \ Session Manager \ Memory Management \ PrefetchParameters]
Under this key there is a setting called EnablePrefetcher, the default setting of which is 3. Increasing this number to 5 gives the prefetcher system more system resources to prefetch application data for faster load times. Depending on the number of boot processes you run on your computer, you may get benefits from settings up to 9. However, I do not have any substantive research data on settings above 5 so I cannot verify the benefits of a higher setting. This setting also may effect the loading times of your most frequently launched applications. This setting will not take effect until after you reboot your system.
Master File Table Zone Reservation
**********************************
[HKEY_LOCAL_MACHINE \ SYSTEM \ CurrentControlSet \ Control \ FileSystem]
Under this key there is a setting called NtfsMftZoneReservation, the default setting of which is 1. The range of this value is from 1 to 4. The default setting reserves one-eighth of the volume for the MFT. A setting of 2 reserves one-quarter of the volume for the MFT. A setting of 3 for NtfsMftZoneReservation reserves three-eighths of the volume for the MFT and setting it to 4 reserves half of the volume for the MFT. Most users will never exceed one-quarter of the volume. I recommend a setting of 2 for most users. This allows for a "moderate number of files" commensurate with the number of small files included in most computer games and applications. Reboot after applying this tweak.
Optimize Boot Files
*******************
[HKEY_LOCAL_MACHINE \ SOFTWARE \ Microsoft \ Dfrg \ BootOptimizeFunction]
Under this key is a text value named Enable. A value of Y for this setting enables the boot files defragmenter. This setting defragments the boot files and may move the boot files to the beginning (fastest) part of the partition, but that last statement is unverified. Reboot after applying this tweak.
Optimizing Startup Programs [msconfig]
**************************************
MSConfig, similar to the application included in Win9x of the same name, allows the user to fine tune the applications that are launched at startup without forcing the user to delve deep into the registry. To disable some of the applications launched, load msconfig.exe from the run command line, and go to the Startup tab. From there, un-ticking the checkbox next to a startup item will stop it from launching. There are a few application that you will never want to disable (ctfmon comes to mind), but for the most part the best settings vary greatly from system to system.
As a good rule of thumb, though, it is unlikely that you will want to disable anything in the Windows directory (unless it's a third-party program that was incorrectly installed into the Windows directory), nor will you want to disable anything directly relating to your system hardware. The only exception to this is when you are dealing with software, which does not give you any added benefits (some OEM dealers load your system up with software you do not need). The nice part of msconfig is that it does not delete any of the settings, it simply disables them, and so you can go back and restart a startup application if you find that you need it. This optimization won't take effect until after a reboot.
Bootvis Application
*******************
The program was designed by Microsoft to enable Windows XP to cold boot in 30 seconds, return from hibernation in 20 seconds, and return from standby in 10 seconds. Bootvis has two extremely useful features. First, it can be used to optimize the boot process on your computer automatically. Second, it can be used to analyze the boot process for specific subsystems that are having difficulty loading. The first process specifically targets the prefetching subsystem, as well as the layout of boot files on the disk. When both of these systems are optimized, it can result in a significant reduction in the time it takes for the computer to boot.
Before attempting to use Bootvis to analyze or optimize the boot performance of your system, make sure that the task scheduler service has been enabled – the program requires the service to run properly. Also, close all open programs as well – using the software requires a reboot.
To use the software to optimize your system startup, first start with a full analysis of a fresh boot. Start Bootvis, go to the Tools menu, and select next boot. Set the Trace Repetition Settings to 2 repetitions, Start at 1, and Reboot automatically. Then set the trace into motion. The system will fully reboot twice, and then reopen bootvis and open the second trace file (should have _2 in the name). Analyze the graphs and make any changes that you think are necessary (this is a great tool for determining which startup programs you want to kill using msconfig). Once you have made your optimizations go to the Trace menu, and select the Optimize System item. This will cause the system to reboot and will then make some changes to the file structure on the hard drive (this includes a defragmentation of boot files and a shifting of their location to the fastest portion of the hard disk, as well as some other optimizations). After this is done, once again run a Trace analysis as above, except change the starting number to 3. Once the system has rebooted both times, compare the charts from the second trace to the charts for the fourth trace to show you the time improvement of the system's boot up.
The standard defragmenter included with Windows XP will not undo the boot optimizations performed by this application.
-----------------------------------
General Performance Tweaks
-----------------------------------
IRQ Priority Tweak
******************
[HKEY_LOCAL_MACHINE \ System \ CurrentControlSet \ Control \ PriorityControl]
You will need to create a new DWORD: IRQ#Priority (where # is the number of the IRQ you want to prioritize) and give it a setting of 1. This setting gives the requisite IRQ channel priority over the other IRQs on a software level. This can be extremely important for functions and hardware subsystems that need real-time access to other parts of the system. There are several different subsystems that might benefit from this tweak. Generally, I recommend giving either the System CMOS or the video card priority. The System CMOS generally has an IRQ setting of 8, and giving it priority enhances the I/O performance of the system. Giving priority to the video card can increase frame rates and make AGP more effective.
You can give several IRQs priority, but I am not entirely certain how the system interacts when several IRQs are given priority – it may cause random instabilities in the system, although it is more likely that there's a parsing system built into Windows XP to handle such an occurrence. Either way, I would not recommend it.
QoS tweak
*********
QoS (Quality of Service) is a networking subsystem which is supposed to insure that the network runs properly. The problem with the system is that it eats up 20% of the total bandwidth of any networking service on the computer (including your internet connection). If you are running XP Professional, you can disable the bandwidth quota reserved for the system using the Group Policy Editor [gpedit.msc].
You can run the group policy editor from the Run command line. To find the setting, expand "Local Computer Policy" and go to "Administrative Templates" under "Computer Configuration." Then find the "Network" branch and select "QoS Packet Scheduler." In the right hand box, double click on the "Limit Reservable Bandwidth." From within the Settings tab, enable the setting and then go into the "Bandwidth Limit %" and set it to 0%. The reason for this is that if you disable this setting, the computer defaults to 20%. This is true even when you aren't using QoS.
Free Idle Tasks Tweak
*********************
This tweak will free up processing time from any idle processes and allow it to be used by the foreground application. It is useful particularly if you are running a game or other 3D application. Create a new shortcut to "Rundll32.exe advapi32.dll,ProcessIdleTasks" and place it on your desktop. Double-click on it anytime you need all of your processing power, before opening the application.
Windows Indexing Services
Windows Indexing Services creates a searchable database that makes system searches for words and files progress much faster – however, it takes an enormous amount of hard drive space as well as a significant amount of extra CPU cycles to maintain the system. Most users will want to disable this service to release the resources for use by the system. To turn off indexing, open My Computer and right click on the drive on which you wish to disable the Indexing Service. Enter the drive's properties and under the general tab, untick the box for "Allow the Indexing Service to index this disk for fast file searching."
Priority Tweak
**************
[HKEY_LOCAL_MACHINE \ SYSTEM \ CurrentControlSet \ Control \ PriorityControl]
This setting effectively runs each instance of an application in its own process for significantly faster application performance and greater stability. This is extremely useful for users with stability problems, as it can isolate specific instances of a program so as not to bring down the entire application. And, it is particularly useful for users of Internet Explorer, for if a rogue web page crashes your browser window, it does not bring the other browser windows down with it. It has a similar effect on any software package where multiple instances might be running at once, such as Microsoft Word. The only problem is that this takes up significantly more memory, because such instances of a program cannot share information that is in active memory (many DLLs and such will have to be loaded into memory multiple times). Because of this, it is not recommended for anyone with less than 512 MB of RAM, unless they are running beta software (or have some other reason for needing the added stability).
There are two parts to this tweak. First is to optimize XP's priority control for the processes. Browse to HKEY_LOCAL_MACHINE \ SYSTEM \ CurrentControlSet \ Control \ PriorityControl and set the "Win32PrioritySeparation" DWORD to 38. Next, go into My Computer and under Tools, open the Folder Options menu. Select the View tab and check the "Launch folder windows in separate process" box. This setting actually forces each window into its own memory tread and gives it a separate process priority.
Powertweak application
**********************
xxx.powertweak.com
Powertweak is an application, which acts much like a driver for our chipsets. It optimizes the communication between the chipset and the CPU, and unlocks several "hidden" features of the chipset that can increase the speed of the system. Specifically, it tweaks the internal registers of the chipset and processor that the BIOS does not for better communication performance between subsystems. Supported CPUs and chipsets can see a significant increase in I/O bandwidth, increasing the speed of the entire system. Currently the application supports most popular CPUs and chipsets, although you will need to check the website for your specific processor/chipset combo – the programmer is working on integrating even more chipsets and CPUs into the software.
Offload Network Task Processing onto the Network Card
*****************************************************
[HKEY_LOCAL_MACHINE \ SYSTEM \ CurrentControlSet \ Services \ Tcpip \ Parameters]
Many newer network cards have the ability of taking some of the network processing load off of the processor and performing it right on the card (much like Hardware T&L on most new video cards). This can significantly lower the CPU processes needed to maintain a network connection, freeing up that processor time for other tasks. This does not work on all cards, and it can cause network connectivity problems on systems where the service is enabled but unsupported, so please check with your NIC manufacturer prior to enabling this tweak. Find the DWORD "DisableTaskOffload" and set the value to 0 (the default value is 1). If the key is not already available, create it.
Force XP to Unload DLLs
***********************
[HKEY_LOCAL_MACHINE \ SOFTWARE \ Microsoft \ Windows \ CurrentVersion \ Explorer]
"AlwaysUnloadDLL"=dword:00000001
XP has a bad habit of keeping dynamic link libraries that are no longer in use resident in memory. Not only do the DLLs use up precious memory space, but they also tend to cause stability problems in some systems. To force XP to unload any DLLs in memory when the application that called them is no longer in memory, browse to HKEY_LOCAL_MACHINE \ SOFTWARE \ Microsoft \ Windows \ CurrentVersion \ Explorer and find the DWORD "AlwaysUnloadDLL". You may need to create this key. Set the value to 1 to force the operating system to unload DLLs.
Give 16-bit apps their own separate processes
*********************************************
[HKEY_LOCAL_MACHINE \ SYSTEM \ CurrentControlSet \ Control \ WOW]
"DefaultSeparateVDM"="Yes"
By default, Windows XP will only open one 16-bit process and cram all 16-bit apps running on the system at a given time into that process. This simulates how MS-DOS based systems viewed systems and is necessary for some older applications that run together and share resources. However, most 16-bit applications work perfectly well by themselves and would benefit from the added performance and stability of their own dedicated resources. To force Windows XP to give each 16-bit application it's own resources, browse to HKEY_LOCAL_MACHINE \ SYSTEM \ CurrentControlSet \ Control \ WOW and find the String "DefaultSeparateVDM". If it is not there, you may need to create it. Set the value of this to Yes to give each 16-bit application its own process, and No to have the 16-bit application all run in the same memory space.
Disable User Tracking
*********************
[HKEY_CURRENT_USER \ Software \ Microsoft \ Windows \ CurrentVersion \ Policies \ Explorer]
"NoInstrumentation"=dword:00000001
The user tracking system built into Windows XP is useless to 99% of users (there are very few uses for the information collected other than for a very nosy system admin), and it uses up precious resources to boot, so it makes sense to disable this "feature" of Windows XP. To do so, browse to HKEY_CURRENT_USER \ Software \ Microsoft \ Windows \ CurrentVersion \ Policies \ Explorer and find the DWORD "NoInstrumentation". You may need to create this key if it is not there. The default setting is 0, but setting it to 1 will disable most of the user tracking features of the system.
Thumbnail Cache
***************
[HKEY_CURRENT_USER \ Software \ Microsoft \ Windows \ CurrentVersion \ Explorer \ Advanced]
"DisableThumbnailCache"=dword:00000001
Windows XP has a neat feature for graphic and video files that creates a "thumbnail" of the image or first frame of the video and makes it into an oversized icon for the file. There are two ways that Explorer can do this, it can create them fresh each time you access the folder or it can load them from a thumbnail cache. The thumbnail caches on systems with a large number of image and video files can become staggeringly large. To disable the Thumbnail Cache, browse to HKEY_CURRENT_USER \ Software \ Microsoft \ Windows \ CurrentVersion \ Explorer \ Advanced and find the DWORD "DisableThumbnailCache". You may need to create this key. A setting of 1 is recommended for systems where the number of graphic and video files is large, and a setting of 0 is recommended for systems not concerned about hard drive space, as loading the files from the cache is significantly quicker than creating them from scratch each time a folder is accessed.
STARTUP
-----------
Windows Prefetcher
******************
[HKEY_LOCAL_MACHINE \ SYSTEM \ CurrentControlSet \ Control \ Session Manager \ Memory Management \ PrefetchParameters]
Under this key there is a setting called EnablePrefetcher, the default setting of which is 3. Increasing this number to 5 gives the prefetcher system more system resources to prefetch application data for faster load times. Depending on the number of boot processes you run on your computer, you may get benefits from settings up to 9. However, I do not have any substantive research data on settings above 5 so I cannot verify the benefits of a higher setting. This setting also may effect the loading times of your most frequently launched applications. This setting will not take effect until after you reboot your system.
Master File Table Zone Reservation
**********************************
[HKEY_LOCAL_MACHINE \ SYSTEM \ CurrentControlSet \ Control \ FileSystem]
Under this key there is a setting called NtfsMftZoneReservation, the default setting of which is 1. The range of this value is from 1 to 4. The default setting reserves one-eighth of the volume for the MFT. A setting of 2 reserves one-quarter of the volume for the MFT. A setting of 3 for NtfsMftZoneReservation reserves three-eighths of the volume for the MFT and setting it to 4 reserves half of the volume for the MFT. Most users will never exceed one-quarter of the volume. I recommend a setting of 2 for most users. This allows for a "moderate number of files" commensurate with the number of small files included in most computer games and applications. Reboot after applying this tweak.
Optimize Boot Files
*******************
[HKEY_LOCAL_MACHINE \ SOFTWARE \ Microsoft \ Dfrg \ BootOptimizeFunction]
Under this key is a text value named Enable. A value of Y for this setting enables the boot files defragmenter. This setting defragments the boot files and may move the boot files to the beginning (fastest) part of the partition, but that last statement is unverified. Reboot after applying this tweak.
Optimizing Startup Programs [msconfig]
**************************************
MSConfig, similar to the application included in Win9x of the same name, allows the user to fine tune the applications that are launched at startup without forcing the user to delve deep into the registry. To disable some of the applications launched, load msconfig.exe from the run command line, and go to the Startup tab. From there, un-ticking the checkbox next to a startup item will stop it from launching. There are a few application that you will never want to disable (ctfmon comes to mind), but for the most part the best settings vary greatly from system to system.
As a good rule of thumb, though, it is unlikely that you will want to disable anything in the Windows directory (unless it's a third-party program that was incorrectly installed into the Windows directory), nor will you want to disable anything directly relating to your system hardware. The only exception to this is when you are dealing with software, which does not give you any added benefits (some OEM dealers load your system up with software you do not need). The nice part of msconfig is that it does not delete any of the settings, it simply disables them, and so you can go back and restart a startup application if you find that you need it. This optimization won't take effect until after a reboot.
Bootvis Application
*******************
The program was designed by Microsoft to enable Windows XP to cold boot in 30 seconds, return from hibernation in 20 seconds, and return from standby in 10 seconds. Bootvis has two extremely useful features. First, it can be used to optimize the boot process on your computer automatically. Second, it can be used to analyze the boot process for specific subsystems that are having difficulty loading. The first process specifically targets the prefetching subsystem, as well as the layout of boot files on the disk. When both of these systems are optimized, it can result in a significant reduction in the time it takes for the computer to boot.
Before attempting to use Bootvis to analyze or optimize the boot performance of your system, make sure that the task scheduler service has been enabled – the program requires the service to run properly. Also, close all open programs as well – using the software requires a reboot.
To use the software to optimize your system startup, first start with a full analysis of a fresh boot. Start Bootvis, go to the Tools menu, and select next boot. Set the Trace Repetition Settings to 2 repetitions, Start at 1, and Reboot automatically. Then set the trace into motion. The system will fully reboot twice, and then reopen bootvis and open the second trace file (should have _2 in the name). Analyze the graphs and make any changes that you think are necessary (this is a great tool for determining which startup programs you want to kill using msconfig). Once you have made your optimizations go to the Trace menu, and select the Optimize System item. This will cause the system to reboot and will then make some changes to the file structure on the hard drive (this includes a defragmentation of boot files and a shifting of their location to the fastest portion of the hard disk, as well as some other optimizations). After this is done, once again run a Trace analysis as above, except change the starting number to 3. Once the system has rebooted both times, compare the charts from the second trace to the charts for the fourth trace to show you the time improvement of the system's boot up.
The standard defragmenter included with Windows XP will not undo the boot optimizations performed by this application.
-----------------------------------
General Performance Tweaks
-----------------------------------
IRQ Priority Tweak
******************
[HKEY_LOCAL_MACHINE \ System \ CurrentControlSet \ Control \ PriorityControl]
You will need to create a new DWORD: IRQ#Priority (where # is the number of the IRQ you want to prioritize) and give it a setting of 1. This setting gives the requisite IRQ channel priority over the other IRQs on a software level. This can be extremely important for functions and hardware subsystems that need real-time access to other parts of the system. There are several different subsystems that might benefit from this tweak. Generally, I recommend giving either the System CMOS or the video card priority. The System CMOS generally has an IRQ setting of 8, and giving it priority enhances the I/O performance of the system. Giving priority to the video card can increase frame rates and make AGP more effective.
You can give several IRQs priority, but I am not entirely certain how the system interacts when several IRQs are given priority – it may cause random instabilities in the system, although it is more likely that there's a parsing system built into Windows XP to handle such an occurrence. Either way, I would not recommend it.
QoS tweak
*********
QoS (Quality of Service) is a networking subsystem which is supposed to insure that the network runs properly. The problem with the system is that it eats up 20% of the total bandwidth of any networking service on the computer (including your internet connection). If you are running XP Professional, you can disable the bandwidth quota reserved for the system using the Group Policy Editor [gpedit.msc].
You can run the group policy editor from the Run command line. To find the setting, expand "Local Computer Policy" and go to "Administrative Templates" under "Computer Configuration." Then find the "Network" branch and select "QoS Packet Scheduler." In the right hand box, double click on the "Limit Reservable Bandwidth." From within the Settings tab, enable the setting and then go into the "Bandwidth Limit %" and set it to 0%. The reason for this is that if you disable this setting, the computer defaults to 20%. This is true even when you aren't using QoS.
Free Idle Tasks Tweak
*********************
This tweak will free up processing time from any idle processes and allow it to be used by the foreground application. It is useful particularly if you are running a game or other 3D application. Create a new shortcut to "Rundll32.exe advapi32.dll,ProcessIdleTasks" and place it on your desktop. Double-click on it anytime you need all of your processing power, before opening the application.
Windows Indexing Services
Windows Indexing Services creates a searchable database that makes system searches for words and files progress much faster – however, it takes an enormous amount of hard drive space as well as a significant amount of extra CPU cycles to maintain the system. Most users will want to disable this service to release the resources for use by the system. To turn off indexing, open My Computer and right click on the drive on which you wish to disable the Indexing Service. Enter the drive's properties and under the general tab, untick the box for "Allow the Indexing Service to index this disk for fast file searching."
Priority Tweak
**************
[HKEY_LOCAL_MACHINE \ SYSTEM \ CurrentControlSet \ Control \ PriorityControl]
This setting effectively runs each instance of an application in its own process for significantly faster application performance and greater stability. This is extremely useful for users with stability problems, as it can isolate specific instances of a program so as not to bring down the entire application. And, it is particularly useful for users of Internet Explorer, for if a rogue web page crashes your browser window, it does not bring the other browser windows down with it. It has a similar effect on any software package where multiple instances might be running at once, such as Microsoft Word. The only problem is that this takes up significantly more memory, because such instances of a program cannot share information that is in active memory (many DLLs and such will have to be loaded into memory multiple times). Because of this, it is not recommended for anyone with less than 512 MB of RAM, unless they are running beta software (or have some other reason for needing the added stability).
There are two parts to this tweak. First is to optimize XP's priority control for the processes. Browse to HKEY_LOCAL_MACHINE \ SYSTEM \ CurrentControlSet \ Control \ PriorityControl and set the "Win32PrioritySeparation" DWORD to 38. Next, go into My Computer and under Tools, open the Folder Options menu. Select the View tab and check the "Launch folder windows in separate process" box. This setting actually forces each window into its own memory tread and gives it a separate process priority.
Powertweak application
**********************
xxx.powertweak.com
Powertweak is an application, which acts much like a driver for our chipsets. It optimizes the communication between the chipset and the CPU, and unlocks several "hidden" features of the chipset that can increase the speed of the system. Specifically, it tweaks the internal registers of the chipset and processor that the BIOS does not for better communication performance between subsystems. Supported CPUs and chipsets can see a significant increase in I/O bandwidth, increasing the speed of the entire system. Currently the application supports most popular CPUs and chipsets, although you will need to check the website for your specific processor/chipset combo – the programmer is working on integrating even more chipsets and CPUs into the software.
Offload Network Task Processing onto the Network Card
*****************************************************
[HKEY_LOCAL_MACHINE \ SYSTEM \ CurrentControlSet \ Services \ Tcpip \ Parameters]
Many newer network cards have the ability of taking some of the network processing load off of the processor and performing it right on the card (much like Hardware T&L on most new video cards). This can significantly lower the CPU processes needed to maintain a network connection, freeing up that processor time for other tasks. This does not work on all cards, and it can cause network connectivity problems on systems where the service is enabled but unsupported, so please check with your NIC manufacturer prior to enabling this tweak. Find the DWORD "DisableTaskOffload" and set the value to 0 (the default value is 1). If the key is not already available, create it.
Force XP to Unload DLLs
***********************
[HKEY_LOCAL_MACHINE \ SOFTWARE \ Microsoft \ Windows \ CurrentVersion \ Explorer]
"AlwaysUnloadDLL"=dword:00000001
XP has a bad habit of keeping dynamic link libraries that are no longer in use resident in memory. Not only do the DLLs use up precious memory space, but they also tend to cause stability problems in some systems. To force XP to unload any DLLs in memory when the application that called them is no longer in memory, browse to HKEY_LOCAL_MACHINE \ SOFTWARE \ Microsoft \ Windows \ CurrentVersion \ Explorer and find the DWORD "AlwaysUnloadDLL". You may need to create this key. Set the value to 1 to force the operating system to unload DLLs.
Give 16-bit apps their own separate processes
*********************************************
[HKEY_LOCAL_MACHINE \ SYSTEM \ CurrentControlSet \ Control \ WOW]
"DefaultSeparateVDM"="Yes"
By default, Windows XP will only open one 16-bit process and cram all 16-bit apps running on the system at a given time into that process. This simulates how MS-DOS based systems viewed systems and is necessary for some older applications that run together and share resources. However, most 16-bit applications work perfectly well by themselves and would benefit from the added performance and stability of their own dedicated resources. To force Windows XP to give each 16-bit application it's own resources, browse to HKEY_LOCAL_MACHINE \ SYSTEM \ CurrentControlSet \ Control \ WOW and find the String "DefaultSeparateVDM". If it is not there, you may need to create it. Set the value of this to Yes to give each 16-bit application its own process, and No to have the 16-bit application all run in the same memory space.
Disable User Tracking
*********************
[HKEY_CURRENT_USER \ Software \ Microsoft \ Windows \ CurrentVersion \ Policies \ Explorer]
"NoInstrumentation"=dword:00000001
The user tracking system built into Windows XP is useless to 99% of users (there are very few uses for the information collected other than for a very nosy system admin), and it uses up precious resources to boot, so it makes sense to disable this "feature" of Windows XP. To do so, browse to HKEY_CURRENT_USER \ Software \ Microsoft \ Windows \ CurrentVersion \ Policies \ Explorer and find the DWORD "NoInstrumentation". You may need to create this key if it is not there. The default setting is 0, but setting it to 1 will disable most of the user tracking features of the system.
Thumbnail Cache
***************
[HKEY_CURRENT_USER \ Software \ Microsoft \ Windows \ CurrentVersion \ Explorer \ Advanced]
"DisableThumbnailCache"=dword:00000001
Windows XP has a neat feature for graphic and video files that creates a "thumbnail" of the image or first frame of the video and makes it into an oversized icon for the file. There are two ways that Explorer can do this, it can create them fresh each time you access the folder or it can load them from a thumbnail cache. The thumbnail caches on systems with a large number of image and video files can become staggeringly large. To disable the Thumbnail Cache, browse to HKEY_CURRENT_USER \ Software \ Microsoft \ Windows \ CurrentVersion \ Explorer \ Advanced and find the DWORD "DisableThumbnailCache". You may need to create this key. A setting of 1 is recommended for systems where the number of graphic and video files is large, and a setting of 0 is recommended for systems not concerned about hard drive space, as loading the files from the cache is significantly quicker than creating them from scratch each time a folder is accessed.
Tuesday, September 4, 2007
Windows uses 20% of your bandwidth
Windows uses 20% of your bandwidth. Here's how to Get it back
A nice little tweak for XP. Microsuft reserve 20% of your available bandwidth for their own purposes (suspect for updates and interrogating your machine etc..)
Here's how to get it back:
Click Start-->Run-->type "gpedit.msc" without the "
This opens the group policy editor. Then go to:
Local Computer Policy-->Computer Configuration-->Administrative Templates-->Network-->QOS Packet Scheduler-->Limit Reservable Bandwidth
Double click on Limit Reservable bandwidth. It will say it is not configured, but the truth is under the 'Explain' tab :
"By default, the Packet Scheduler limits the system to 20 percent of the bandwidth of a connection, but you can use this setting to override the default."
So the trick is to ENABLE reservable bandwidth, then set it to ZERO.
This will allow the system to reserve nothing, rather than the default 20%.
WISE WORDS:The better part of valour is discretion.
A nice little tweak for XP. Microsuft reserve 20% of your available bandwidth for their own purposes (suspect for updates and interrogating your machine etc..)
Here's how to get it back:
Click Start-->Run-->type "gpedit.msc" without the "
This opens the group policy editor. Then go to:
Local Computer Policy-->Computer Configuration-->Administrative Templates-->Network-->QOS Packet Scheduler-->Limit Reservable Bandwidth
Double click on Limit Reservable bandwidth. It will say it is not configured, but the truth is under the 'Explain' tab :
"By default, the Packet Scheduler limits the system to 20 percent of the bandwidth of a connection, but you can use this setting to override the default."
So the trick is to ENABLE reservable bandwidth, then set it to ZERO.
This will allow the system to reserve nothing, rather than the default 20%.
WISE WORDS:The better part of valour is discretion.
How To Remove Admin$ Shares
By default Windows 2000, Windows XP and WinNT automatically setup hidden admin shares (admin$, c$ and d$), this registry key will disable these hidden shares.
System Key: [HKEY_LOCAL_MACHINE\ System\ CurrentControlSet\ Services\ LanmanServer\ Parameters]
Value Name: AutoShareWks
Data Type: REG_DWORD (DWORD Value)
Value Data: (0 = disable shares, 1 = enable)
This registry key actually stops the recreation of the shares, therefore it may be necessary to delete the shares through the drive properties also or you can also remove the shares through the Computer Management Console.
1. In Control Panel, double-click Administrative Tools, and then double-click Computer Management.
2. Click to expand Shared Folders, and then click Shares.
3. In the Shared Folder column, right-click the share you want to delete, click Stop sharing, and then click OK.
Note : To remove the admin share for only the current session use the second method (Computer Management console), if you want a permanent removal, add the AutoShareWks registry.
System Key: [HKEY_LOCAL_MACHINE\ System\ CurrentControlSet\ Services\ LanmanServer\ Parameters]
Value Name: AutoShareWks
Data Type: REG_DWORD (DWORD Value)
Value Data: (0 = disable shares, 1 = enable)
This registry key actually stops the recreation of the shares, therefore it may be necessary to delete the shares through the drive properties also or you can also remove the shares through the Computer Management Console.
1. In Control Panel, double-click Administrative Tools, and then double-click Computer Management.
2. Click to expand Shared Folders, and then click Shares.
3. In the Shared Folder column, right-click the share you want to delete, click Stop sharing, and then click OK.
Note : To remove the admin share for only the current session use the second method (Computer Management console), if you want a permanent removal, add the AutoShareWks registry.
Subscribe to:
Posts (Atom)