Disable Windows XP Boot Logo:
It is possible to disable the XP splash screen, which will slightly speed up the
overall boot process. Be aware that removing the splash screen will also cause
you not to see any boot-up messages that might come up (chkdsk, convert ... ),
but if your system runs without any problems then it should not matter.
Edit boot.ini.
Add " /noguiboot" right after "/fastdetect".
Upon restarting, the splash screen will be gone. It can be re-enabled by removing the new switch.
Clean Your Prefetch to Improve Performance:
This is a unique technique for WinXP. We know that it is necessary to scrub registry and TEMP files for Win9X/ME/2000 periodically. Prefetch is a new and
very useful technique in Windows XP. However, after using XP some time, the prefetch directory can get full of junk and obsolete links in the Prefetch catalog, which can slow down your computer noticeably.
Open C (system drive):/windows/prefetch, delete those junk and obsolete files,
reboot. It is recommended that you do this every month.
Performance Increase Through My Computer:
Easy enough tweak to usually find out about it on your own, but still, some of
us still don't find it right away. So here it is:
Start > right-click on My Computer and select Properties.
Click on the "Advanced" tab.
See the "Performance" section? Click "Settings".
Disable the following:
Fade or slide menus into view
Fade or slide ToolTips into view
Fade out menu items after clicking
Show Shadows under menus
Slide open combo boxes
Slide taskbar buttons
Use a background image for each folder type
Use common tasks in folders
There, now Windows will still look nice and perform faster.
Easy Way to Adjust LargeSystemCache:
Normally, the tweak I've seen asks you to go into
HKLM\System\CurrentControlSet\Control\Session Manager\Memory Management and
change the value to either O or 1 to the adjustment the LargeSystemCache.
However, in Windows XP, all you have to do is:
Right-click My Computer.
Select Properties.
Click Advanced.
Choose Performance.
Click Advanced again.
Select either Programs or System Cache under Memory Usage.
Programs = 0 for the registry tweak equivalent
System Cache = 1 for the registry tweak equivalent
Startup & Shutdown Windows XP More Faster:
Like previous versions of windows, it takes long time to restart or shutdown
windows XP when the "Exit Windows" sound is enabled. To solve this problem you
must disable this useless sound.
Click Start button.
Go to settings > Control Panel > Sound, Speech and Audio devices > Sounds and
Audio Devices > Sounds.
Then under program events and windows menu click on "Exit Windows" sub-menu and
highlight it. Now from sounds you can select, choose "none" and then click
Apply and OK.
Now you should see some improvements when starting up or shutting down your system.
Turn Off Autoplay for Program CDs:
How can you stop Windows XP from launching program CDs?
Click Start, click Run, type GPEDIT.MSC to open Group Policy in the Microsoft
Management Console.
Double-click Computer Configuration, double-click Administrative templates,
double-click System, and then click Turn off autoplay.
The instructions on your screen describe how to configure this setting. Click
Properties to display the setting dialog.
Click Enabled, and choose CD-ROM drives, then click OK, to stop CD autoplay.
This setting does not prevent Autoplay for music CDs.
WISE WORDS:Clever men are good, but they are not the best.
Saturday, September 22, 2007
Friday, September 21, 2007
EASTER EGGS
Easter Eggs are undocumented, hidden tidbits in software, games, etc., that users accidentally stumble upon. These are fun to find, and thousands have already been documented. Easter eggs started out as a rebellion by early programmers who did not get credit for their work. That’s why some of them are as simple as a scrolling list of programmers. However, you also find some as advanced as a hidden car racing game in Excel 2000. So read on to explore the amusing world of Easter eggs.
Windows XP :
Unexpected shutdown:-You will be needing a software called Resource Hacker. Please refer my earlier post how-to-customise-your-start-button to know how to get Resource Hacker. Resource Hacker is a free tool to view and modify 32-bit Windows executables and resource files.
Open the msgina.dll file, located in the C:\Windows\System32 directory, in Resource Hacker. In the left pane, expand Dialog > 2210 > 1033. A dialog box opens at the bottom right hand of the screen. Notice the line just below the drop-down list entitled ‘Why did the computer shut down unexpectedly?!’
Solitare Win Win:-Force Solitare to win by a hack. Here’s how: Open sol.exe located in C:\Windows\System32\ using Resource Hacker. Expand String Table > 64 > 1033 in the left pane. Notice a line in the right pane saying 1010, “Force a win”. Use these numbers to enable the Easter Egg. Now expand Menu > 1 > 1033. Create a menu by typing the following just before the last closing brace:
POPUP “&Easter Egg”
{
MENUITEM "&Egg 1", 1008
MENUITEM "&Egg 2", 1009
MENUITEM "&Egg 3", 1010
}
Now, click the Compile Script button. Next, go to File > Save and save it in the original location, i.e., C:\Windows\System32\sol.exe. Also, replace sol.exe in the C:\Windows\System32\dllcache folder.
Now, a new menu Easter Egg appears with Egg 1, Egg 2 and Egg 3 as options. Click Egg 3 to force a win.
WinRAR:
Works on: WinRAR 3.20, 3.30
Falling Book:-WinRAR—the popular file compression utility—has a smart Easter Egg. Start WinRAR and go to Help > About. Next, click the book icon and it starts to fall. Further, if you press and hold [Shift], and click the logo, you see a small sail boat near the letter ‘R’. You may have to click a few times to see it , though.
Winamp:
Works on: Winamp 2.91:
Full Screen Credits:- Start Winamp, go to Winamp menu, click Nullsoft Winamp and switch to the Credits tab to see an animated screen. Now, hold down [Ctrl] + [Alt] and rightclick twice on the animation. This changes it to full-screen mode and alters the animation a bit. Repeat the same step to get back to normal mode. This full-screen animation depends on the active visualization. Change it to spectrum and then oscilloscope and repeat the process to see the difference.
Works On: Winamp 5:
Full Screen Credits:An animated logo comes up as you go to Winamp menu > Nullsoft Winamp and click the Winamp tab. Press and hold [Shift] and double-click on this logo to change it to an ASCII art.
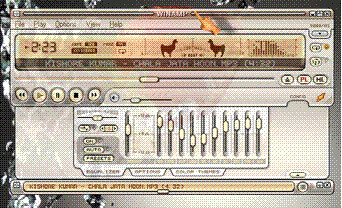 Dancing Llamas:This is one amusing egg in Winamp 5. First play a song with fast beats and heavy bass. Now, switch to the modern skin and resize the main window. Increase its width to make the Beat Analyzer visible to the left of the Spectrum Analyzer. Now, hold down [Shift] + [Ctrl] + [Alt] and click the centre of the Beat Analyzer. You’ll see two llamas striking their heads on the ground in tune with each beat.
Requires Windows XP or 2000,Winamp5
Transparent Beats:- Play a song that’s akin to the one described above. Now, ensure that the main window has the focus (its title bar should be brighter than that of other windows) and type ‘NULLSOFT’. However, since pressing [L] opens the File Open dialog, you’ll have to press [Esc] after each [L]. Hence, you end up typing [N] [U] [L] [Esc] [L] [Esc] [S] [O] [F] [T]. This done, you see that the main window goes transparent at each beat and then reverts to being opaque. This Easter egg consumes a lot of system resources. If your system runs slow, type NULLSOFT again to turn it off, or just exit Winamp and restart it. In Winamp 2.91, the title bar shows a funny change when you do the same thing. Try this and see yourself.
Windows 98:
Teapot:
Works on: Windows 98, Windows 95
Right-click on the desktop and select Properties. Go to the Screensaver tab and choose the Pipes screensaver. Click Settings and select Pipes as Multiple, Pipe Style as Traditional, Joint Type as Mixed and Surface Style as Solid. Click OK and then click the Preview button. Watch the screensaver churn out teapots instead of joints!
Windows 98 team:
Go to C:\Windows\ ApplicationData\ Microsoft\WELCOME and find the file Weldata.exe. Right-click it and select Create Shortcut. Now, rightclick the shortcut and select Properties. In the General tab, add Y o u _ a r e _ a_real_rascal to the Target text box, after the path, and choose Minimized in the Run combo box. Click OK, doubleclick the shortcut and enjoy!

Windows 98 team:
Version 2
Works on:Windows 98 There is another way to view
Windows 98 team credits. Double-click the clock in the system tray to bring up the Date and Time Properties. Click the Time Zone tab, hold down [Ctrl] and click and hold the mouse button on Cairo, Egypt. With the mouse button still pressed, drag the pointer to Baton Rouge, LA. Release the mouse button but keep [Ctrl] pressed. Click on Baton Rouge, LA again and drag it to Redmond, WA. The credits movie starts to play once you release the mouse button. You can also try doing the same thing in Regional Settings under Control Panel.


to be continued....
WISE WORDS:Constant practice often excels even talent.
Windows XP :
Unexpected shutdown:-You will be needing a software called Resource Hacker. Please refer my earlier post how-to-customise-your-start-button to know how to get Resource Hacker. Resource Hacker is a free tool to view and modify 32-bit Windows executables and resource files.
Open the msgina.dll file, located in the C:\Windows\System32 directory, in Resource Hacker. In the left pane, expand Dialog > 2210 > 1033. A dialog box opens at the bottom right hand of the screen. Notice the line just below the drop-down list entitled ‘Why did the computer shut down unexpectedly?!’
Solitare Win Win:-Force Solitare to win by a hack. Here’s how: Open sol.exe located in C:\Windows\System32\ using Resource Hacker. Expand String Table > 64 > 1033 in the left pane. Notice a line in the right pane saying 1010, “Force a win”. Use these numbers to enable the Easter Egg. Now expand Menu > 1 > 1033. Create a menu by typing the following just before the last closing brace:
POPUP “&Easter Egg”
{
MENUITEM "&Egg 1", 1008
MENUITEM "&Egg 2", 1009
MENUITEM "&Egg 3", 1010
}
Now, click the Compile Script button. Next, go to File > Save and save it in the original location, i.e., C:\Windows\System32\sol.exe. Also, replace sol.exe in the C:\Windows\System32\dllcache folder.
Now, a new menu Easter Egg appears with Egg 1, Egg 2 and Egg 3 as options. Click Egg 3 to force a win.
WinRAR:
Works on: WinRAR 3.20, 3.30
Falling Book:-WinRAR—the popular file compression utility—has a smart Easter Egg. Start WinRAR and go to Help > About. Next, click the book icon and it starts to fall. Further, if you press and hold [Shift], and click the logo, you see a small sail boat near the letter ‘R’. You may have to click a few times to see it , though.
Winamp:
Works on: Winamp 2.91:
Full Screen Credits:- Start Winamp, go to Winamp menu, click Nullsoft Winamp and switch to the Credits tab to see an animated screen. Now, hold down [Ctrl] + [Alt] and rightclick twice on the animation. This changes it to full-screen mode and alters the animation a bit. Repeat the same step to get back to normal mode. This full-screen animation depends on the active visualization. Change it to spectrum and then oscilloscope and repeat the process to see the difference.
Works On: Winamp 5:
Full Screen Credits:An animated logo comes up as you go to Winamp menu > Nullsoft Winamp and click the Winamp tab. Press and hold [Shift] and double-click on this logo to change it to an ASCII art.
Dancing Llamas:This is one amusing egg in Winamp 5. First play a song with fast beats and heavy bass. Now, switch to the modern skin and resize the main window. Increase its width to make the Beat Analyzer visible to the left of the Spectrum Analyzer. Now, hold down [Shift] + [Ctrl] + [Alt] and click the centre of the Beat Analyzer. You’ll see two llamas striking their heads on the ground in tune with each beat.Requires Windows XP or 2000,Winamp5
Transparent Beats:- Play a song that’s akin to the one described above. Now, ensure that the main window has the focus (its title bar should be brighter than that of other windows) and type ‘NULLSOFT’. However, since pressing [L] opens the File Open dialog, you’ll have to press [Esc] after each [L]. Hence, you end up typing [N] [U] [L] [Esc] [L] [Esc] [S] [O] [F] [T]. This done, you see that the main window goes transparent at each beat and then reverts to being opaque. This Easter egg consumes a lot of system resources. If your system runs slow, type NULLSOFT again to turn it off, or just exit Winamp and restart it. In Winamp 2.91, the title bar shows a funny change when you do the same thing. Try this and see yourself.
Windows 98:
Teapot:
Works on: Windows 98, Windows 95
Right-click on the desktop and select Properties. Go to the Screensaver tab and choose the Pipes screensaver. Click Settings and select Pipes as Multiple, Pipe Style as Traditional, Joint Type as Mixed and Surface Style as Solid. Click OK and then click the Preview button. Watch the screensaver churn out teapots instead of joints!
Windows 98 team:
Go to C:\Windows\ ApplicationData\ Microsoft\WELCOME and find the file Weldata.exe. Right-click it and select Create Shortcut. Now, rightclick the shortcut and select Properties. In the General tab, add Y o u _ a r e _ a_real_rascal to the Target text box, after the path, and choose Minimized in the Run combo box. Click OK, doubleclick the shortcut and enjoy!
Windows 98 team:
Version 2
Works on:Windows 98 There is another way to view
Windows 98 team credits. Double-click the clock in the system tray to bring up the Date and Time Properties. Click the Time Zone tab, hold down [Ctrl] and click and hold the mouse button on Cairo, Egypt. With the mouse button still pressed, drag the pointer to Baton Rouge, LA. Release the mouse button but keep [Ctrl] pressed. Click on Baton Rouge, LA again and drag it to Redmond, WA. The credits movie starts to play once you release the mouse button. You can also try doing the same thing in Regional Settings under Control Panel.
to be continued....
WISE WORDS:Constant practice often excels even talent.
Thursday, September 20, 2007
Open the Command Prompt from the Right-Click Menu
Recently i was working on my java project which requires to use command prompt more frequently than ever before. But its really becomes boring to "cd blah\blah.." to get to my working directory every time i wanted to test my program. Its not that i was not aware of the fact that command prompt can be added to right click context menu to any folder while we are in GUI [Graphical User Interface] mode.
As far as i remember, i have had an apps called 'powertoys' from Microsoft. But only God knows where it is hiding in my 250GB harddisk [i am not a very disciplined fellow when comes to organizing things in order when it comes to harddisk or my bedroom.]. Yeah, a little goggling and i can find that stuff again but i rather choose to investigate what actually powertoys does under the hood. Because in computing world nothing is as such as magic. So here is the trick add a extra option for opening cmd prompt to folder right click context menus, also on drives and My Computer.
copy what's in the code area to notepad and save as cmd.reg
CODE:
**********************************************************************************
Windows Registry Editor Version 5.00
[HKEY_CLASSES_ROOT\Drive\shell\cmd]
@="Command Prompt"
[HKEY_CLASSES_ROOT\Drive\shell\cmd\command]
@="cmd.exe /k \"cd %L\""
[HKEY_CLASSES_ROOT\Directory\shell\cmd]
@="Command Prompt"
[HKEY_CLASSES_ROOT\Directory\shell\cmd\command]
@="cmd.exe /k \"cd %L\""
[HKEY_LOCAL_MACHINE\SOFTWARE\Classes\CLSID\
{20D04FE0-3AEA-1069-A2D8-08002B30309D}\shell\cmd]
@="Command Prompt"
[HKEY_LOCAL_MACHINE\SOFTWARE\Classes\CLSID\
{20D04FE0-3AEA-1069-A2D8-08002B30309D}\shell\cmd\command]
@="cmd.exe /k \"cd %L\""
**********************************************************************************
Double click on cmd.reg and merge it into registry. Maybe you need to restart computer to see the effect. I hope, you will also find some usefulness of the newly added option.
***Those who want to do it more easy way rather than editing registry,Download and install a free copy of Microsoft's "Open Command Window Here" PowerToy from http://www.microsoft.com/windowsxp/downloads/powertoys/xppowertoys.mspx
WISE WORDS:Each one sees what he carries in his heart.
Wednesday, September 19, 2007
Internet Explorer Tricks and Tips
-
Making the Internet Explorer & the Explorer Toolbars Fancy
The Internet Explorer toolbar looks pretty simple. Want to make it fancy and kewl? Why not add a background image to it. To do this kewl hack launch the Windows Registry Editor and go to the following key: HKEY_CURRENT_USER\SOFTWARE\Microsoft\ Internet Explorer\Toolbar\.
Now in the right pane create a new String Value and name it BackBitmap and modify it's value to the path of the Bitmap you want to dress it up with by rightclicking on it and choosing Modify. When you reboot the Internet Explorer and the Windows Explorer toolbars will have a new look.
Change Internet Explorer's Caption
Don't like the caption of Internet Explorer caption? Want to change it? Open the registry editor and go to
HKEY_LOCAL_MACHINE\SOFTWARE\Microsoft\Internet Explorer\Main.
In the right pane create a new String Value names Window Title (Note the space between Window and Title). Right click on this newly created String Value and select Modify. Type in the new caption you want to be displayed. Restart for the settings to take place.
Now let's move on to some Outlook Express Tricks.
Colorful Background
Don't like the boring background colors of Outlook Express? To change it launch the Windows Registry Editor and scroll down to the
HKEY_CURRENT_USER\Software\Microsoft\Internet Mail And News key.
On the left pane, click on ColorCycle or select Edit and Modify in the menu. Now change the value to 1. Close and restart. Now, launch Outlook Express and whenever you open up a New Message, hold down ctrl-shift and tap the z key to scroll to change the background color. Repeat the keystroke to cycle through the colors.
Internet Explorer 5 Hidden Features
Microsoft Internet Explorer 5 has several hidden features which can be controlled using the Windows Registry. Open your registry and scroll down to the following key:
HKEY_CURRENT_USER\Software\Policies\Microsoft\Internet Explorer\Restrictions
Create a new DWORD value named x(See complete list of values of x below) and modify it's value to 1 to enable it and to 0 to disable it.
NoBrowserClose : Disable the option of closing Internet Explorer.
NoBrowserContextMenu : Disable right-click context menu.
NoBrowserOptions : Disable the Tools / Internet Options menu.
NoBrowserSaveAs : Disable the ability to Save As.
NoFavorites : Disable the Favorites.
NoFileNew : Disable the File / New command.
NoFileOpen : Disable the File / Open command.
NoFindFiles : Disable the Find Files command.
NoSelectDownloadDir : Disable the option of selecting a download directory.
NoTheaterMode : Disable the Full Screen view option.
Soon i will come up with a new whole range of tricks on iE. Till then enjoy this one.
Tuesday, September 18, 2007
CLSID Folders & Hide Folder
CLSID Folders Explained
Don't you just hate those stubborn stupid icons that refuse to leave the desktop, like the Network Neighborhood icon. I am sure you want to know how you can delete them. You may say, that is really simple, simply right click on the concerned icon and select Delete. Well not exactly, you see when you right click on these special folders( see entire list below)neither the rename nor the delete option does not appear. To delete these folders, there are two methods, the first one is using the System Policy Editor(Poledit in the Windows installation CD)and the second is using the Registry.
Before we go on, you need to understand what CLSID values are. These folders, like the Control Panel, Inbox, The Microsoft Network, Dial Up Networking etc are system folders. Each system folder has a unique CLSID key or the Class ID which is a 16-byte value which identifies an individual object that points to a corresponding key in the registry.
To delete these system Folders from the desktop simply go to the following registry key:
HKEY_LOCAL_MACHINE\Software\Microsoft\Windows\CurrentVersion\
Explorer\Desktop\Namespace{xxxxxxxx-xxxx-xxxx-xxxx-xxxxxxxxxxxx}
To delete an icon simply delete the 16 byte CLSID value within "NameSpace". The following are the CLSID values of the most commonly used icons:
My Briefcase:{85BBD920-42AO-1069-A2E4-08002B30309D}
Desktop: {00021400-0000-0000-C000-0000000000046}
Control Panel:{21EC2020-3AEA-1069-A2DD-08002B30309D}
Dial-Up-Networking:{992CFFA0-F557-101A-88EC-00DD01CCC48}
Fonts: {BD84B380-8CA2-1069-AB1D-08000948534}
Inbox :{00020D76-0000-0000-C000-000000000046}
My Computer :{20D04FE0-3AEA-1069-A2D8-08002B30309D}
Network Neighborhood:{208D2C60-3AEA-1069-A2D7-O8002B30309D}
Printers :{2227A280-3AEA-1069-A2DE-O8002B30309D}
Recycle Bin :{645FF040-5081-101B-9F08-00AA002F954E}
The Microsoft Network:{00028B00-0000-0000-C000-000000000046}
History: {FF393560-C2A7-11CF-BFF4-444553540000}
Winzip :{E0D79300-84BE-11CE-9641-444553540000}
For example, to delete the Recycle Bin, first note down it's CLSID value, which is: 645FF040-5081-101B-9F08-00AA002F954E. Now go to the Namespace key in the registry and delete the corresponding key.
HKEY_LOCAL_MACHINE\SOFTWARE\Microsoft\Windows\CurrentVersion\
explorer\Desktop\NameSpace\{645FF040-5081-101B-9F08-00AA002F954E}
Similarly to delete the History folder, delete the following key:
HKEY_LOCAL_MACHINE\SOFTWARE\Microsoft\Windows\CurrentVersion\
explorer\Desktop\NameSpace\{FBF23B42-E3F0-101B-8488-00AA003E56F8}
Sometimes, you may need to play a trick on your brother or friend, well this one teaches you how to hide all icons from the Desktop. Go to the following registry key:
HKEY_CURRENT_USER\Software\Microsoft\Windows\
CurrentVersion\Policies\Explorer
In the right pane create a new DWORD value by the name: NoDesktop and set its value to: 1. Reboot and you will find no icons on the desktop.
Till now you simply learnt how to delete the special system folders by deleting a registry key, but the hack would have been better if there was a way of adding the DELETE and RENAME option to the right click context menus of these special folders. You can actually change the right click context menu of any system folder and add any of the following options: RENAME, DELETE, CUT, COPY, PASTE and lots more.
This hack too requires you to know the CLSID value of the system folder whose menu you want to customize. In this section, I have taken up Recycle Bin as the folder whose context menu I am going to edit.
Firstly launch the registry editor and open the following registry key:
HKEY_CLASSES_ROOT\CLSID\
{645FF040-5081-101B-9F08-00AA002F954E}\ShellFolder.
In Case you want to edit some other folder like say the FONTS folder, then you will open the following key:
HKEY_CLASSES_ROOT\CLSID\{CLSID VALUE HERE}\ShellFolder.
In the right pane there will be a DWORD value names attributes. Now consider the following options:
- To add the Rename option to the menu, change the value of Attributes to
50 01 00 20
- To add the Delete option to the menu, change the value of Attributes to
60 01 00 20
3. To add both the Rename & Delete options to the menu, change the value of Attributes to 70,01,00,20
4. Add Copy to the menu, change Attributes to 41 01 00 20
5. Add Cut to the menu, change Attributes to 42 01 00 20
6. Add Copy & Cut to the menu, change Attributes to 43 01 00 20
7. Add Paste to the menu, change Attributes to 44 01 00 20
8. Add Copy & Paste to the menu, change Attributes to 45 01 00 20
9. Add Cut & Paste to the menu, change Attributes to 46 01 00 20
10.Add all Cut, Copy & Paste to the menu, change Attributes to 47 01 00 20
We want to add only the Rename option to the right click context menu of the Recycle Bin, so change the value of attributes to: 50 01 00 20. Press F5 to refresh and then after rebooting you will find that when you right click on the Recycle Bin a RENAME option pops up too.
To reset the default Windows options change the value of Attributes back to
40 01 00 20
The Registry File which one can create for the above process would be something like the below:
REGEDIT4
[HKEY_CLASSES_ROOT\CLSID\
{645FF040-5081-101B-9F08-00AA002F954E}\Shell-Folder]
"Attributes"=hex:50,01,00,20
Lets look at another security implication of our this newly gained knowledge. Anywhere in the desktop [or in any place hard disk] right click and go New -> Folder. Now name anything you like to this newly created folder [i won't really bother about that], just add ".{21EC2020-3AEA-1069-A2DD-08002B30309D}" without double quote at the last of the name.
That is if your folder name is chan, rename it with chan.{21EC2020-3AEA-1069-A2DD-08002B30309D} ->press Enter
Now try to open the folder. What happened?????
You seems landed up opening Control panel!!!!!Imagine if you apply this trick to your private folder, your secret contents will be safer than normal.
Now its important to know how to get back the normal folder so that you can access its content for yourself.Follow the below procedure.
[For those people who know a little bit of DOS: Simple rename it back to some other name using "rename" command]
1. open notepad and copy-paste the below content in it
rename chan.{21EC2020-3AEA-1069-A2DD-08002B30309D} chan
2. save the file as "normal.bat" in the same directory where our folder is.
3. Double click on it & your good old folder is back !!!!
NOTE:
*This is the same technique used by many popular softwares to hide folder contents. Now you know that they are not really doing magic but simply renaming your folder under the hood.
**Do not forget the period after the 'n' in chan. Similarly all system folders can be added to the Start Menu.(accept My Briefcase, I think).
***This trick can be applied on files too.WISE WORDS:Education begins with life.
Monday, September 17, 2007
Internet Explorer meets the Group Policy Editor
XP Professional's Group Policy Editor lets you tweak Internet Explorer in countless ways—from changing its logo and background, to changing its title bar text and beyond.
ufffffff!!!!!!! That a quite long tutorial!!! I am tired:-(..so see you guys tomorrow.
Have a nice day. :-)
XP Professional owners have a reason to feel good about spending the extra bucks or so they forked over for their version of the operating system: the Group Policy Editor, available only in Professional, can make all kinds of secret tweaks to Internet Explorer. This tool, primarily used for setting network and multiuser policies and rights, can also be used to customize the way XP and Internet Explorer look and work. It makes it easy to customize many different aspects of Internet Explorer's behavior and appearance from one central place, without having to edit the Registry or delve deep into menus, dialog boxes, and options. You can customize how Internet Explorer looks and works for each individual account on the machine, or just for a single account if there is only one.
That means that you'll be able to create customized versions of IE for a variety of different purposes. For example, you can create customized browsers for your children, or for a business if you run or administer a small business.
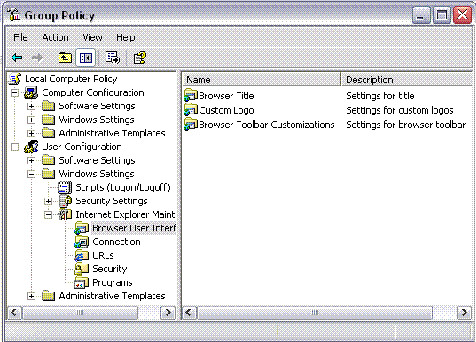
Run the Group Policy Editor by typing gpedit.msc at a command line or the Run box and pressing Enter. When it opens, go to User Configuration\Windows Settings\Internet Explorer Maintenance. There are five categories of Internet Explorer settings you can modify:
-
Browser User Interface
-
Connection
-
URLs
-
Security
-
Programs
To change individual settings, browse to any of the categories, then from the right pane choose the setting you want to configure—for example, to change the browser title. Double-click on the setting, then fill out the dialog box, such as the one shown in below figure, which lets you change Internet Explorer's static and animated logos.

There are quite a few settings you can change with the Group Policy Editor. You can spend your whole day to tinker and play with them. Next, we'll take a look at what the best of each of these categories can do.
1. Browser User Interface:
As the name implies, this section lets you customize Internet Explorer's interface. This section, as a whole, lets you create your own customized version of Internet Explorer. For example, you can create a version of IE specifically for one of your children—take a digital photo of her and use it as the background for the toolbar, crop a headshot photo of your child and use it as the animated custom logo, and change the browser title to put her name on it. There are three types of tweaks you can make in this section:
- Browser Title
-
This option lets you customize Internet Explorer's titlebar text, though only to a limited degree; you can add your name or company's name to a text string of "Microsoft Internet Explorer provided by." For example, you can have the titlebar read "Microsoft Explorer provided by Preston Gralla." When you do this, Outlook Express will have the same title as well. Because you need to have that initial text string, this isn't a great hack unless you're a computer manufacturer and want to brand the browser.
- Custom Logo
-
This setting lets you replace Internet Explorer's static and animated logo with logos of your own. Note that to do this, you'll first have to create the logos yourself. It's easier to use the Group Policy Editor to change your logo than to use the Registry.
- Browser Toolbar Customizations
-
You can use your own bitmap as the background to the Internet Explorer toolbar. Additionally, you can delete the existing toolbar buttons and add buttons of your own. You don't have to worry if the bitmap you want to use is not the same size as the toolbar. XP will accommodate it—for example, by tiling a graphic that is smaller than the toolbar so that it appears multiple times.
2. Connection:
This section lets you customize Internet Explorer's connection settings, which you would otherwise have to go to several places to set.
- Connection Settings
-
This lets you customize your existing Internet connection settings and import them for another use on the PC. It doesn't have any use if you're the only user of the machine; it's intended to help you set up other accounts' connection settings. If you have a network at home, for example, you could copy the settings from one machine to every other machine on the network.
- Automatic Browser Configuration
-
This is purely an administrator's tool. It lets you automatically change browser configurations on users' machines.
- Proxy Settings
-
This lets you tell Internet Explorer to use proxy servers. You can also set up proxy servers from within Internet Explorer. For more details on setting up proxy servers.
- User Agent String
-
This lets you customize the user agent string that is sent to web sites whenever you visit them. The user agent string gives out basic information about your operating system and browser to the web site so that the site can better track usage statistics. Using this setting lets you append a specific text string to your PC's user agent string.
3. URLs:
This section is mainly for administrators, so if you don't need administrative tools you can pretty much forgo it. If you are an administrator, it will let you specify IE settings for multiple machines, such as setting a home page for all, specifying a URL they will go to when Help is chosen, and populating their Favorites with those of your choice. If you run a small business, you can use these settings to build a business-specific browser for all of your employees. For example, set the home page to be your company's home page or populate Favorites with Intranet pages or other pages your employees need to access regularly, such as benefits information.
- Favorites and Links
-
This lets you create a Favorites folder and links, or import them. It's primarily an administrator's tool, since it doesn't add much extra functionality to the normal way that you can manage Favorites.
- Important URLs
-
You can specify the starting page, create your own customized Search bar, and create a Help page that will display when someone clicks on Help -> Online Support. Again, this is primarily an administrator's tool.
4. Security:
Here's where to set Internet Explorer security settings. You can change these settings from directly within Internet Explorer just as easily as changing them here, unless you need to change the settings for several accounts, in which case here's the place to go.
- Security Zones and Content Rating
-
You can customize both security zones and content ratings, which limit sites with objectionable content from being visited. This is primarily an administrator's tool, since these settings can be edited easily from inside Internet Explorer by choosing Tools -> Internet Options -> Security and Tools -> Internet Options -> Content. But it's ideal for parents who have networks at home and want to customize different security settings for their children's computers. You can set a higher level of security for children's computers and a lower level for parents' PCs.
- Authenticode Settings
-
This lets you designate specific credential agencies and software publishers as trustworthy. This is primarily an administrator's tool, since these settings can be edited easily from inside Internet Explorer by choosing Tools -> Internet Options -> Security and Tools -> Internet Options -> Content -> Certificates.
5. Programs:
Once again, this section is mainly for administrators. It lets you change default programs for multiple machines. So, for users who require only a simple email program, you can set the default to be Outlook Express. For other users, you can set it as Outlook or a third-party email program.
- Programs
-
This lets you change the default programs to be used for purposes such as email, HTML editing, and others. This is primarily an administrator's tool, since these settings can be edited easily by choosing Tools -> Internet Options -> Security and Tools -> Internet Options -> Programs
ufffffff!!!!!!! That a quite long tutorial!!! I am tired:-(..so see you guys tomorrow.
Have a nice day. :-)
Sunday, September 16, 2007
Hide Folder Options
This is a cool trick which you can use to keep your private folders secret from the intruding eyes other users. Suppose you a some private documents in a folder and you made it hidden but it doesn't give you assurance that your folders will be hidden from others. If after someone enable "Show hidden files and folders" from Tools->Folder Options..->View tab, he can easily discover your private folder.
But just imagine if he can't even find the "Folder Options.." in Tools in menubar?
Wicked cool.. huh??;-)
Here is the way to do it:
1. Go to start then in run type regedit
2. After opening new window go through following
HKEY_CURRENT_ USER\Software\ Microsoft\ Windows\CurrentVersion\Policies\ Explorer
3. Double click Explorer then there is "NoFolderOptions" [without quotes] option on right panel double click it and set it to 0 [zero in number] in Hexadecimal.
4. Oh, so you can't see "NoFolderOptions" on the right panel? No problem. Right click
Go for this one:
i. run -> gpedit.msc
ii. User Configuration
iii. Administrative template
iv. Windows Component
v. Windows explorer
vi. In right panel, double click on"remove folder option menu item from tools menu"
vii. Select 'disable' -> apply
viii. ok
opps!!! what have you done with your folder options in tools menu??????
Enjoy.
Subscribe to:
Posts (Atom)